
资料下载


通过使用ESP8266 NodeMCU Web服务器来控制的电子元件
刘秀英
分享资料个
描述
在这篇文章中,我们将讨论如何使用我们的手机通过使用 ESP8266 NodeMCU Web 服务器来控制我们的电子元件。我们通过手机浏览器连接到我们的网络服务器并控制我们喜欢的任何组件。在这篇文章中,我们使用 LED 和无源蜂鸣器,但这可以扩展到通过继电器控制高压电器。
链接到我的页面ESP8266 NodeMCU Web Server:控制手机中的组件
请观看以下视频,了解我们将在这篇文章中做什么的演示。
什么是 ESP8266 NodeMCU Web 服务器?
在深入探讨如何通过手机控制组件之前,让我们先讨论一下什么是 Web 服务器。
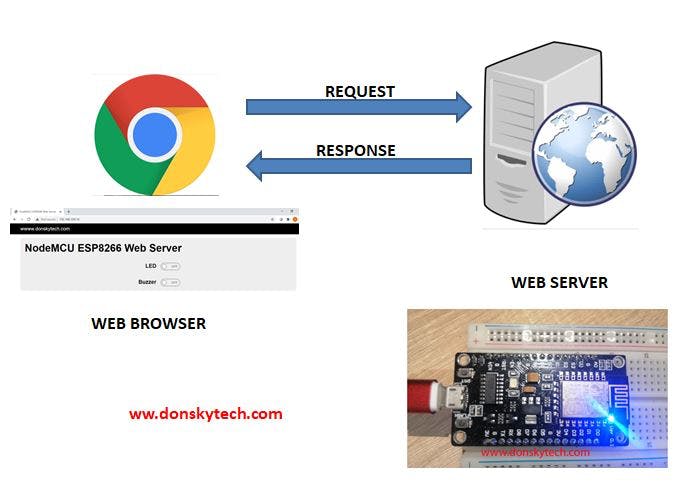
来自维基百科,“网络服务器是服务器软件,或专用于运行该软件的硬件,可以满足万维网上的客户请求。
在我们的案例中,我们使用 NodeMCU ESP8266 的功能充当我们的 Web 服务器并托管我们的网站。我们在浏览器中输入 Web 服务器的地址时发出“请求”,我们收到了 html 标记形式的“响应”。下图是我们的浏览器发送到我们的 Web 服务器的 HTTP GET 请求的示例。
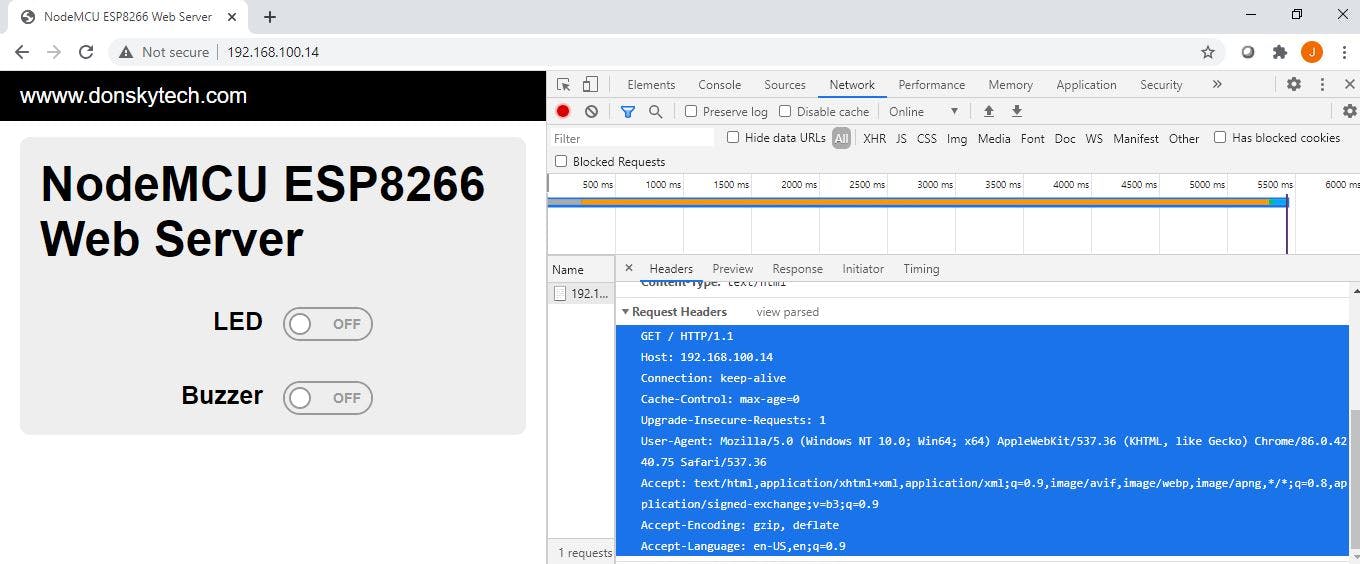
NodeMCU ESP8266 Web 服务器接收到这个请求并回复一个 HTML 响应。它还处理我们组件的接口,因此它检查来自 Web 浏览器的请求并采取相应的行动。
ESP8266 芯片及其最新的 ESP32 芯片都是关于 wifi 和连接性的。这使其非常适合我们的物联网 (IOT) 项目。
接线图
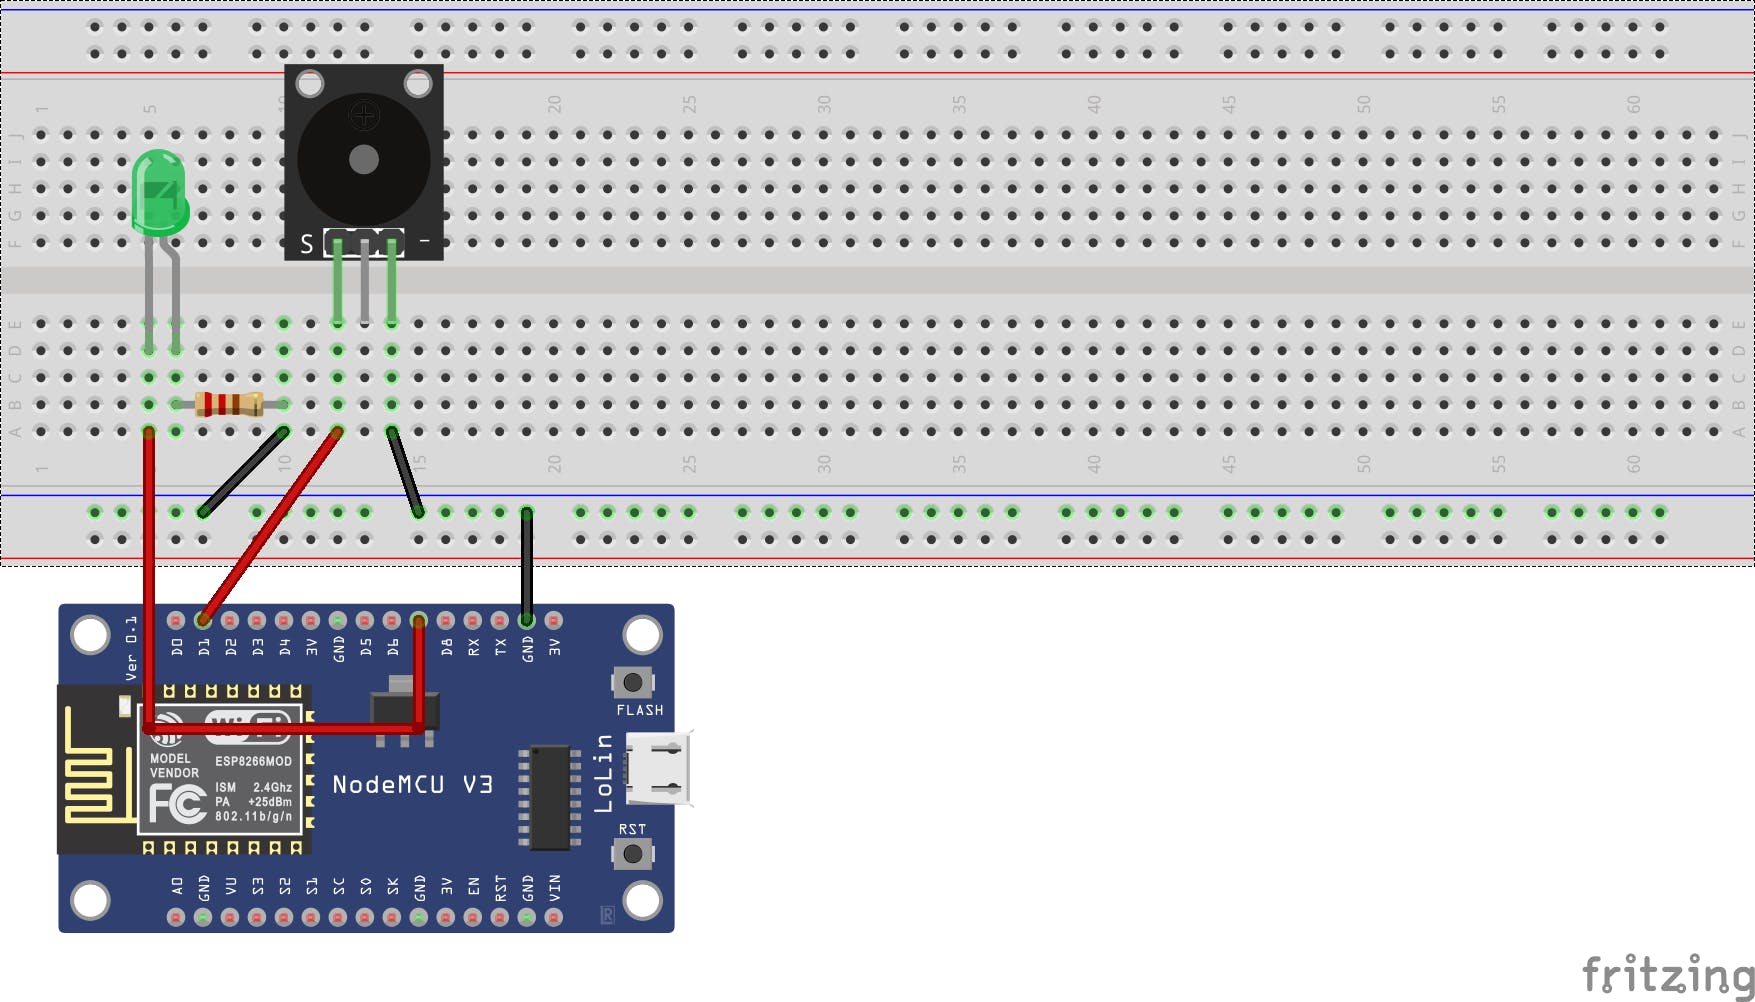
NodeMCU ESP8266 组件 D1 无源蜂鸣器信号引脚 D7 LED 阳极 GND 面包板 GND 导轨
注意:在 LED 上添加一个 220 欧姆的限流电阻,并确保将蜂鸣器和引导至面包板导轨的接地。
代码
该项目的代码在我的github帐户中,如下所示。
#include <ESP8266WiFi.h>
#include <ESP8266WebServer.h>
/********** PLEASE CHANGE THIS *************************/
const char* ssid = "" ;
const char* password = "" ;
ESP8266WebServer server(80);

uint8_t LEDPin = D7;
bool LEDStatus = LOW;

uint8_t buzzerPin = D1;
bool buzzerStatus = LOW;
void setup() {
Serial.begin(115200);
pinMode(LEDPin, OUTPUT);
pinMode(buzzerPin, OUTPUT);

Serial.println("Connecting to ");
Serial.println(ssid);

//connect to your local wi-fi network
WiFi.begin(ssid, password);

//check wi-fi is connected to wi-fi network
while (WiFi.status() != WL_CONNECTED) {
delay(1000);
Serial.print(".");
}
Serial.println("");
Serial.println("WiFi connected..!");
Serial.print("Got IP: ");  Serial.println(WiFi.localIP());

server.on("/", handleRoot);
server.on("/toggleLED", updateLED);
server.on("/toggleBuzzer", updateBuzzerSound);
server.onNotFound(handleNotFound);

server.begin();
Serial.println("HTTP server started");
}
void loop() {
server.handleClient();
}
void handleRoot() {
server.send(200, "text/html", prepareHTML());
}

void updateLED() {
Serial.println("Updating LED Status....");
LEDStatus = !LEDStatus;
digitalWrite(LEDPin, LEDStatus);
server.send(200, "text/html", prepareHTML());
}

void updateBuzzerSound() {
Serial.println("Updating Buzzer Status....");
buzzerStatus = !buzzerStatus;
if (buzzerStatus)
tone(buzzerPin, 1200);
else
noTone(buzzerPin);

server.send(200, "text/html", prepareHTML());
}

void handleNotFound() {
server.send(404, "text/plain", "Not found");
}
String prepareHTML() {
String html = ""
""
""
"UTF-8\">"
"viewport\" content=\"width=device-width, initial-scale=1\">"
"NodeMCU ESP8266 Web Server "
""
""
""
"
""
""
""
"container\">"
"hero\">"
"NodeMCU ESP8266 Web Server
"
"flex-container\">"
" flex-child magenta\">"
"component-label\">LED"
" "
" flex-child green\">"
"grid-child green\">"
"display: inline\">"
"onoffswitch\">";
if (LEDStatus)
html = html + "checkbox\" name=\"onoffswitch\" class=\"onoffswitch-checkbox\" id=\"ledSwitch\" tabindex=\"0\" checked onclick=\"window.location.href='toggleLED'\">";
else
html = html + "checkbox\" name=\"onoffswitch\" class=\"onoffswitch-checkbox\" id=\"ledSwitch\" tabindex=\"0\" onclick=\"window.location.href='toggleLED'\">";
html = html +
"
"onoffswitch-inner\">"
"onoffswitch-switch\">"
""
""
""
""
" "
""
"flex-container\">"
" flex-child magenta\">"
"component-label\">Buzzer"
" "
" flex-child green\">"
"grid-child green\">"
"display: inline\">"
"onoffswitch\">";
if (buzzerStatus)
html = html + "checkbox\" name=\"onoffswitch\" class=\"onoffswitch-checkbox\" id=\"buzzerSwitch\" tabindex=\"0\" checked onclick=\"window.location.href='toggleBuzzer'\">";
else
html = html + "checkbox\" name=\"onoffswitch\" class=\"onoffswitch-checkbox\" id=\"buzzerSwitch\" tabindex=\"0\" onclick=\"window.location.href='toggleBuzzer'\">";
html = html +
"
"onoffswitch-inner\">"
"onoffswitch-switch\">"
""
""
""
""
" "
""
""
""
""
"";
return html;
}
让我们逐行讨论代码。
#include <ESP8266WiFi.h>
#include <ESP8266WebServer.h>
/********** PLEASE CHANGE THIS *************************/
const char* ssid = "" ;
const char* password = "" ;
包括必要的头文件。我们正在使用ESP8266 Core for Arduino对我们的 NodeMCU 进行编程。如果您不知道这是如何完成的,请查看我关于如何安装此插件的步骤的另一篇文章。请更改 ssid 和密码以匹配您的 wifi 设置。
ESP8266WebServer server(80);
uint8_t LEDPin = D7;
bool LEDStatus = LOW;
uint8_t buzzerPin = D1;
bool buzzerStatus = LOW;
我们在这里制作了一个 ESP8266 NodeMCU Web 服务器,因此我们定义了一个可以同时处理一个客户端的服务器。有关更多详细信息,请参阅ESP8266 Arduino Core github 项目上的以下链接。我们定义了 LED 引脚和蜂鸣器引脚,并将两个组件的初始状态设置为低电平。
void setup() {
Serial.begin(115200);
pinMode(LEDPin, OUTPUT);
pinMode(buzzerPin, OUTPUT);
Serial.println("Connecting to ");
Serial.println(ssid);
//connect to your local wi-fi network
WiFi.begin(ssid, password);
//check wi-fi is connected to wi-fi network
while (WiFi.status() != WL_CONNECTED) {
delay(1000);
Serial.print(".");
}
Serial.println("");
Serial.println("WiFi connected..!");
Serial.print("Got IP: "); Serial.println(WiFi.localIP());
server.on("/", handleRoot);
server.on("/toggleLED", updateLED);
server.on("/toggleBuzzer", updateBuzzerSound);
server.onNotFound(handleNotFound);
server.begin();
Serial.println("HTTP server started");
}
我们首先将引脚设置为输出,然后连接到我们的 Wifi。之后,我们为我们的 Web 服务器设置 url 目标。我们定义了三个 url 链接,我们将使用它们来访问我们的 web 服务器。对于每个链接,我们设置了一个函数,一旦请求该 url,就会调用该函数。
-
http://
/ -> 显示我们的根页面 -
http://
/toggleLED -> 切换我们的 LED 值 -
http://
/toggleBuzzer -> 打开和关闭蜂鸣器。
void loop() {
server.handleClient();
}
服务器等待来自我们手机的任何 GET 请求。它只接受一个同时的客户。稍后我们将创建一篇文章,使其更具动态性并处理更多请求。
void handleRoot() {
server.send(200, "text/html", prepareHTML());
}
void updateLED() {
Serial.println("Updating LED Status....");
LEDStatus = !LEDStatus;
digitalWrite(LEDPin, LEDStatus);
server.send(200, "text/html", prepareHTML());
}
void updateBuzzerSound() {
Serial.println("Updating Buzzer Status....");
buzzerStatus = !buzzerStatus;
if (buzzerStatus)
tone(buzzerPin, 1200);
else
noTone(buzzerPin);
server.send(200, "text/html", prepareHTML());
}
void handleNotFound() {
server.send(404, "text/plain", "Not found");
}
当调用我们 Web 服务器中的特定 url 时调用的函数。每个函数都会调用prepareHTML()方法,该方法会返回一个 HTML 标记。
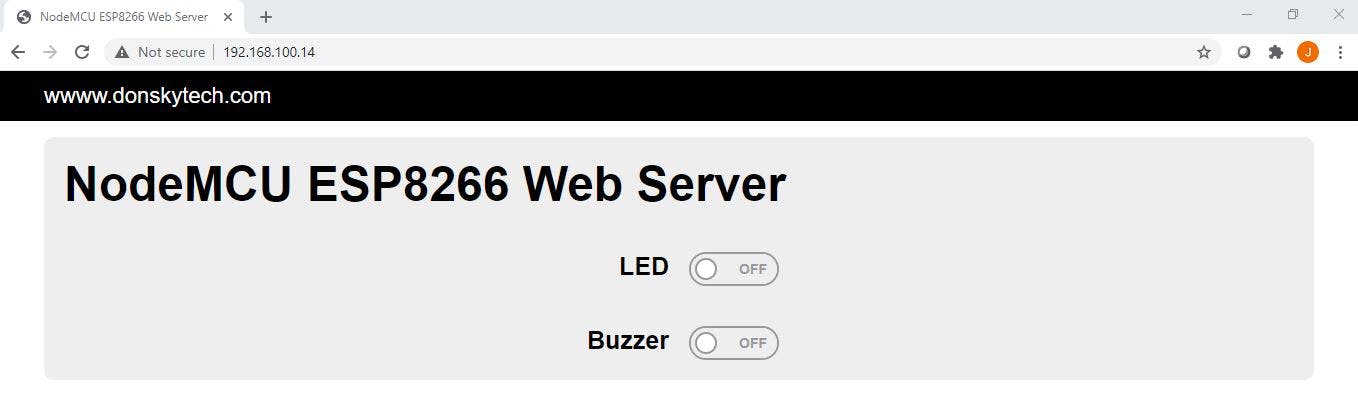
handleRoot函数创建初始 html,并在客户端调用我们的默认 Web 服务器 IP 地址和端口时显示。
当我们滑动LED 切换按钮时会调用updateLED 。它将 LED 的输出设置为 HIGH 或 LOW
updateBuzzerSound在我们滑动Buzzer 切换按钮时被调用。它调用tone和noTone函数来控制无源蜂鸣器。
当访问的 url 不等于我们的根页面、toggleLED 或 toggleBuzzer 时会调用 handleNotFound,并且只会在我们的浏览器中返回一条文本消息。
String prepareHTML() {
String html  = "html>"
"<html>"
"<head>"
"<meta charset=\"UTF-8\">"
"<meta name=\"viewport\" content=\"width=device-width, initial-scale=1\">"
"<title>NodeMCU ESP8266 Web Servertitle>"
.
.
.
函数prepareHTML()是有趣的部分,因为这是我们创建 html 页面并使用级联样式表 (css) 和 Javascript 来创建用户界面的地方。如果您想查看原始代码,请单击此链接。我使用mincss框架为我们的页面设置样式,以便它在我们的手机中看起来不错。为了创建滑动切换按钮,我使用了https://proto.io/freebies/onoff/ ,这是一种使用纯 CSS 的 html 用户界面。所有权利都属于他们,因为他们想出了这么好的工具和 html UI。没有侵犯版权,因为我在谷歌上搜索过!
这个函数中有趣的部分就在这行中。
if (LEDStatus)
html = html + "\"checkbox\" name=\"onoffswitch\" class=\"onoffswitch-checkbox\" id=\"ledSwitch\" tabindex=\"0\" checked onclick=\"window.location.href='toggleLED'\">";
else
html = html + "\"checkbox\" name=\"onoffswitch\" class=\"onoffswitch-checkbox\" id=\"ledSwitch\" tabindex=\"0\" onclick=\"window.location.href='toggleLED'\">";
if (buzzerStatus)
html = html + "\"checkbox\" name=\"onoffswitch\" class=\"onoffswitch-checkbox\" id=\"buzzerSwitch\" tabindex=\"0\" checked onclick=\"window.location.href='toggleBuzzer'\">";
else
html = html +     "\"checkbox\" name=\"onoffswitch\" class=\"onoffswitch-checkbox\" id=\"buzzerSwitch\" tabindex=\"0\" onclick=\"window.location.href='toggleBuzzer'\">";
注意“ checked ”属性。如果存在此属性,则表示切换滑块按钮为ON ,否则为OFF 。
我们添加了一个“onclick ”属性并使用 javascript 向我们预定义的toggleLED和toggleBuzzer url 端点发出 GET 请求。
而已!
快乐探索!
如果你喜欢我的帖子,那么请考虑分享这个。谢谢!
声明:本文内容及配图由入驻作者撰写或者入驻合作网站授权转载。文章观点仅代表作者本人,不代表电子发烧友网立场。文章及其配图仅供工程师学习之用,如有内容侵权或者其他违规问题,请联系本站处理。 举报投诉
- 相关下载
- 相关文章


