资料下载

使用Swift语言在LCD上显示温度
描述
在上一个任务中,您了解了 LCD。现在您将了解更多信息,LCD 将用于显示您房间的温度。
第 1 步:您需要什么

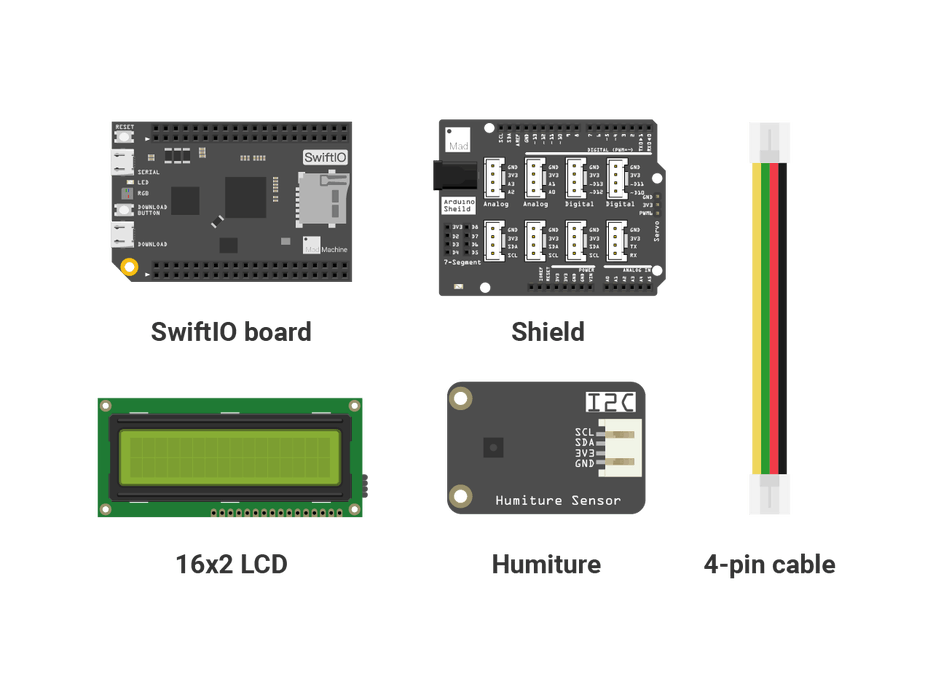
您将使用的零件都包含在此Maker 套件中。
- SwiftIO 板
- 盾
- 温湿度传感器
- 16x2 液晶
- 4 针电缆
第 2 步:温湿度传感器
温湿度传感器可以同时感应温度和湿度。
它使用 I2C 协议与 SwiftIO 板进行通信。您可以SHT3x.swift在此任务中找到可用于读取值的文件。
第 3 步:电路

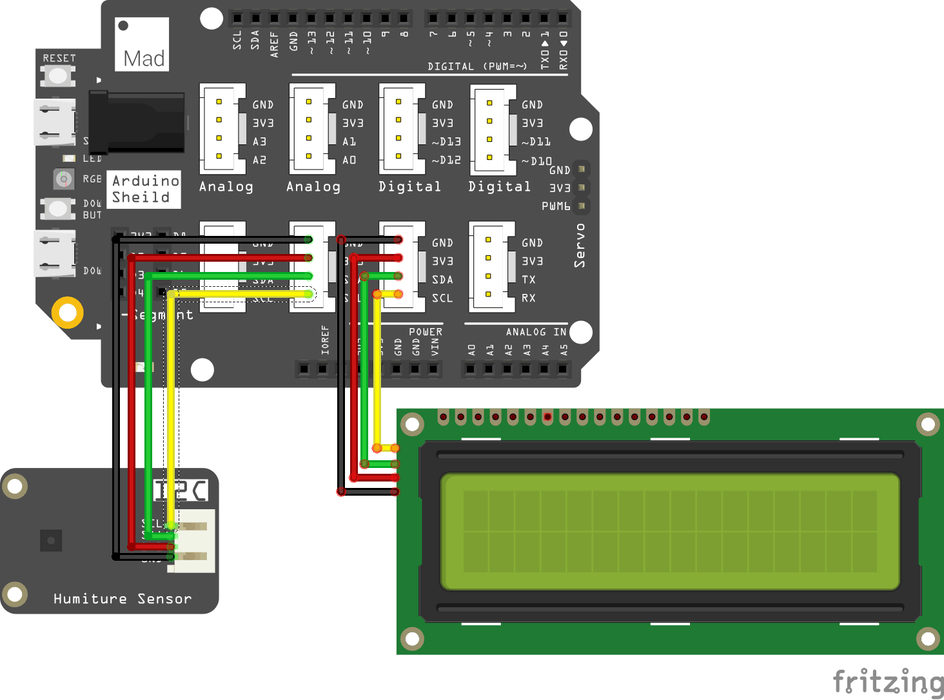
将屏蔽罩放在 SwiftIO 板的顶部。
将温湿度传感器和 LCD 连接到 I2C0。共有三个可用引脚,您可以选择任意两个。
第 4 步:代码
/* Import the SwiftIO library to use everything in it. */
import SwiftIO

/* Import the board library to use the Id of the specific board. */
import SwiftIOBoard


/* Initialize the LCD and sensor to use the I2C communication. */
let i2c = I2C(Id.I2C0)
let lcd = LCD1602(i2c)
let sht = SHT3x(i2c)

while true{
    /* Read and display the temperature on the LCD and update the value every 1s. */
    let temp = sht.readCelsius()

    lcd.write(x:0, y:0, "Temperature:")
    lcd.write(x: 0, y: 1, temp)
    lcd.write(x:4, y:1, " ")
    lcd.write(x:5, y:1, "C")

    sleep(ms: 1000)
}
第 5 步:代码分析
在这个项目中,您可以找到LCD1602.swiftLCD 文件和SHT3x.swift传感器文件。您可以直接使用它们来简化您的代码,而无需根据它们的数据表进行配置。
那么让我们来看看文件main.swift。
import SwiftIO
import SwiftIOBoard
导入必要的库:SwiftIO和SwiftIOFeather。SwiftIO用于控制SwiftIO板的输入输出。SwiftIOBoard定义板的引脚名称。
let i2c = I2C(Id.I2C0)
let lcd = LCD1602(i2c)
let sht = SHT3x(i2c)
初始化 I2C 接口 I2C0。然后初始化 LCD 和传感器。它们都需要 I2C 接口作为参数。
let temp = sht.readCelsius()
要获取温度,您需要readCelsius()文件中的方法SHT3x.swift。它会将温度计算为摄氏度。
lcd.write(x:0, y:0, "Temperature:")
lcd.write(x: 0, y: 1, temp)
lcd.write(x:4, y:1, " ")
lcd.write(x:5, y:1, "C")
当您获得该值时,您可以将其显示在 LCD 上。这四个语句都是关于要显示的内容:
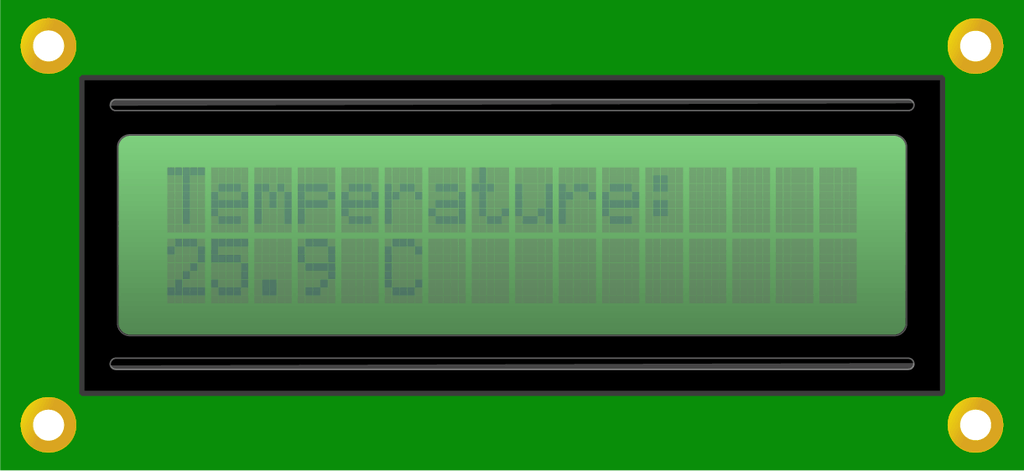
- LCD 的第一行将显示文本“温度:”。它从原点开始。
- 温度将显示在第一列的第二行。它们将占用四个字符。
- 第五个是空白,用于将值与单位分开。
- 第六是单位。
sleep(ms: 1000)
传感器每 1s 读取一次值,因此 LCD 上的值将每秒刷新一次。
第 6 步:运行项目

下载代码后,液晶显示屏开始显示温度。该值会略有变化。
第 7 步:使用库
上面的代码包括配置 LCD 和温湿度传感器的两个文件。但是,还有一种更方便的方法——使用库,您无需在项目中添加硬件驱动程序。
简而言之,库包含用于特定功能的代码块。然后你可以在你的任何项目中使用它来实现这些功能。
让我们看一下代码:
/* Import the SwiftIO library to use everything in it. */
import SwiftIO

/* Import the board library to use the Id of the specific board. */
import SwiftIOBoard

/* Import LCD1602 and SHT3x driver from MadDrivers which is an online git repo. */
import LCD1602
import SHT3x

/* Initialize the LCD and sensor to use the I2C communication. */
let i2c = I2C(Id.I2C0)
let lcd = LCD1602(i2c)
let sht = SHT3x(i2c)

while true{
    /* Read and display the temperature on the LCD and update the value every 1s. */
    let temp = sht.readCelsius()

    lcd.write(x:0, y:0, "Temperature:")
    lcd.write(x: 0, y: 1, temp)
    lcd.write(x:4, y:1, " ")
    lcd.write(x:5, y:1, "C")

    sleep(ms: 1000)
}
在前面的代码中,包含了这两个文件,因此您可以直接使用它们。
现在,您将在代码中使用在线库 - LCD1602 和 SHT3x。它们位于包含所有相关硬件库的 MadDriver 中,并且其位置已在项目中指示。因此,您无需将这些文件添加到您的项目中,只需将它们导入您的代码即可。IDE 将在构建项目时自动下载它们。
然后剩下的代码和上一个一样。
声明:本文内容及配图由入驻作者撰写或者入驻合作网站授权转载。文章观点仅代表作者本人,不代表电子发烧友网立场。文章及其配图仅供工程师学习之用,如有内容侵权或者其他违规问题,请联系本站处理。 举报投诉
- 相关下载
- 相关文章


