资料下载

多彩世界地图上的物联网圣诞老人追踪器
描述
呼呼呼……圣诞老人来了!
每年平安夜圣诞老人都会踏上环游世界的旅程,为全世界的孩子们送出礼物。但是知道那天圣诞老人在哪里会很酷吗?
MKR1000 圣诞老人追踪器来救援!
您可能已经知道我们可以从两个地方获取圣诞老人的位置信息,一个来自NORAD ,一个来自Google 。虽然 NORAD 是发起圣诞老人追踪传统的原始组织,但谷歌为圣诞老人追踪提供了一个开发人员友好的(未记录的)API 。使用此 API,您将能够跟踪实时圣诞老人信息,包括位置、到达和离开时间、在该位置发送的礼物,与在 Google 的圣诞老人跟踪网站上相同。所以在这个项目中我选择使用谷歌圣诞老人数据来实现我的圣诞老人追踪器。
这个项目的想法很简单:使用 LED 显示圣诞老人去过的地方以及圣诞老人在世界地图上的当前位置。这是我在项目结束时得到的:
系统架构
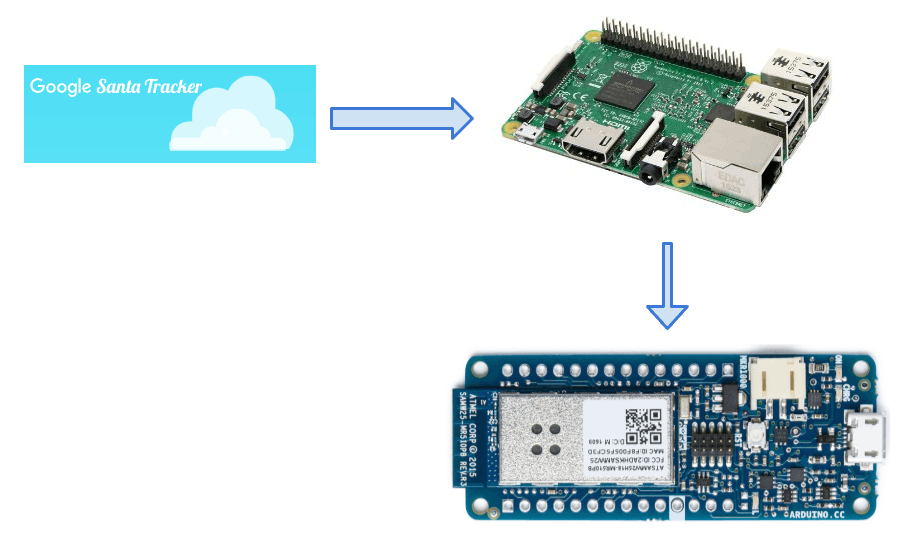
总体而言,该设计使用一个树莓派和一个 MKR1000 来处理和可视化从 Google Santa Tracker API 获取的圣诞老人数据。

如您所见,从 Google Santa Tracker API 获取的数据首先通过 Raspberry PI 放置。原因是 API 响应 JSON 大约为 20M,这太大而无法放入 MKR1000 的内存(我的草图加载后有 18M 可用)进行处理。所以我使用 Raspberry Pi 3 首先使用数据,并生成一个更小的数据格式,这是为我的应用程序量身定做的。之后的数据通过托管在 Raspberry Pi 上的 REST API 服务器公开。MKR1000 开发板将每 10 秒调用一次 REST API 以获取当前圣诞老人的位置。
电路设计
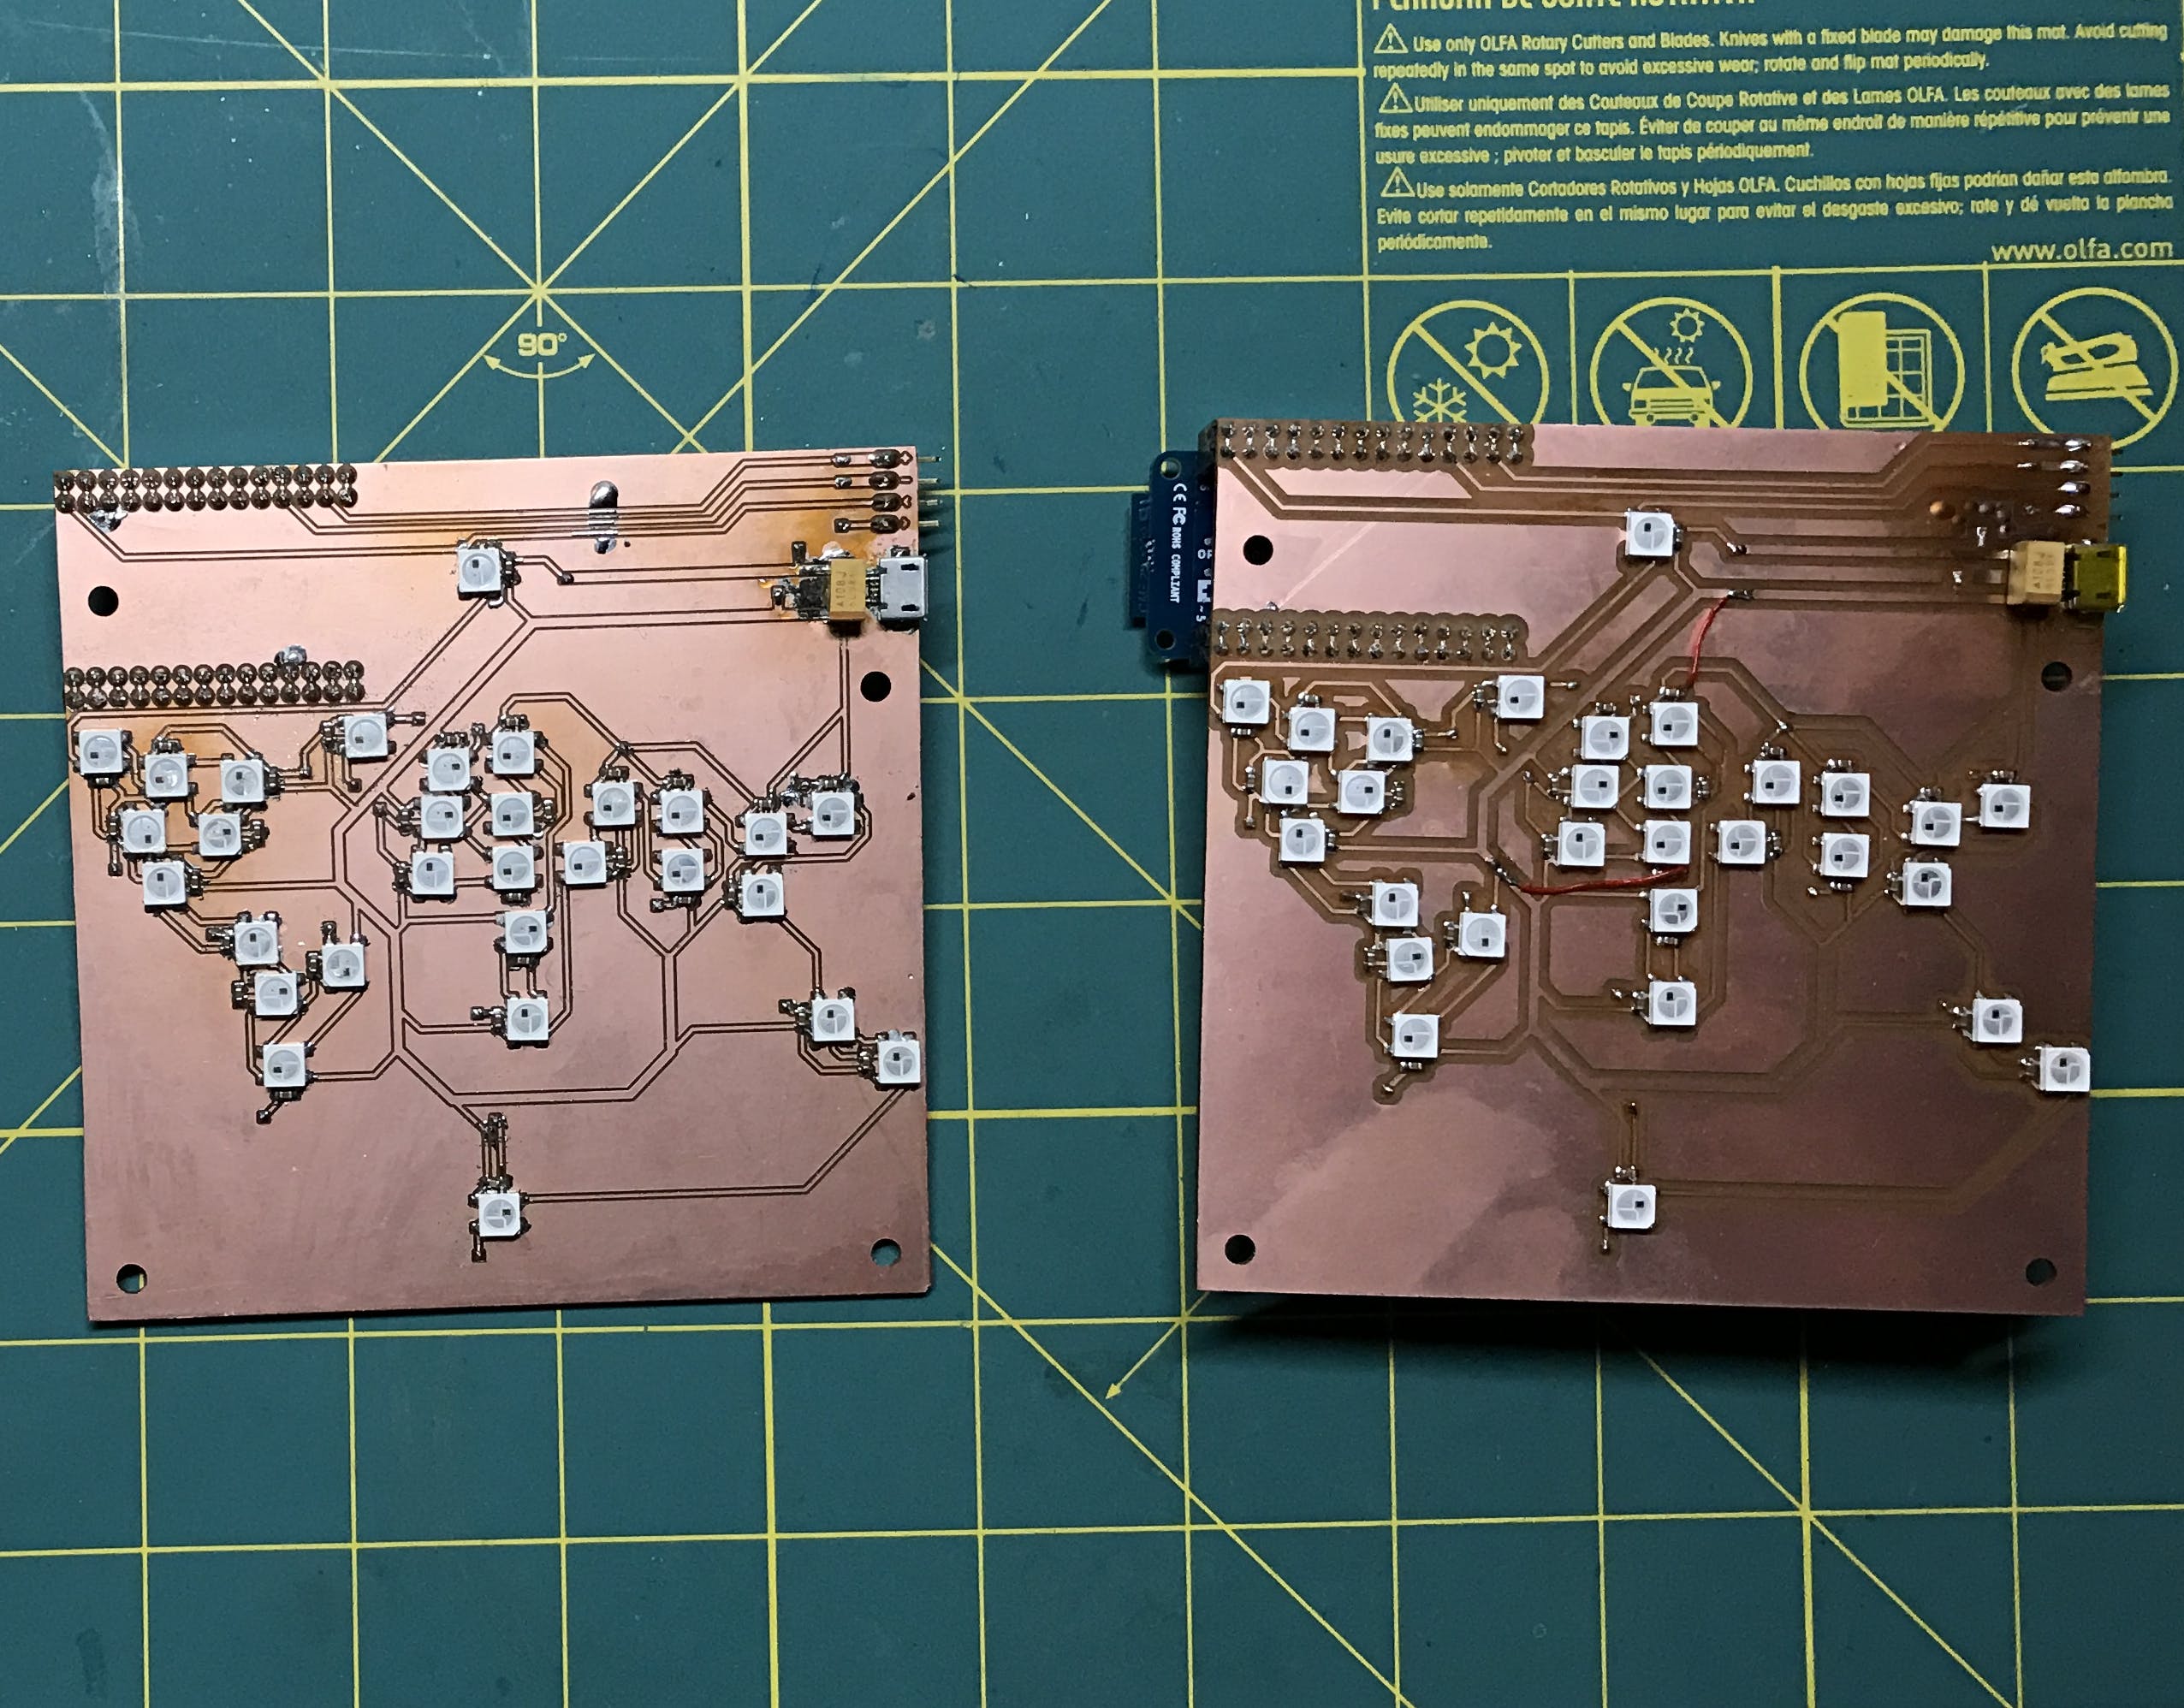
MKR1000 连接到具有 30 个 WS2812B RGB NeoPixel LED 的定制 PCB。每个 LED 代表一个地理位置。这个想法是让离圣诞老人当前位置最近的 LED 灯闪烁,然后打开圣诞老人过去所在位置的所有 LED 灯。
PCB 针对由 Othermill 生产的双面 PCB 进行了优化,但也应该可以通过 OSH Park 等在线 PCB 服务轻松生产。
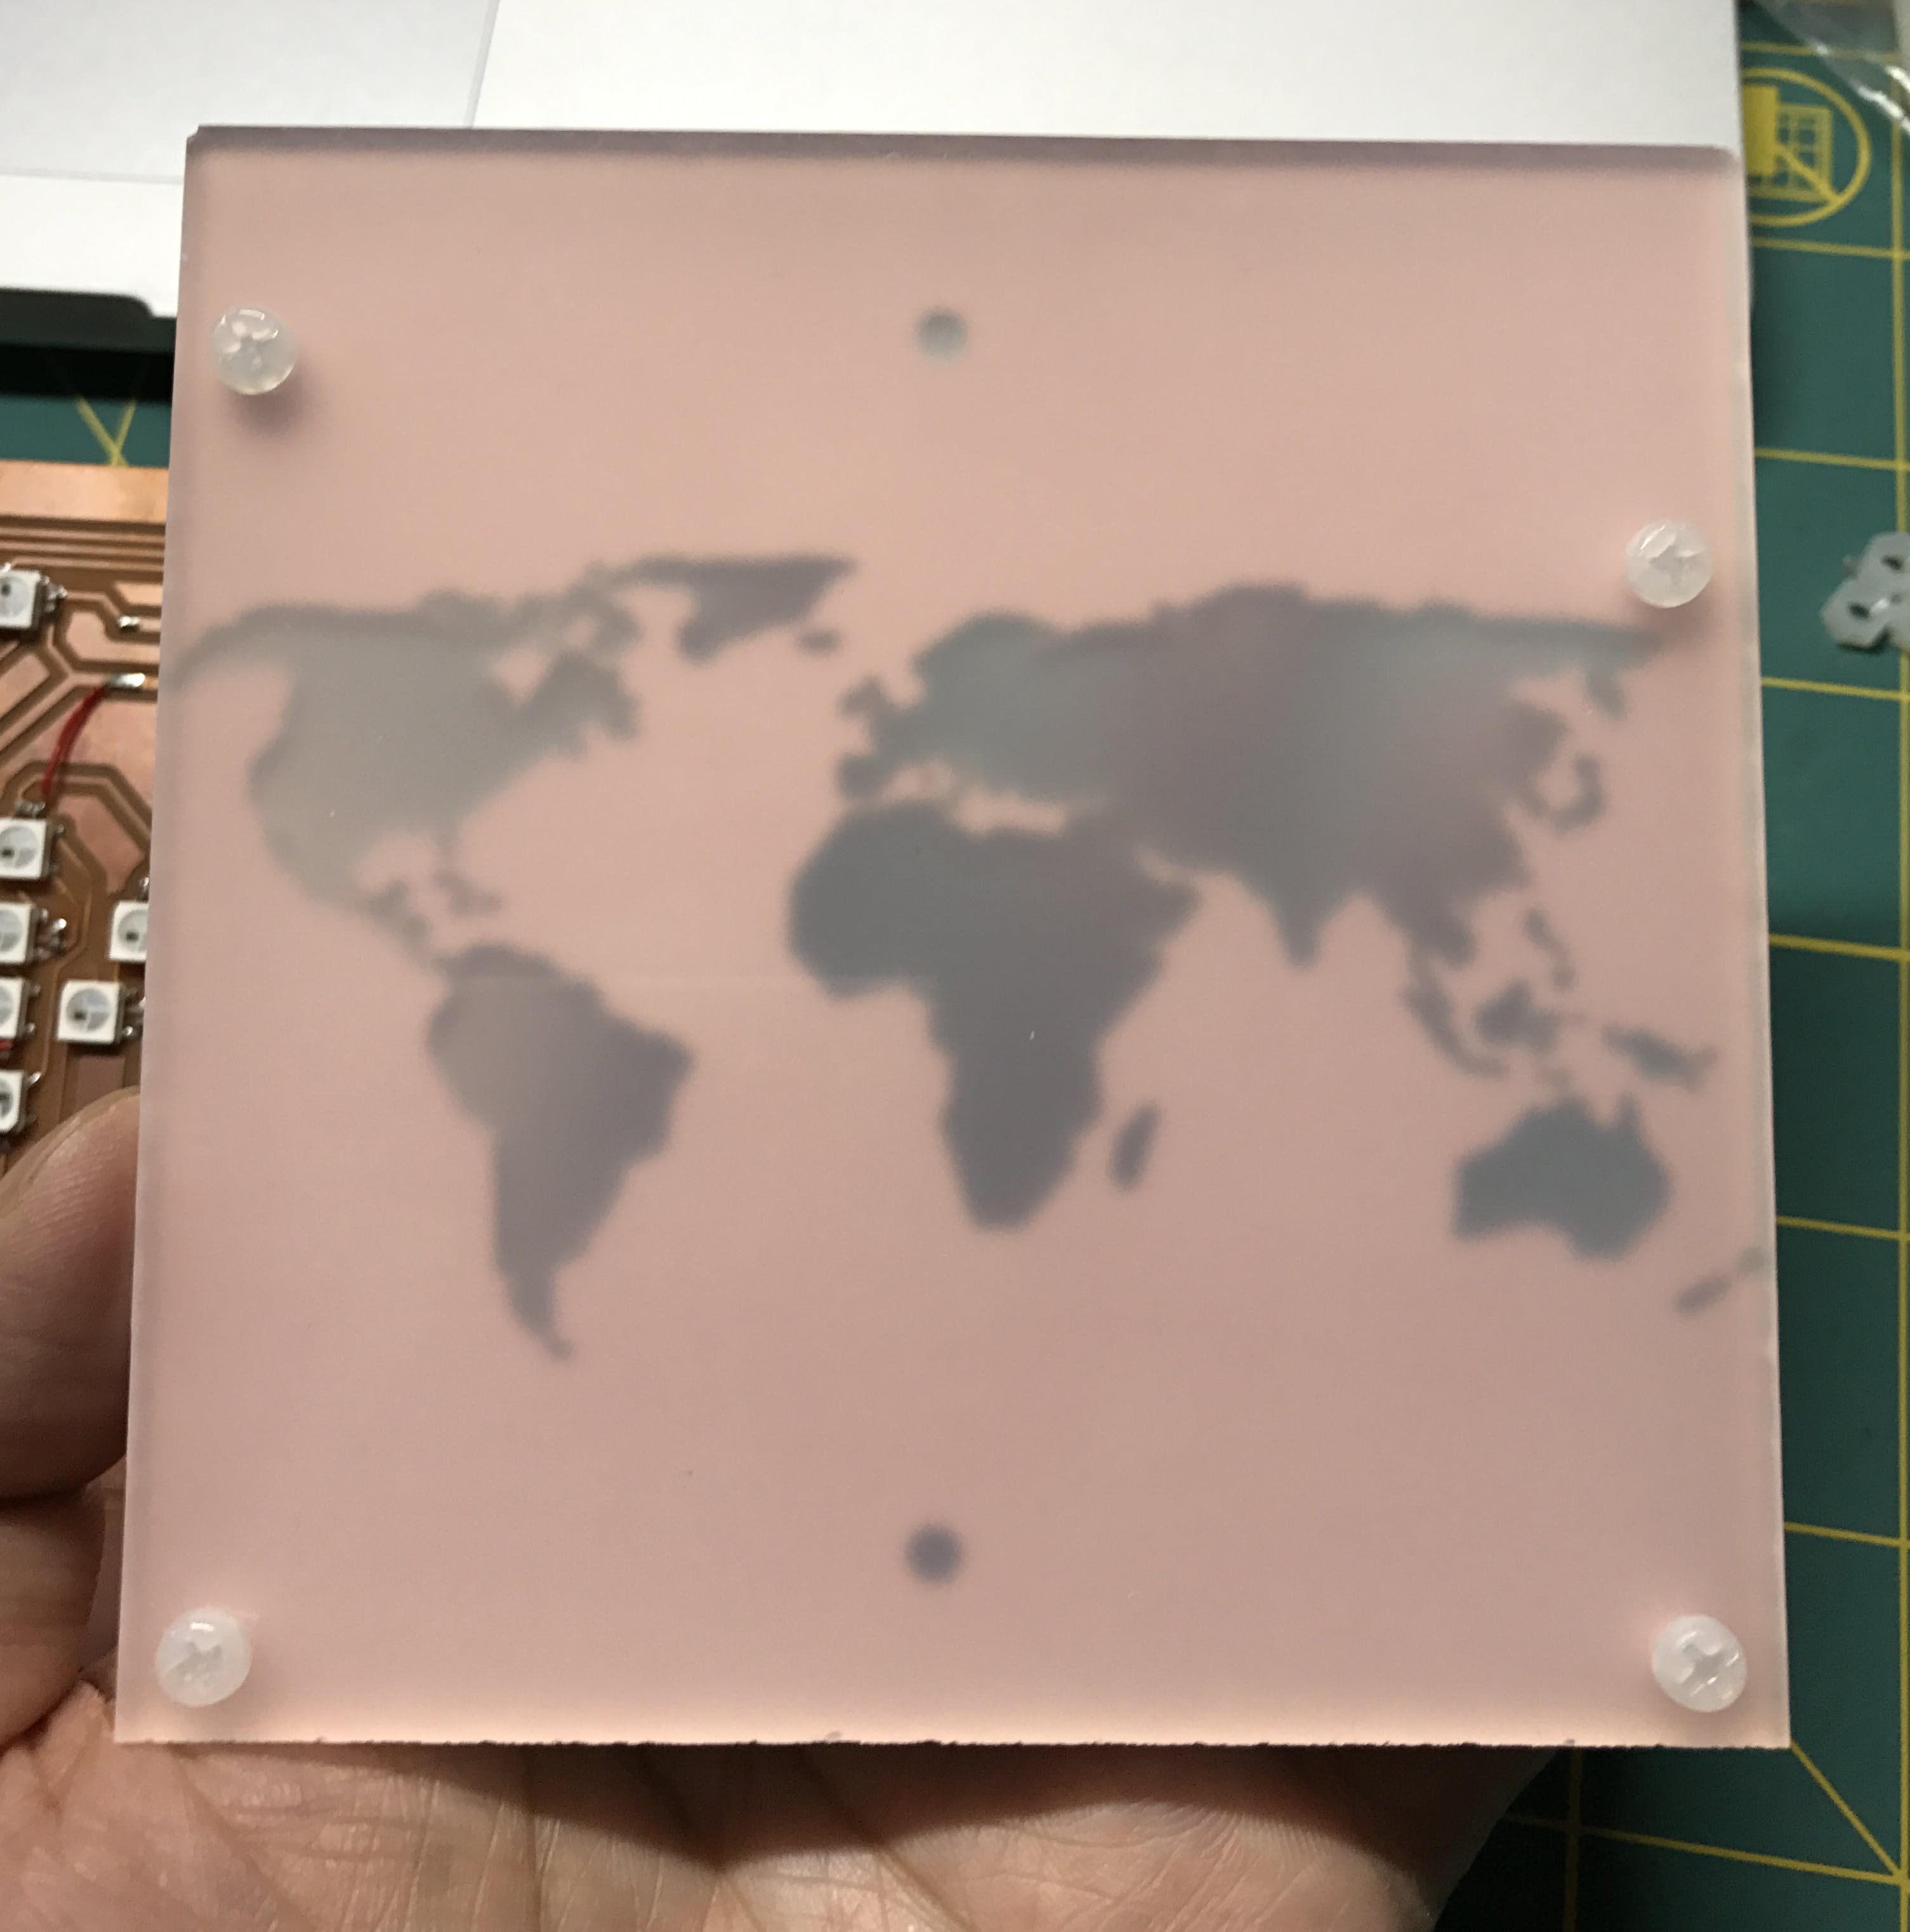
我在PCB上铺了30个NeoPixels,形成了一张世界地图。您可能现在看不到它,但是在涂上负片掩模和扩散器后,它会更容易识别。

使这种家庭铣削友好的主要考虑因素是通孔的位置。由于过孔是在 PCB 板上钻的,因此两侧未连接。因此,您需要通过电线将它们的两侧焊接在一起。正因为如此,通孔不能像在商业 PCB 中通常那样放置在 SMT 组件下方。
PCB 文件背后有一些设计注意事项:
- 电源通过粗干线传输并下沉到另一根粗地线中。这是因为 30 个 NeoPixel 会消耗相当多的电流。
- NeoPixels 尽可能靠近主干电源线连接。这是为了减少多个 NeoPixel 之间的压降。不同的电压会导致亮度和颜色略有不同。
- 靠近电源连接一个 1000 uF 电容器。这是使用 NeoPixels的推荐最佳实践。
- 过孔放置在其他 SMT 组件之外,因为它们将通过手动焊接两侧连接,焊点不会适合另一个 SMT 组件。这在商业服务生产的 PCB 上不是问题,但在家庭制作 PCM 时应考虑在内。
- 确保在电线之间留出足够的空间。 焊接后很容易短路,因为自制的PCB没有绝缘层。这可以在 Otherplan 应用程序中通过将迹线间隙设置为比默认值 0.006 英寸更大的值(例如 0.06 英寸应该足够好)来完成。我发现我的第一块完全焊接的电路板因为短路而无法正常工作,而且修复起来比制作另一块电路板更难。
- 如果您要处理大量 SMT 组件,热风返修站将为您节省大量焊接时间。虽然这是可行的,但真的不值得一个一个地手工焊接组件。热风也会使组件自动对齐到准确的位置。

世界地图面具和扩散器
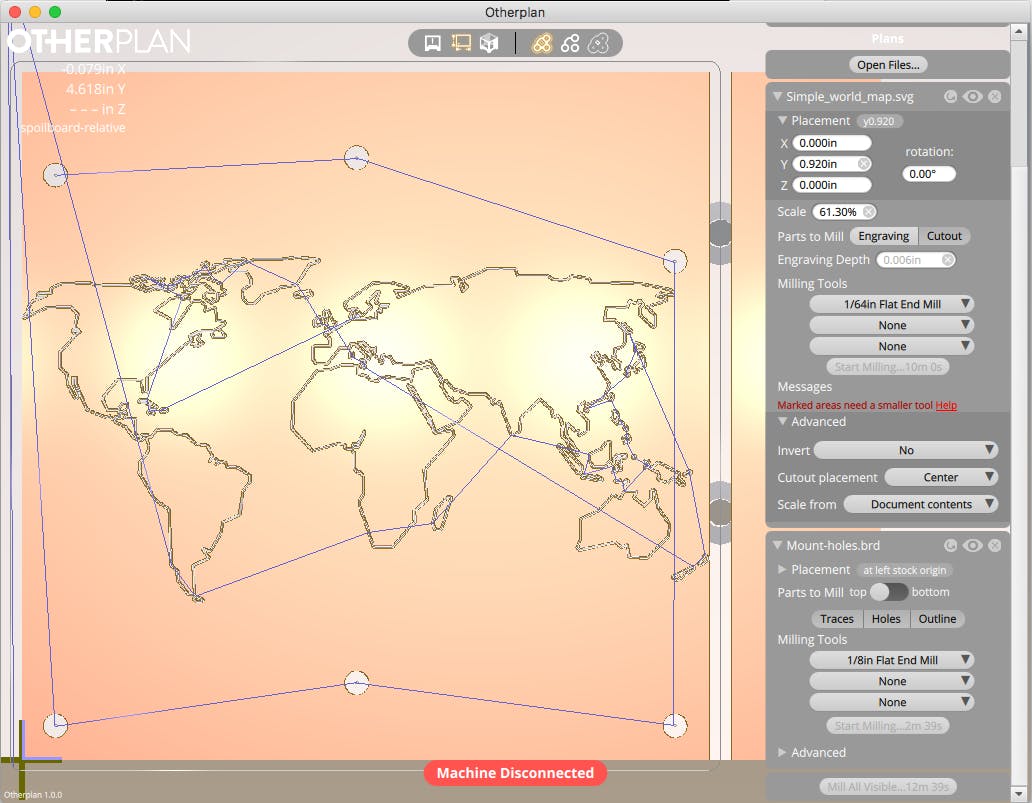
因为 Othermill 可以直接从 SVG 进行铣削,所以我只使用从 wikimedia.org 找到的世界地图。
我还创建了另一个包含钻孔的鹰文件。这些孔用于将掩模安装到电路板上。
因为我想获得尽可能高的铣削精度,所以最好的方法是使用对齐支架。但是轮廓肯定会和括号重叠。我找到的解决方案是首先只切割地图而不切割轮廓。然后在不告诉软件的情况下取下支架。然后开始铣削以钻孔并切割轮廓。该软件将使用相同的刀具路径在您想要的精确位置切割轮廓。

组装非常简单。我使用了 4 个 M3 尼龙长螺钉、4 个支架和 4 个螺母。

树莓派预处理服务器
Google Santa Tracker API 的响应是一个巨大的 JSON 文件。这对 MKR1000 来说可能是个问题,但对 Raspberry Pi 3 来说根本不是问题。所以我设置了一个 HTTP 服务器来预处理 JSON 文件并为 MKR1000 生成较小的数据。
Raspberry Pi 服务器还将位置直接映射到相应 LED 的索引,以进一步减少 MKR1000 上的计算。为此,我首先手动为每个 LED 分配一个坐标,然后计算圣诞老人路径中的每个位置与 LED 坐标之间的距离,找到最近的 LED 来表示该位置。
服务器是用 Python 编写的,并使用 Flask 网络框架将 REST 端点公开给 MKR1000。
from flask import Flask
import requests
import json
import math
import sys
app = Flask(__name__)
# Google's Santa API. Only updates on Dec 24.
# santa_api_url = 'https://santa-api.appspot.com/info?client=web&language=en&fingerprint=&routeOffset=0&streamOffset=0'
# My Fake Santa API.
santa_api_url = 'http://localhost:1224/info'
# LEDs metadata.
leds = [
   {'name': 'North Pole', 'location': {'lat': 90.0, 'lng': 30.0}},
   {'name': 'Alaska (US)', 'location': {'lat': 64.536117, 'lng': -151.258768}},
   {'name': 'Alberta (Canada)', 'location': {'lat': 48.9202307, 'lng': -93.69738}},
   {'name': 'Ontario (Canada)', 'location': {'lat': 50.956252, 'lng': -87.369255}},
   {'name': 'Utah (US)', 'location': {'lat': 40.7765868, 'lng': -111.9905244}},
   {'name': 'Tennessee (US)', 'location': {'lat': 36.1865589, 'lng': -86.9253274}},
   {'name': 'Mexico City (Mexico)', 'location': {'lat': 19.39068, 'lng': -99.2836957}},
   {'name': 'Bogota (Columbia)', 'location': {'lat': 4.6482837, 'lng': -74.2478905}},
   {'name': 'Brasilia (Brazil)', 'location': {'lat': -15.721751, 'lng': -48.0082759}},
   {'name': 'Santiago (Chile)', 'location': {'lat': -33.4727092, 'lng': -70.7699135}},
   {'name': 'Greenland', 'location': {'lat': 70.8836652, 'lng': -59.6665893}},
   {'name': 'UK', 'location': {'lat': 64.6748061, 'lng': -7.9869018}},
   {'name': 'Spain', 'location': {'lat': 40.4379332, 'lng': -3.749576}},
   {'name': 'Mali', 'location': {'lat': 17.5237416, 'lng': -8.4791157}},
   {'name': 'Finland', 'location': {'lat': 64.6479136, 'lng': 17.1440256}},
   {'name': 'Greece', 'location': {'lat': 38.2540419, 'lng': 21.56707}},
   {'name': 'Libya', 'location': {'lat': 21.520733, 'lng': 23.237173}},
   {'name': 'Central African Republic', 'location': {'lat': 6.2540984, 'lng': -0.2809593}},
   {'name': 'Botswana', 'location': {'lat': -22.327399, 'lng': 22.4437318}},
   {'name': 'Saudi Arabia', 'location': {'lat': 24.0593214, 'lng': 40.6158589}},
   {'name': 'Turkmenistan', 'location': {'lat': 38.9423384, 'lng': 57.3349508}},
   {'name': 'Xinjiang (China)', 'location': {'lat': 42.0304225, 'lng': 77.3185349}},
   {'name': 'India', 'location': {'lat': 20.8925986, 'lng': 73.7613366}},
   {'name': 'Henan (China)', 'location': {'lat': 33.8541479, 'lng': 111.2634555}},
   {'name': 'Cambodia', 'location': {'lat': 12.2978202, 'lng': 103.8594626}},
   {'name': 'Japan', 'location': {'lat': 34.452585, 'lng': 125.382845}},
   {'name': 'Australia', 'location': {'lat': -25.0340388, 'lng': 115.2378468}},
   {'name': 'New Zealand', 'location': {'lat': -43.0225411, 'lng': 163.4767905}},
   {'name': 'South Pole', 'location': {'lat': -90.0, 'lng': 30.0}},
]
@app.route('/santa')
def santa():
   santa_info = requests.get(santa_api_url).json()
   santa_time = santa_info['now']
   response = []
   for dest_json in santa_info['destinations']:
       if santa_time < dest_json['arrival']:
           break
       dist, led, led_index = closest_led(dest_json['location'])
       response.append({
           'i': led_index,
           'd': int(dist),
           'n': dest_json['city'],
           'p': dest_json['presentsDelivered']
       })
   return app.response_class(json.dumps(response).replace(' ',''), content_type='application/json')
def distance(loc1, loc2, unit='M'):
   lat1 = loc1['lat']
   lng1 = loc1['lng']
   lat2 = loc2['lat']
   lng2 = loc2['lng']
   radlat1 = math.pi * lat1 / 180
   radlat2 = math.pi * lat2 / 180
   theta = lng1-lng2
   radtheta = math.pi * theta / 180
   dist = (math.sin(radlat1) * math.sin(radlat2) +
       math.cos(radlat1) * math.cos(radlat2) * math.cos(radtheta));
   dist = math.acos(dist)
   dist = dist * 180 / math.pi
   dist = dist * 60 * 1.1515
   if unit == 'K':
       return dist * 1.609344
   if unit == 'N':
       return dist * 0.8684
   return dist
def closest_led(loc):
   min_dist = sys.float_info.max
   min_led = None
   min_index = 0
   for index, led in enumerate(leds):
       led_loc = led['location']
       dist = distance(loc, led_loc)
       if dist < min_dist:
           min_dist = dist
           min_led = led
           min_index = index
   return min_dist, min_led, min_index
if __name__ == '__main__':
   app.run(host='0.0.0.0', port=2412)
由于 Google Santa Tracker API 一年中只有一天(12 月 24 日)更新,为了测试整个系统,我还编写了一个模拟真实圣诞老人追踪器 API 服务器的假圣诞老人追踪器 API 服务器。有了这个假的 API 服务器,我还可以控制行进速度并根据需要重置。该服务器也是一个 Flask Python 服务器,在 Raspberry Pi 3 的不同端口上运行。
from flask import Flask, request
import json
import time
app = Flask(__name__)
fake_start_time = 0  # initialized to first arrival time from json
real_start_time = 0  # set to start time
speed_factor = 100  # fake clock speed
all_destinations = None
current_info = {
   'status': 'OK',
   'language': 'en',
   'now': None,            # Will be set to fake time
   'timeOffset': 120000,
   'fingerprint': '3b8835bc354c6d5018344b289b833402f7079844',
   'refresh': 51449,
   'switchOff': False,
   'clientSpecific': {
       'DisableEarth': False,
       'DisableTracker': False,
       'DisableWikipedia': False,
       'DisablePhotos': False,
       'HighResolutionPhotos': False,
       'EarthAltitudeMultiplier': 1
   },
   'routeOffset': 0,
   'destinations': None    # Will only have destinations up to two towns ahead
}
@app.route('/info')
def info():
   if real_start_time != 0:
       advance_fake_time()
   return app.response_class(json.dumps(current_info), content_type='application/json')
@app.route('/start')
def start():
   global real_start_time, speed_factor
   real_start_time = real_now()
   speed_factor = int(request.args.get('speed', '100'))
   print(u'fake clock stated at speed {0}'.format(speed_factor))
   return 'ok'
@app.route('/reset')
def reset():
   global real_start_time
   real_start_time = 0
   current_info['destinations'] = all_destinations[:3]
   return 'ok'
def index_of_current_destination(ts):
   for i, dest in enumerate(all_destinations):
       if dest['departure'] > ts:
           return i
   return 0
def current_destinations():
   index = index_of_current_destination(fake_now()) + 3
   return all_destinations[:index]
def advance_fake_time():
   current_info['now'] = fake_now()
   current_info['destinations'] = current_destinations()
def real_now():
   return int(time.time() * 100)
def fake_now():
   return (real_now() - real_start_time) * speed_factor + fake_start_time
def arrival(d):
   return d['arrival']
def load_json():
   with open('santa2016.json') as data_file:
       data = json.load(data_file)
   global all_destinations, fake_start_time
   all_destinations = sorted(data['destinations'], key=arrival)
   fake_start_time = all_destinations[1]['arrival']
   reset()
   print(u'{0} destinations loaded, fake_start_time={1}'.format(len(all_destinations), fake_start_time))
if __name__ == '__main__':
   load_json()
   app.run(host='0.0.0.0', port=1224)
MKR1000 固件
现在 MKR1000 已准备好从 Raspberry Pi 服务器获取数据,并打开和关闭 LED。
#include
#include
#include
#include "JsonStreamingParser.h"
#include "JsonListener.h"
#define LED_PIN 6
#define LED_NUM 30
#define BRIGHTNESS 50
Adafruit_NeoPixel strip = Adafruit_NeoPixel(LED_NUM, LED_PIN, NEO_GRB + NEO_KHZ800);
char ssid[] = "YOUR_SSID";     //  your network SSID (name)
char pass[] = "YOUR_PWRD";  // your network password
int keyIndex = 0;            // your network key Index number (needed only for WEP)
int status = WL_IDLE_STATUS;
IPAddress server(192, 168, 1, 120);  // numeric IP for RPI server
//char server[] = "rpi3.local";    // name address for RPI server
char endpoint[] = "/santa";
int port = 2412;
// Initialize the Ethernet client library
// with the IP address and port of the server
// that you want to connect to (port 80 is default for HTTP):
WiFiClient client;
class Led {
 public:
   String name;
   int distance;
   int presents;
   boolean on;
};
Led leds[30];
class LedSwitcher: public JsonListener {
 public:
   void whitespace(char c) {}
   void startDocument() {}
   void key(String key) {
     Serial.println(key);
     currentKey = key;
   }
   void value(String value) {
     Serial.println(value);
     if (currentKey == "i") {
       ledIndex = value.toInt();
     } else if (currentKey == "p") {
       presents = value.toInt();
     } else if (currentKey == "d") {
       distance = value.toInt();
     } else {
       name = value;
     }
   }
   void endArray() {}
   void endObject() {
     Serial.println("End of Object");
     Serial.print(ledIndex);
     Serial.print(":");
     Serial.print(name.c_str());
     Serial.print(",");
     Serial.print(presents);
     Serial.print(",");
     Serial.print(distance);
     leds[ledIndex].on = true;
     leds[ledIndex].name = name;
     leds[ledIndex].presents = presents;
     leds[ledIndex].distance = distance;
   }
   void endDocument() {}
   void startArray() {}
   void startObject() {}
   int lastLed() {
     return ledIndex;
   }
 private:
   String currentKey;
   int ledIndex;
   int presents;
   int distance;
   String name;
};
LedSwitcher ledSwitcher;
void connectToWifi() {
 // check for the presence of the shield:
 if (WiFi.status() == WL_NO_SHIELD) {
   Serial.println("WiFi shield not present");
   // don't continue:
   while (true);
 }
 // attempt to connect to Wifi network:
 while (status != WL_CONNECTED) {
   Serial.print("Attempting to connect to SSID: ");
   Serial.println(ssid);
   // Connect to WPA/WPA2 network. Change this line if using open or WEP network:
   status = WiFi.begin(ssid, pass);
   // wait 10 seconds for connection:
   delay(10000);
 }
 Serial.println("Connected to wifi");
 printWifiStatus();
}
boolean connectToSantaServer() {
 Serial.println("Starting connection to server...");
 return client.connect(server, port);
}
void ensureConnected() {
 if (!client.connected()) {
   while (!connectToSantaServer()) {
     Serial.println("Failed to connect to server. Retry in 5 seconds");
     delay(5000);
   }
   Serial.println("connected to server");
 }
}
void fetchSantaInfo() {
 ensureConnected();
 // Make a HTTP request:
 client.print("GET ");
 client.print(endpoint);
 client.println(" HTTP/1.1");
 client.print("Host: ");
 client.println(server);
 client.println("Connection: close");
 client.println();
 int bytes = 0;
 boolean isBody = false;
 JsonStreamingParser parser;
 parser.setListener(&ledSwitcher);
 Serial.println();
 Serial.println("Received response:");
 Serial.println();
 while (client.connected()) {
   while (client.available()) {
     char c = client.read();
     ++bytes;
     //Serial.write(c);
     if (isBody || c == '[') {
       isBody = true;
       parser.parse(c);
     }
   }
 }
 Serial.println();
 Serial.println();
 Serial.println("Disconnecting from server.");
 client.stop();
 Serial.print("Received: ");
 Serial.print(bytes);
 Serial.println(" Bytes.");
}
void flashLastLed() {
 strip.setPixelColor(ledSwitcher.lastLed(), strip.Color(0, 0, 0));
 strip.show();
 delay(500);
 strip.setPixelColor(ledSwitcher.lastLed(), strip.Color(255, 0, 0));
 strip.show();
 delay(500);
}
void setup() {
 //Initialize serial and wait for port to open:
 Serial.begin(9600);
 strip.setBrightness(BRIGHTNESS);
 strip.begin();
 strip.show(); // Initialize all pixels to 'off'.
 connectToWifi();
 fetchSantaInfo();
 for (int i = 0; i < 30; ++i) {
   if (leds[i].on) {
     strip.setPixelColor(i, strip.Color(255, 0, 0));
   } else {
     strip.setPixelColor(i, strip.Color(0, 0, 0));
   }
 }
 strip.show();
}
void loop() {
 fetchSantaInfo();
 delay(1000);
 for (int i = 0; i < 10; ++i) {
   flashLastLed();
 }
}
void printWifiStatus() {
 // print the SSID of the network you're attached to:
 Serial.print("SSID: ");
 Serial.println(WiFi.SSID());
 // print your WiFi shield's IP address:
 IPAddress ip = WiFi.localIP();
 Serial.print("IP Address: ");
 Serial.println(ip);
 // print the received signal strength:
 long rssi = WiFi.RSSI();
 Serial.print("signal strength (RSSI):");
 Serial.print(rssi);
 Serial.println(" dBm");
}
由于大部分工作都是在 Raspberry Pi 上完成的,所以这里的代码很简单。它连接到 WiFi,每 10 秒从 Raspberry Pi 获取圣诞老人数据,并相应地更新 NeoPixels。
现在让我们启动它:
结论
MKR1000 是一款非常强大的物联网应用板,但它也有其自身的局限性。借助更强大的 SBC(单板计算机),如 Raspberry Pi 3,我们将能够与具有更复杂 API 的任何服务进行交互。
希望你喜欢这个项目作为一个小小的节日惊喜。
声明:本文内容及配图由入驻作者撰写或者入驻合作网站授权转载。文章观点仅代表作者本人,不代表电子发烧友网立场。文章及其配图仅供工程师学习之用,如有内容侵权或者其他违规问题,请联系本站处理。 举报投诉
- 相关下载
- 相关文章


