资料下载

×
如何将DS18B20数字温度传感器与Arduino结合使用
消耗积分:2 |
格式:zip |
大小:0.02 MB |
2023-02-07
描述
大家好!今天我将向您展示如何将 DS18B20数字温度传感器与 Arduino 结合使用,这样您就可以测量空气、水等液体和地面的温度。
第 1 步:有关传感器的信息

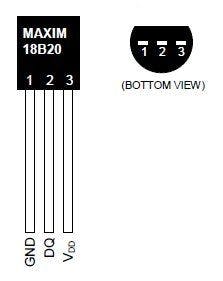
DS18B20是 Maxim IC 的 1-Wire 数字温度传感器。以 9 到 12 位精度报告摄氏度,从 -55 到 125 (+/-0.5)。每个传感器都刻有一个独特的 64 位序列号 - 允许在一条数据总线上使用大量传感器。
特征:
- 独特的 1-Wire® 接口只需要一个端口引脚进行通信
- 每个设备都有一个唯一的 64 位串行代码,存储在板载 ROM 中
- 多点功能简化了分布式温度传感应用
- 无需外部元件
- 可以通过数据线供电。
- 电源范围为 3.0V 至 5.5V
- 测量温度范围为 –55°C 至 +125°C(–67°F 至 +257°F)±0.5°C 精度为 –10°C 至 +85°C
- 温度计分辨率可由用户选择,范围为 9 至 12 位
- 在 750 毫秒(最大)内将温度转换为 12 位数字字
- 用户可定义的非易失性 (NV) 警报设置
- 报警搜索命令识别并寻址温度超出编程限制(温度报警条件)的设备
- 应用包括恒温控制、工业系统、消费品、温度计或任何热敏系统
第 2 步:您需要什么:

1 / 3
要制作温度计,您需要以下物品:
- 面包板
- 将所有东西连接在一起的跳线。
*一些商店出售带有 4.7k 电阻的传感器。
第 3 步:库
在开始之前,请在 /Progam Files(x86)/Arduino/Libraries(默认)下载并解压缩以下库,以便将传感器与 Arduino 板一起使用。
第 4 步:构建简单电路

1 / 2
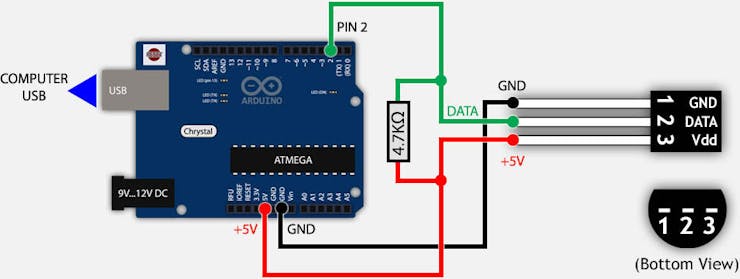
要在 IDE 的串行监视器上打印来自 DS18B20 的数据,您必须按照原理图构建电路。
首先将传感器插入面包板上,然后按以下顺序使用跳线将其引脚连接到 Arduino:引脚 1 到 GND;pin 2 到任何数字 pin(在我们的例子中是 pin 2);pin 3接+5V或+3.3V,最后接上拉电阻。
第 5 步:代码
/********************************************************************/
// First we include the libraries
#include <OneWire.h>
#include <DallasTemperature.h>
/********************************************************************/
// Data wire is plugged into pin 2 on the Arduino
#define ONE_WIRE_BUS 2
/********************************************************************/
// Setup a oneWire instance to communicate with any OneWire devices
// (not just Maxim/Dallas temperature ICs)
OneWire oneWire(ONE_WIRE_BUS);
/********************************************************************/
// Pass our oneWire reference to Dallas Temperature.
DallasTemperature sensors(&oneWire);
/********************************************************************/
void setup(void)
{
 // start serial port
 Serial.begin(9600);
 Serial.println("Dallas Temperature IC Control Library Demo");
 // Start up the library
 sensors.begin();
}
void loop(void)
{
 // call sensors.requestTemperatures() to issue a global temperature
 // request to all devices on the bus
/********************************************************************/
 Serial.print(" Requesting temperatures...");
 sensors.requestTemperatures(); // Send the command to get temperature readings
 Serial.println("DONE");
/********************************************************************/
 Serial.print("Temperature is: ");
 Serial.print(sensors.getTempCByIndex(0)); // Why "byIndex"?
   // You can have more than one DS18B20 on the same bus.
   // 0 refers to the first IC on the wire
   delay(1000);
}
下载、打开并上传.ino文件。
如果一切正常,您应该会看到温度被测量并显示在IDE 的串行监视器中,如上面的屏幕截图所示。
声明:本文内容及配图由入驻作者撰写或者入驻合作网站授权转载。文章观点仅代表作者本人,不代表电子发烧友网立场。文章及其配图仅供工程师学习之用,如有内容侵权或者其他违规问题,请联系本站处理。 举报投诉
评论(0)
发评论
- 相关下载
- 相关文章


