
资料下载

带有RT-Thread的Arduino应用程序
描述
介绍
本文中的“app”是指预编译的二进制文件,无需使用 Arduino IDE,即可直接在 Arduino 板卡上运行。
并且因为它是一个文件,“应用程序”可以通过 SD 卡、以太网、WiFi 或任何合适的方法分发。
标题图显示了执行 Arduino 应用程序RTT-QRCode的 MKR ZERO 板。
你有兴趣吗?
(本文基于Arduino RT-Thread库v0.6.0。)
动态模块
在 RT-Thread 架构中,“app”被称为动态模块,构建为动态共享库,扩展名为“ .mo”或“ .so”。(什么是 RT-Thread?=> Arduino 上的多任务处理)
RT-Thread 提供 API 来访问动态模块。更有趣的是,MSH(一个微型外壳)能够.mo直接执行“”文件(详细信息在以下部分中)。
RT-Thread 的原始动态链接器似乎不适用于 ARM Cortex-M。所以我修改了 Arduino RT-Thread 库的代码。
多发性硬化症
Module SHell (MSH) 是默认启用的一项新功能(从 v0.5.1 开始),它构建在 FinSH 之上。(什么是 FinSH?=> Arduino 上的多任务处理)
由于 Arduino 应用程序是由 MSH 执行的,让我们简单介绍一下。
相比 FinSH,MSH 更符合 Unix shell 的使用习惯:
- 在 FinSH 中发出命令
led(0, 1)
copy("datalog.txt", "copy.txt")
- 在 MSH 中发出命令
led 0 1
cp datalog.txt copy.txt
但是,MSH 不支持像 FinSH 提供的那样的 shell 变量。
另一个限制是用户定义的 MSH 命令的原型是固定的:
int my_msh_cmd(int argc, char **argv)
MSH 执行用户命令时,参数argc为参数个数加一,参数列表argv为参数列表(firstentryiscommandname)。您可能已经猜到了,所有参数只能是char数组类型。
以下是 MSH 命令格式的“led”示例。
int led(int argc, char **argv) {
  // argc - the number of arguments
  // argv[0] - command name, e.g. "led"
  // argv[n] - nth argument in the type of char array

  rt_uint32_t id;
  rt_uint32_t state;

  if (argc != 3) {
    rt_kprintf("Usage: led \n");
    return 1;
  }
  rt_kprintf("led%s=%s\n", argv[1], argv[2]);

  // convert arguments to their specific types
  sscanf(argv[1], "%u", &id);
  sscanf(argv[2], "%u", &state);
  if (id != 0) {
    rt_kprintf("Error: Invalid led ID\n");
    return 1;
  }

  if (state) {
    digitalWrite(LED_BUILTIN, HIGH);
  } else {
    digitalWrite(LED_BUILTIN, LOW);
  }

  return 0;
}
制作 Arduino 应用程序
首先,CONFIG_USING_MODULE在“rtconfig.h”中启用,因为默认情况下它是禁用的。
构建可执行文件
让我们在 Arduino IDE 中打开“HelloMo”示例,然后按“验证”。(该示例也可以在下面的“代码”部分中找到。)代码现在被构建到一个包含草图和库的单个可执行文件中。我们可以使用 GCC 工具readelf(Arduino IDE 提供)来验证。
{path_to_gcc_tools}\arm-none-eabi-readelf -h {path_to_output}\HelloMo.ino.elf
ELF Header:
 Magic:   7f 45 4c 46 01 01 01 00 00 00 00 00 00 00 00 00
 Class:                             ELF32
 Data:                              2's complement, little endian
 Version:                           1 (current)
 OS/ABI:                            UNIX - System V
 ABI Version:                       0
 Type:                              EXEC (Executable file)
 Machine:                           ARM
 Version:                           0x1
 Entry point address:               0xf7fd
 Start of program headers:          52 (bytes into file)
 Start of section headers:          798052 (bytes into file)
 Flags:                             0x5000002, has entry point, Version5 EABI
 Size of this header:               52 (bytes)
 Size of program headers:           32 (bytes)
 Number of program headers:         2
 Size of section headers:           40 (bytes)
 Number of section headers:         18
 Section header string table index: 15
如果您不确定 GCC 工具和编译输出的位置,请在 File-> Preferences 中启用以下选项。
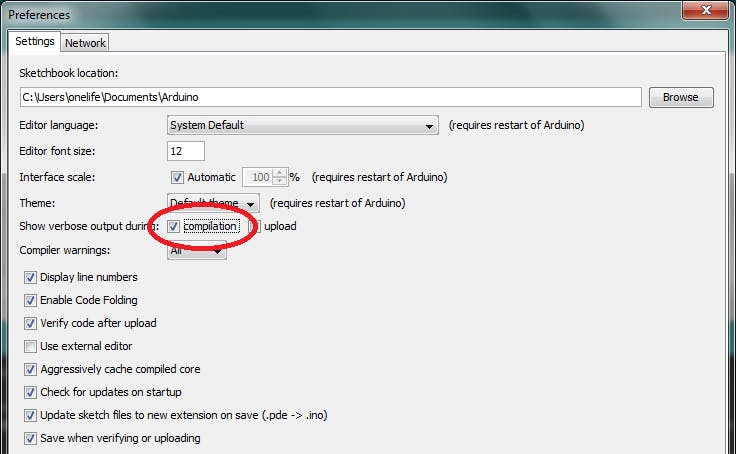
再次单击“验证”,您将在输出窗口中观察到信息:
...
Compiling sketch...
"C:\\Users\\onelife\\AppData\\Local\\Arduino15\\packages\\arduino\\tools\\arm-none-eabi-gcc\\4.8.3-2014q1/bin/arm-none-eabi-gcc" -mcpu=cortex-m0plus -mthumb -c -g -Os -Wall -Wextra -std=gnu11 -ffunction-sections -fdata-sections -nostdlib --param max-inline-insns-single=500 -MMD -DF_CPU=48000000L -DARDUINO=10809 -DARDUINO_SAMD_MKRZERO -DARDUINO_ARCH_SAMD -DUSE_ARDUINO_MKR_PIN_LAYOUT -D__SAMD21G18A__ -DUSB_VID=0x2341 -DUSB_PID=0x804f -DUSBCON "-DUSB_MANUFACTURER=\"Arduino LLC\"" "-DUSB_PRODUCT=\"Arduino MKRZero\"" "-IC:\\Users\\onelife\\AppData\\Local\\Arduino15\\packages\\arduino\\tools\\CMSIS\\4.5.0/CMSIS/Include/" "-IC:\\Users\\onelife\\AppData\\Local\\Arduino15\\packages\\arduino\\tools\\CMSIS-Atmel\\1.1.0/CMSIS/Device/ATMEL/" "-IC:\\Users\\onelife\\AppData\\Local\\Arduino15\\packages\\arduino\\hardware\\samd\\1.6.21\\cores\\arduino" "-IC:\\Users\\onelife\\AppData\\Local\\Arduino15\\packages\\arduino\\hardware\\samd\\1.6.21\\variants\\mkrzero" "-IC:\\Users\\onelife\\Documents\\Arduino\\libraries\\RT-Thread\\src" "-IC:\\Users\\onelife\\AppData\\Local\\Arduino15\\packages\\arduino\\hardware\\samd\\1.6.21\\libraries\\SPI" "C:\\Users\\onelife\\AppData\\Local\\Temp\\arduino_build_508434\\sketch\\hello_mo.c" -o "C:\\Users\\onelife\\AppData\\Local\\Temp\\arduino_build_508434\\sketch\\hello_mo.c.o"
...
就我而言,GCC 工具位于“ C:\\Users\\onelife\\AppData\\Local\\Arduino15\\packages\\arduino\\tools\\arm-none-eabi-gcc\\4.8.3-2014q1/bin/”,编译输出位于“ C:\\Users\\onelife\\AppData\\Local\\Temp\\arduino_build_508434\\”。
构建应用程序(动态共享库)
但是,我们要构建的目标“应用程序”是一种共享库。它必须与位置无关,因此可以加载到任何 RAM 地址中。为了让它更小(因为我们的 RAM 大小是有限的),最终的二进制文件将不包含其他库的任何功能。(所有外部功能都应由固件端提供。)
坏消息是 Arduino IDE 不提供这些选项。好消息是 Arduino IDE 确实提供了我们需要的所有工具。我们开始做吧。
第一步是编译。
我们必须将选项“ -mlong-calls -fPIC”添加到原始编译命令中(在输出窗口中查找“正在编译草图...”)。
{path_to_gcc_tools}\arm-none-eabi-gcc -mlong-calls -fPIC ... {path_to_output}\sketch\hello_mo.c -o {path_to_output}\sketch\hello_mo.c.o

{path_to_gcc_tools}\arm-none-eabi-gcc -mlong-calls -fPIC ... {path_to_output}\sketch\load_mo.c -o {path_to_output}\sketch\load_mo.c.o
第二步是链接。
在这一步中,我们选择将目标文件构建为“ app ”(带有入口点的“.mo”文件)或将其构建为库(不带入口点的“.so”文件)。在以下示例中,我们将“ load_mo.c.o”构建为“app”,并将“ hello_mo.c.o”构建为库。
我们通过以下方式修改链接命令(寻找“将所有内容链接在一起......”)
-
只保留目标目标文件,例如“
load_mo.c.o”,并删除其他 -
删除选项“
-Wl,--unresolved-symbols=report-all” -
删除选项“
-L{path_to_output}” -
删除选项“
-T.../flash_with_bootloader.ld” -
删除选项“
-Wl,--start-group ... -Wl,--end-group” -
添加选项“
-shared -fPIC -nostdlib -Wl,-marmelf -Wl,-z,max-page-size=0x4” -
添加入口点选项(例如“
-Wl,-eload_hello”或“-Wl,-e0”表示无)
{path_to_gcc_tools}\arm-none-eabi-g++ -shared -fPIC -nostdlib -Wl,-e0 -Wl,-marmelf -Wl,-z,max-page-size=0x4 ... -o {path_to_output}\hello_mo.elf {path_to_output}\hello_mo.c.o

{path_to_gcc_tools}\arm-none-eabi-g++ -shared -fPIC -nostdlib -Wl,-eload_hello -Wl,-marmelf -Wl,-z,max-page-size=0x4 ... -o {path_to_output}\load_mo.elf {path_to_output}\load_mo.c.o
第三步是分条。
为了进一步减小文件大小,我们必须去掉 ELF 文件中不必要的部分。
{path_to_gcc_tools}\arm-none-eabi-strip -R .hash -R .comment -R .ARM.attributes {path_to_output}\hello_mo.elf -o {path_to_output}\hello.so

{path_to_gcc_tools}\arm-none-eabi-strip -R .hash -R .comment -R .ARM.attributes {path_to_output}\load_mo.elf -o {path_to_output}\load.mo
第四步是检查大小(可选)。
{path_to_gcc_tools}\arm-none-eabi-size {path_to_output}\hello.so

{path_to_gcc_tools}\arm-none-eabi-size {path_to_output}\load.mo
恭喜!您刚刚构建了一个 Arduino 应用程序。让我们检查一下输出。
{path_to_gcc_tools}\arm-none-eabi-readelf -h {path_to_output}\hello.so
ELF Header:
 Magic:   7f 45 4c 46 01 01 01 00 00 00 00 00 00 00 00 00
 Class:                             ELF32
 Data:                              2's complement, little endian
 Version:                           1 (current)
 OS/ABI:                            UNIX - System V
 ABI Version:                       0
 Type:                              DYN (Shared object file)
 Machine:                           ARM
 Version:                           0x1
 Entry point address:               0x0
 Start of program headers:          52 (bytes into file)
 Start of section headers:          896 (bytes into file)
 Flags:                             0x5000000, Version5 EABI
 Size of this header:               52 (bytes)
 Size of program headers:           32 (bytes)
 Number of program headers:         3
 Size of section headers:           40 (bytes)
 Number of section headers:         9
 Section header string table index: 8

{path_to_gcc_tools}\arm-none-eabi-readelf -h {path_to_output}\load.mo
ELF Header:
 Magic:   7f 45 4c 46 01 01 01 00 00 00 00 00 00 00 00 00
 Class:                             ELF32
 Data:                              2's complement, little endian
 Version:                           1 (current)
 OS/ABI:                            UNIX - System V
 ABI Version:                       0
 Type:                              DYN (Shared object file)
 Machine:                           ARM
 Version:                           0x1
 Entry point address:               0x285
 Start of program headers:          52 (bytes into file)
 Start of section headers:          1060 (bytes into file)
 Flags:                             0x5000002, has entry point, Version5 EABI
 Size of this header:               52 (bytes)
 Size of program headers:           32 (bytes)
 Number of program headers:         3
 Size of section headers:           40 (bytes)
 Number of section headers:         9
 Section header string table index: 8
它表明“ .so”和“ .mo”文件都是“ DYN”(动态)类型。不同之处在于“ .so”文件没有入口点,而“ .mo”文件有。
我们还没有完成。
最后一步是公开应用程序所需的功能。
在文件“ ”中,如果启用mo_sym.h,所有内核 API 都已经公开。CONFIG_USING_MODULE如有必要,您可以添加自己的。
发出 MSH 命令“ lsym”将列出所有暴露的符号:
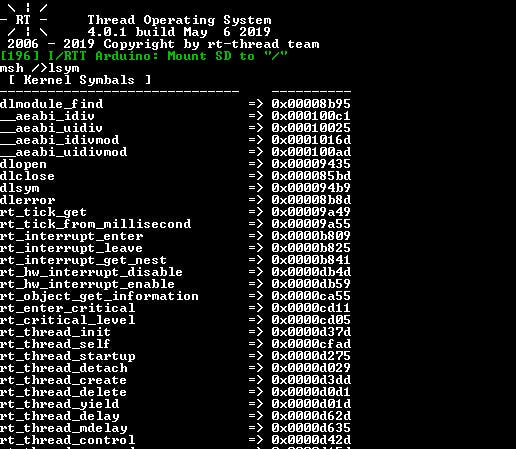
运行 Arduino 应用程序
hello.so让我们将“ ”和“ ”复制load.mo到具有以下文件结构的SD卡。
SD_ROOT/
├── lib/
│   └── hello.so
└── mo/
    └── load.mo
规则是,如果我们将相对路径传递给dlopen()或 MSH,它将分别在和中查找“ .so”和“ ” 。.mo/lib//mo/
现在我们将卡插入 Arduino 板,在本例中为 MRKZERO ,上传“HelloMo”草图(草图什么都不做),然后发出命令“ load”。
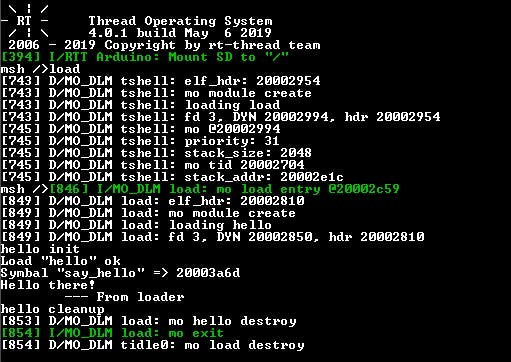
为了显示有关应用程序执行过程的更多详细信息,我们可以在“ dlmodule.c”中启用调试消息:
#define LOG_LVL LOG_LVL_DBG
结果揭示了以下过程:
-
MSH 线程 ("tshell") 将 "
load.mo" 加载到 RAM 并创建一个新线程 ("load") 以执行入口点函数 "load_hello()" -
“
load_hello()”然后加载“hello.so”,调用它的“module_init()”函数,调用它的“say_hello()”函数(不是入口点) -
在 "
say_hello()" 返回后, "load_hello()" 关闭 "hello.so" (调用它的 "module_cleanup()" 函数然后销毁它的 RAM 副本) -
“加载”线程标记以销毁“”的RAM副本,
load.mo然后退出 -
" " 的 RAM 副本
load.mo最终被空闲线程 ("tidle0") 销毁
" module_init()" 和 " module_cleanup()" 是特殊函数。如果定义,前者.mo在将应用程序加载到 RAM 后由 MSH 线程(在“”文件的情况下)调用,后者.mo在销毁 RAM 副本之前由空闲线程(在“”文件的情况下)调用。
让我们将“hello_mo.c”重建为一个应用程序(入口点是“ say_hello()”,例如-Wl,-esay_hello)并执行。
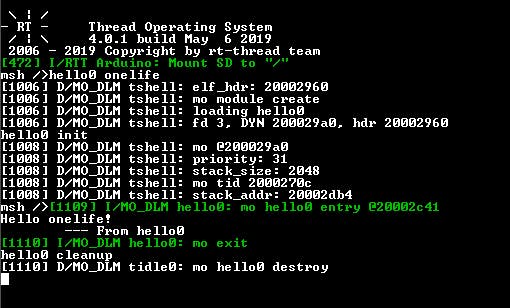
结果清楚地表明“ module_init()”被MSH线程(“tshell”)module_cleanup()调用,“ ”被空闲线程(“tidle0”)调用。顺便说一句,传递给这两个函数的参数是指向模块描述符的指针。
优点缺点
优点
(我们感兴趣的是)Arduino 应用程序可以构建一次并在许多板上运行。根据 Wiki ,“可用于 Cortex-M0 / Cortex-M0+ / Cortex-M1 的二进制指令无需修改即可在 Cortex-M3 / Cortex-M4 / Cortex-M7 上执行。可用于 Cortex-M3 的二进制指令无需修改即可执行在 Cortex-M4 / Cortex-M7 / Cortex-M33 / Cortex-M35P 上进行修改。”
因此,为 MKR Zero 板(SAMD 架构)构建的应用程序应该在 Arduino Due(SAM 架构)上运行而不会出现问题。
此功能可以实现远程添加或更新功能而无需重新启动(与 OTA 固件更新相比)等。
缺点
与 MSH 命令相比,Arduino 应用程序需要更多 RAM。另一个主要缺点是在固件方面,应用程序所需的所有外部功能都必须在那里待机(尽管固件可能不会使用它们)并暴露(在“ mo_sym.h”中)。
动态模块状态
Arduino RT-Thread 库 v0.6.0 中的功能仍处于 beta 阶段。
在原始代码(RT-Thread 项目)中,除了DYNELF 文件的类型,动态链接器还支持REL类型。但是,经过一些测试,我发现至少对于 ARM Cortex-M 架构,只有“ .o”(对象)文件类型为REL. 所以目前RELArduino RT-Thread 库不支持 ELF 文件类型。
此外,仅测试了两种重新分配类型:
-
R_ARM_JUMP_SLOT -
R_ARM_RELATIVE
我需要一些代码来测试其他类型。因此,如果您遇到其他类型的错误,请帮助提出问题。
最后,并非所有“libgcc”函数都默认公开。例如,开关助手功能没有公开。您可以将它们添加到“ mo_sym.h”或在您的应用程序中将“ switch...case...”替换为“ ” 。if...else...
RTT-QRCode 应用程序
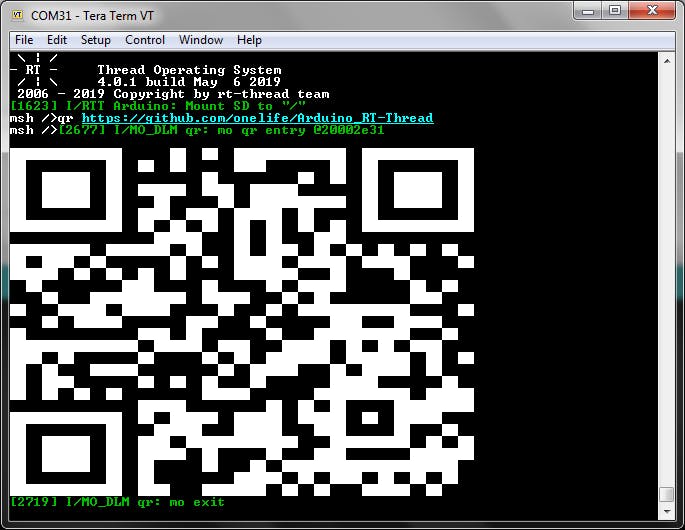
有一个更复杂的示例RTT-QRCode ,可以构建为 MSH 命令或 Arduino 应用程序。请查看代码并玩得开心!
下一步
- Arduino上的多任务处理
- 带有 RT-Thread 的更好的 SD 库
- RT-Thread Primer(即将推出)
声明:本文内容及配图由入驻作者撰写或者入驻合作网站授权转载。文章观点仅代表作者本人,不代表电子发烧友网立场。文章及其配图仅供工程师学习之用,如有内容侵权或者其他违规问题,请联系本站处理。 举报投诉
- 相关下载
- 相关文章


