
资料下载

如何利用Walle-ng 进行面部跟踪和识别
该应用程序根据画面中人脸的位置连续监控和调整两个伺服系统的垂直和水平位置。如果检测到人脸,则会记录该活动,并使用 Amazon Web Services (AWS) API 网关、Lambda 和简单通知服务 (SNS) 向管理员发送通知短信。该项目扩展了 OpenCV 开放模型动物园中的人脸识别演示。
要求
总建造成本不到 175 美元。硬件可以从 Amazon、Sparkfun 或 Adafruit 购买。
Raspberry Pi 4B(首选 4GB)
Movidius 电脑棒 2
微型 HDMI 电缆(仅限 RPI 4)
键盘和鼠标
微型 SD 卡(首选 8GB 或更大)
MakerFocus Raspberry Pi 平移/倾斜帽
MakerFocus Raspberry Pi 夜视相机
适用于 Raspberry Pi Cam 的 Adafruit Flex 电缆
iUniker Raspberry Pi 集群案例
树莓派充电器 (RPI 4)
AWS 控制台访问
公对母 GPIO 带状电缆
钻头
集会
Walle-ng 可以组装成多种配置,这实际上取决于用例和用户偏好。对于此安装,iUniker Raspberry Pi Cluster Case 的两个部分用于容纳 Raspberry Pi 和安装平移/倾斜帽。Raspberry Pi 安装在机箱下部的顶部,风扇安装在顶部(外部)。建议安装散热器,通过顶部塑料件中的开口连接和馈送 Picam 柔性电缆,并将 GPIO 带状电缆的母端放在 Raspberry Pi GPIO 引脚上,然后再围绕 Raspberry Pi 组装外壳。
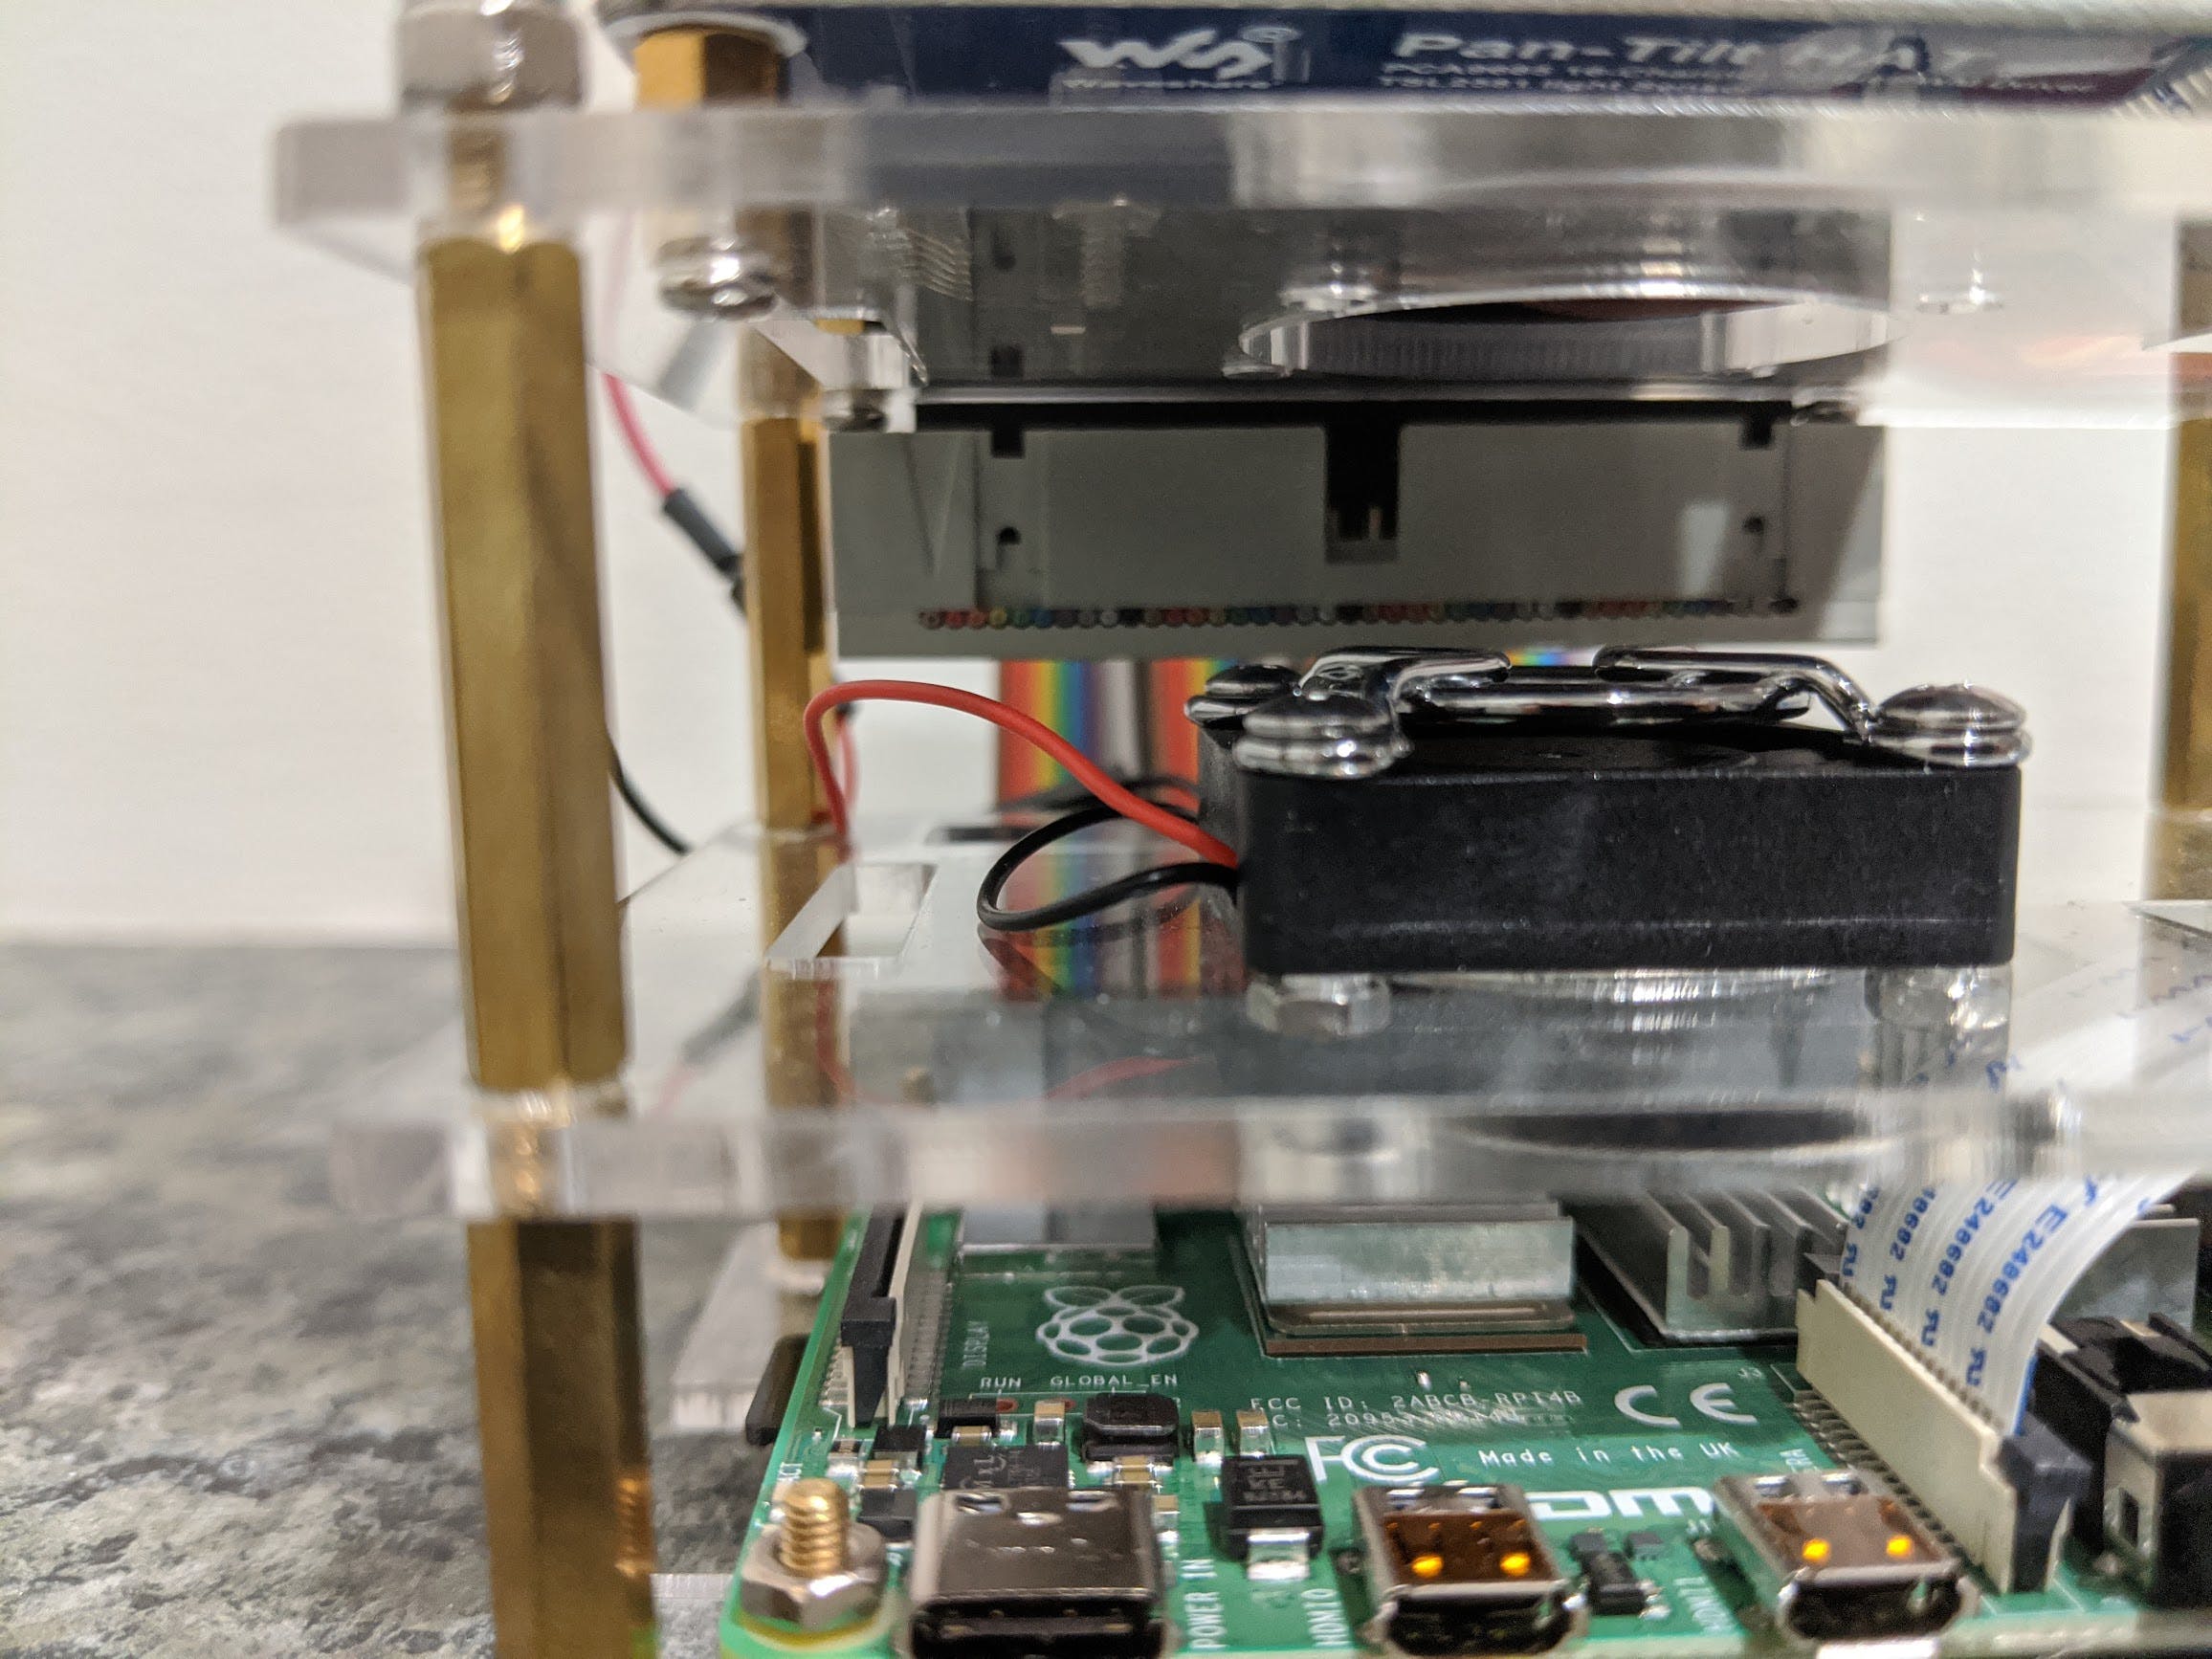
组装中最困难的部分是将平移/倾斜帽连接到 iUniker 外壳的最上部。顶部塑料外壳件(固定平移/倾斜帽的部分)与用于 iUniker 外壳顶部的部件相同(与中间部件相同)。使用提供的说明组装平移/倾斜帽后,将帽子放在 iUniker 的顶部,并以可以标记 4 个孔位置的方式放置,位于平移/倾斜帽 PCB 的角上, 在 iUniker 塑料上使用标记。钻孔后,使用 iUniker 套件随附的可用硬件将平移/倾斜帽固定到塑料上。请注意,在图像中,由于 iUniker 塑料件中的开口,我只能将 4 个孔中的 3 个固定到塑料上。大学教师'
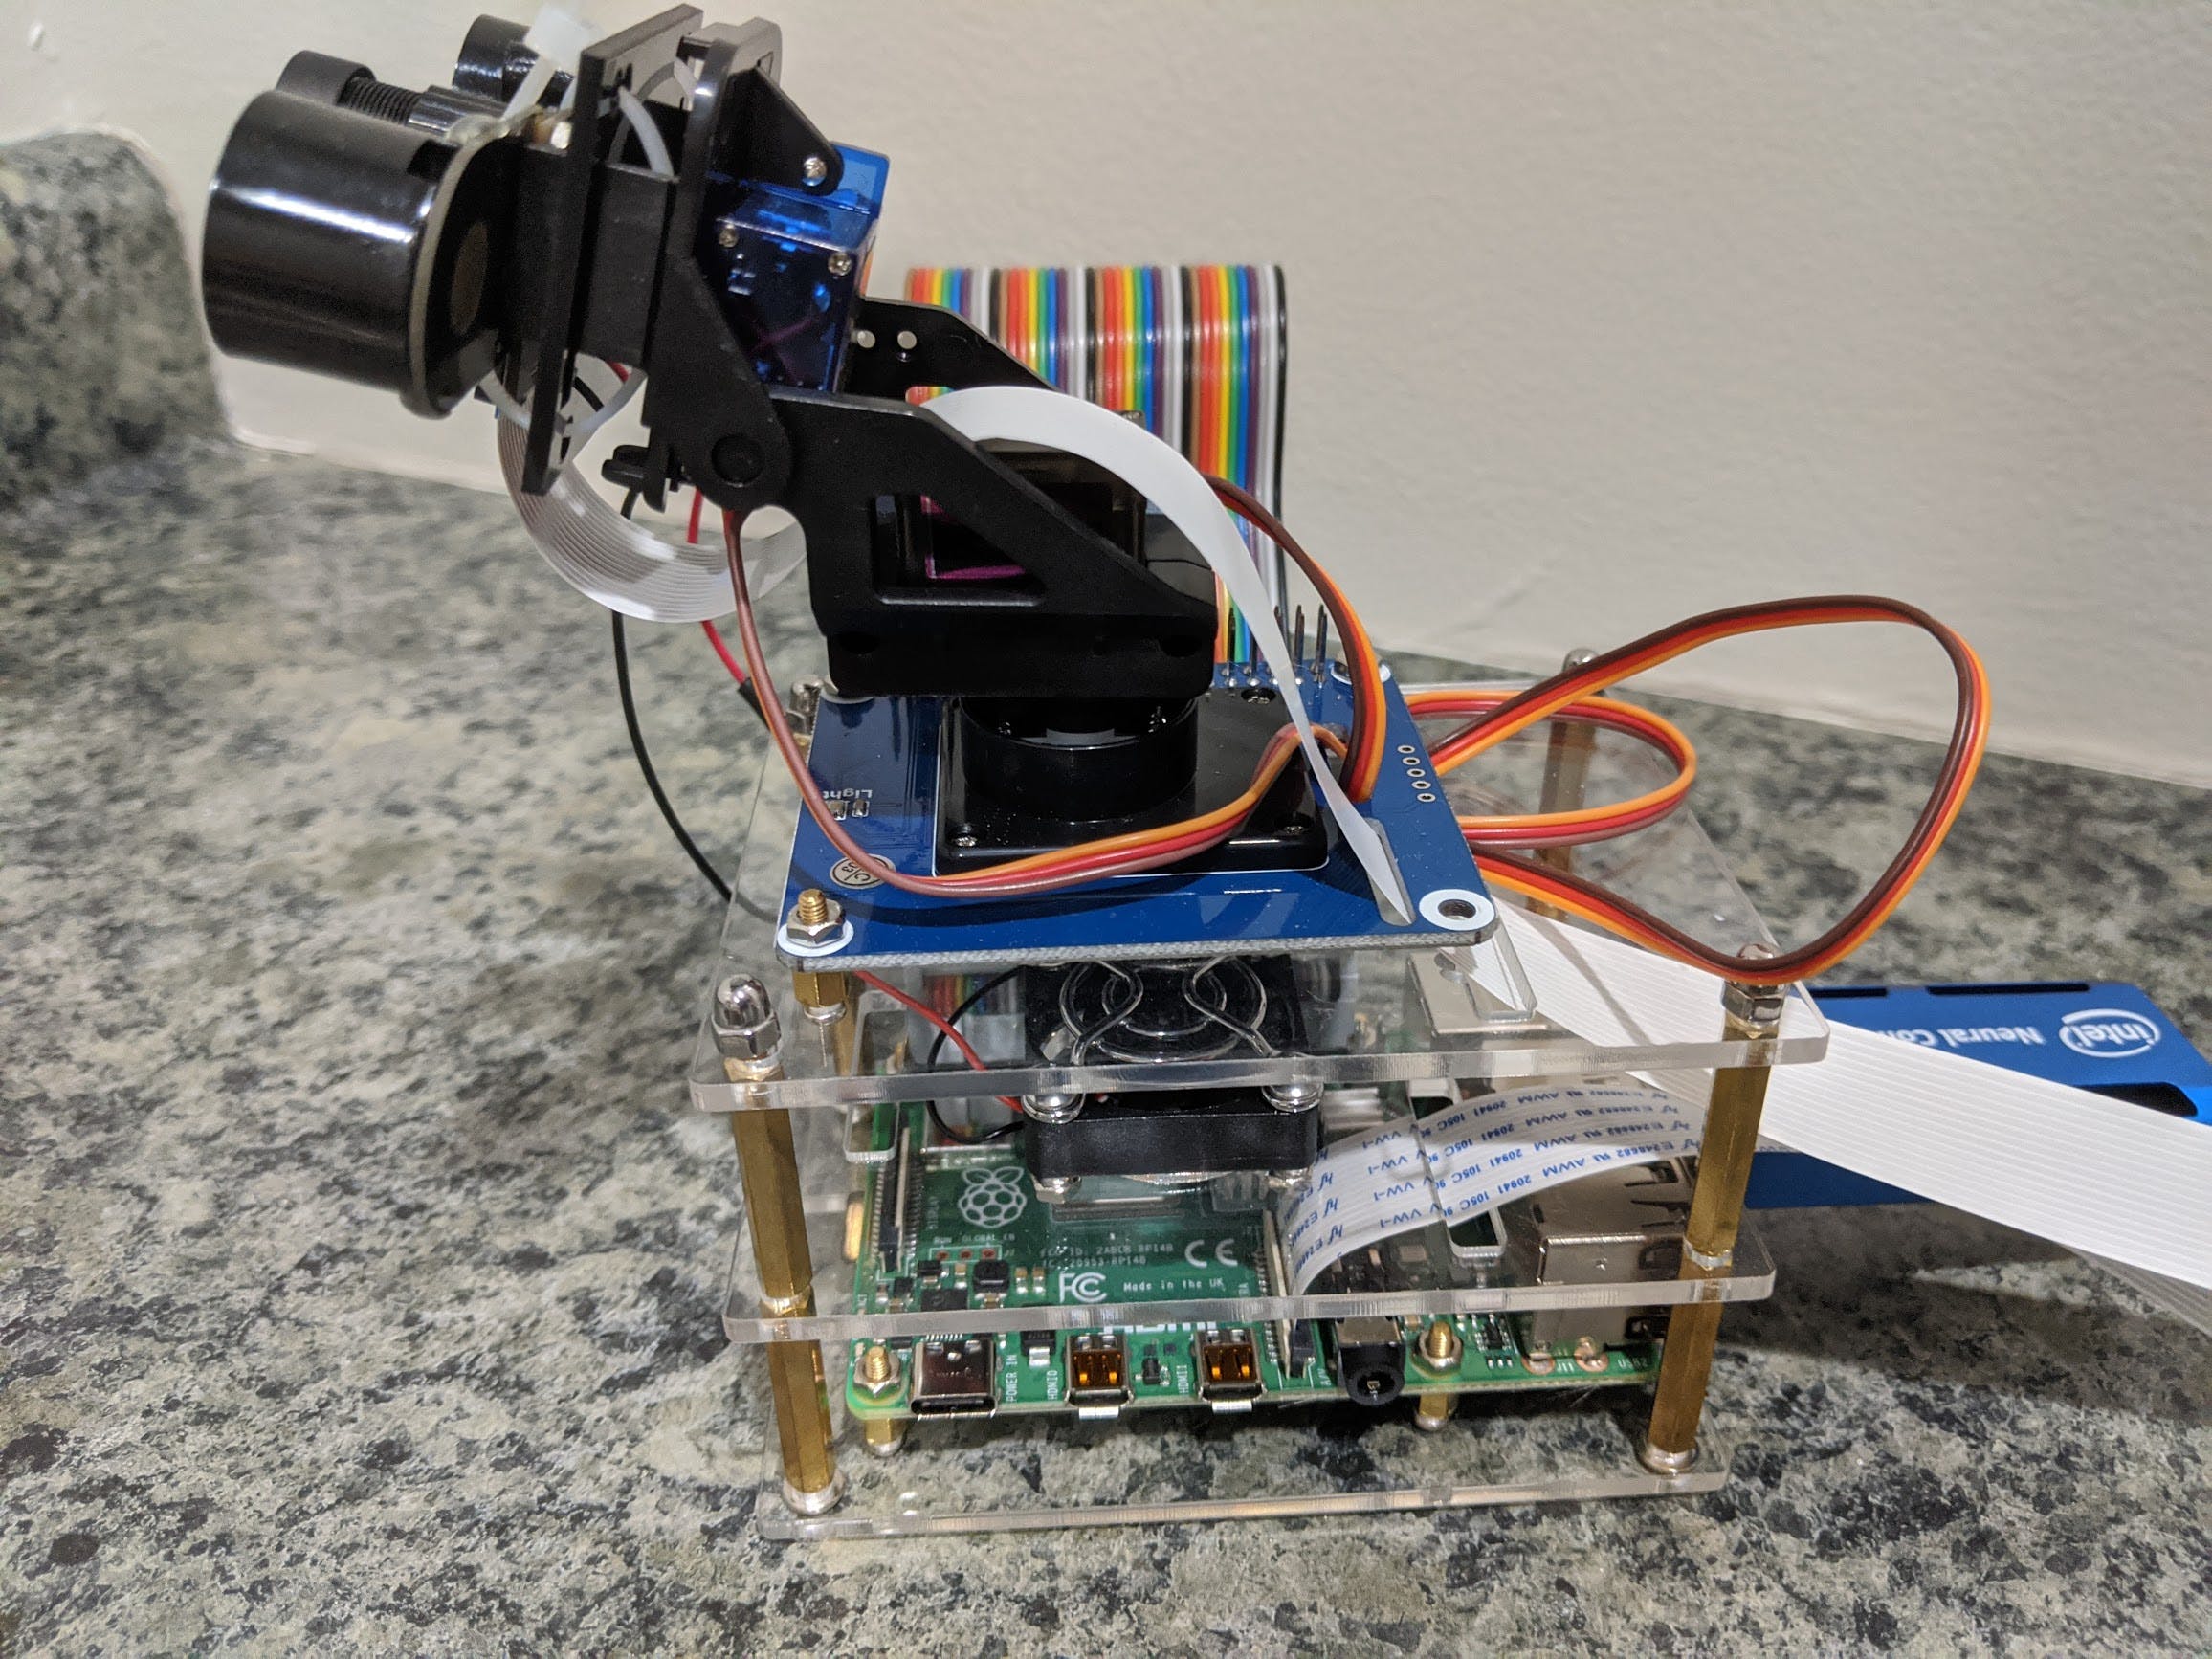
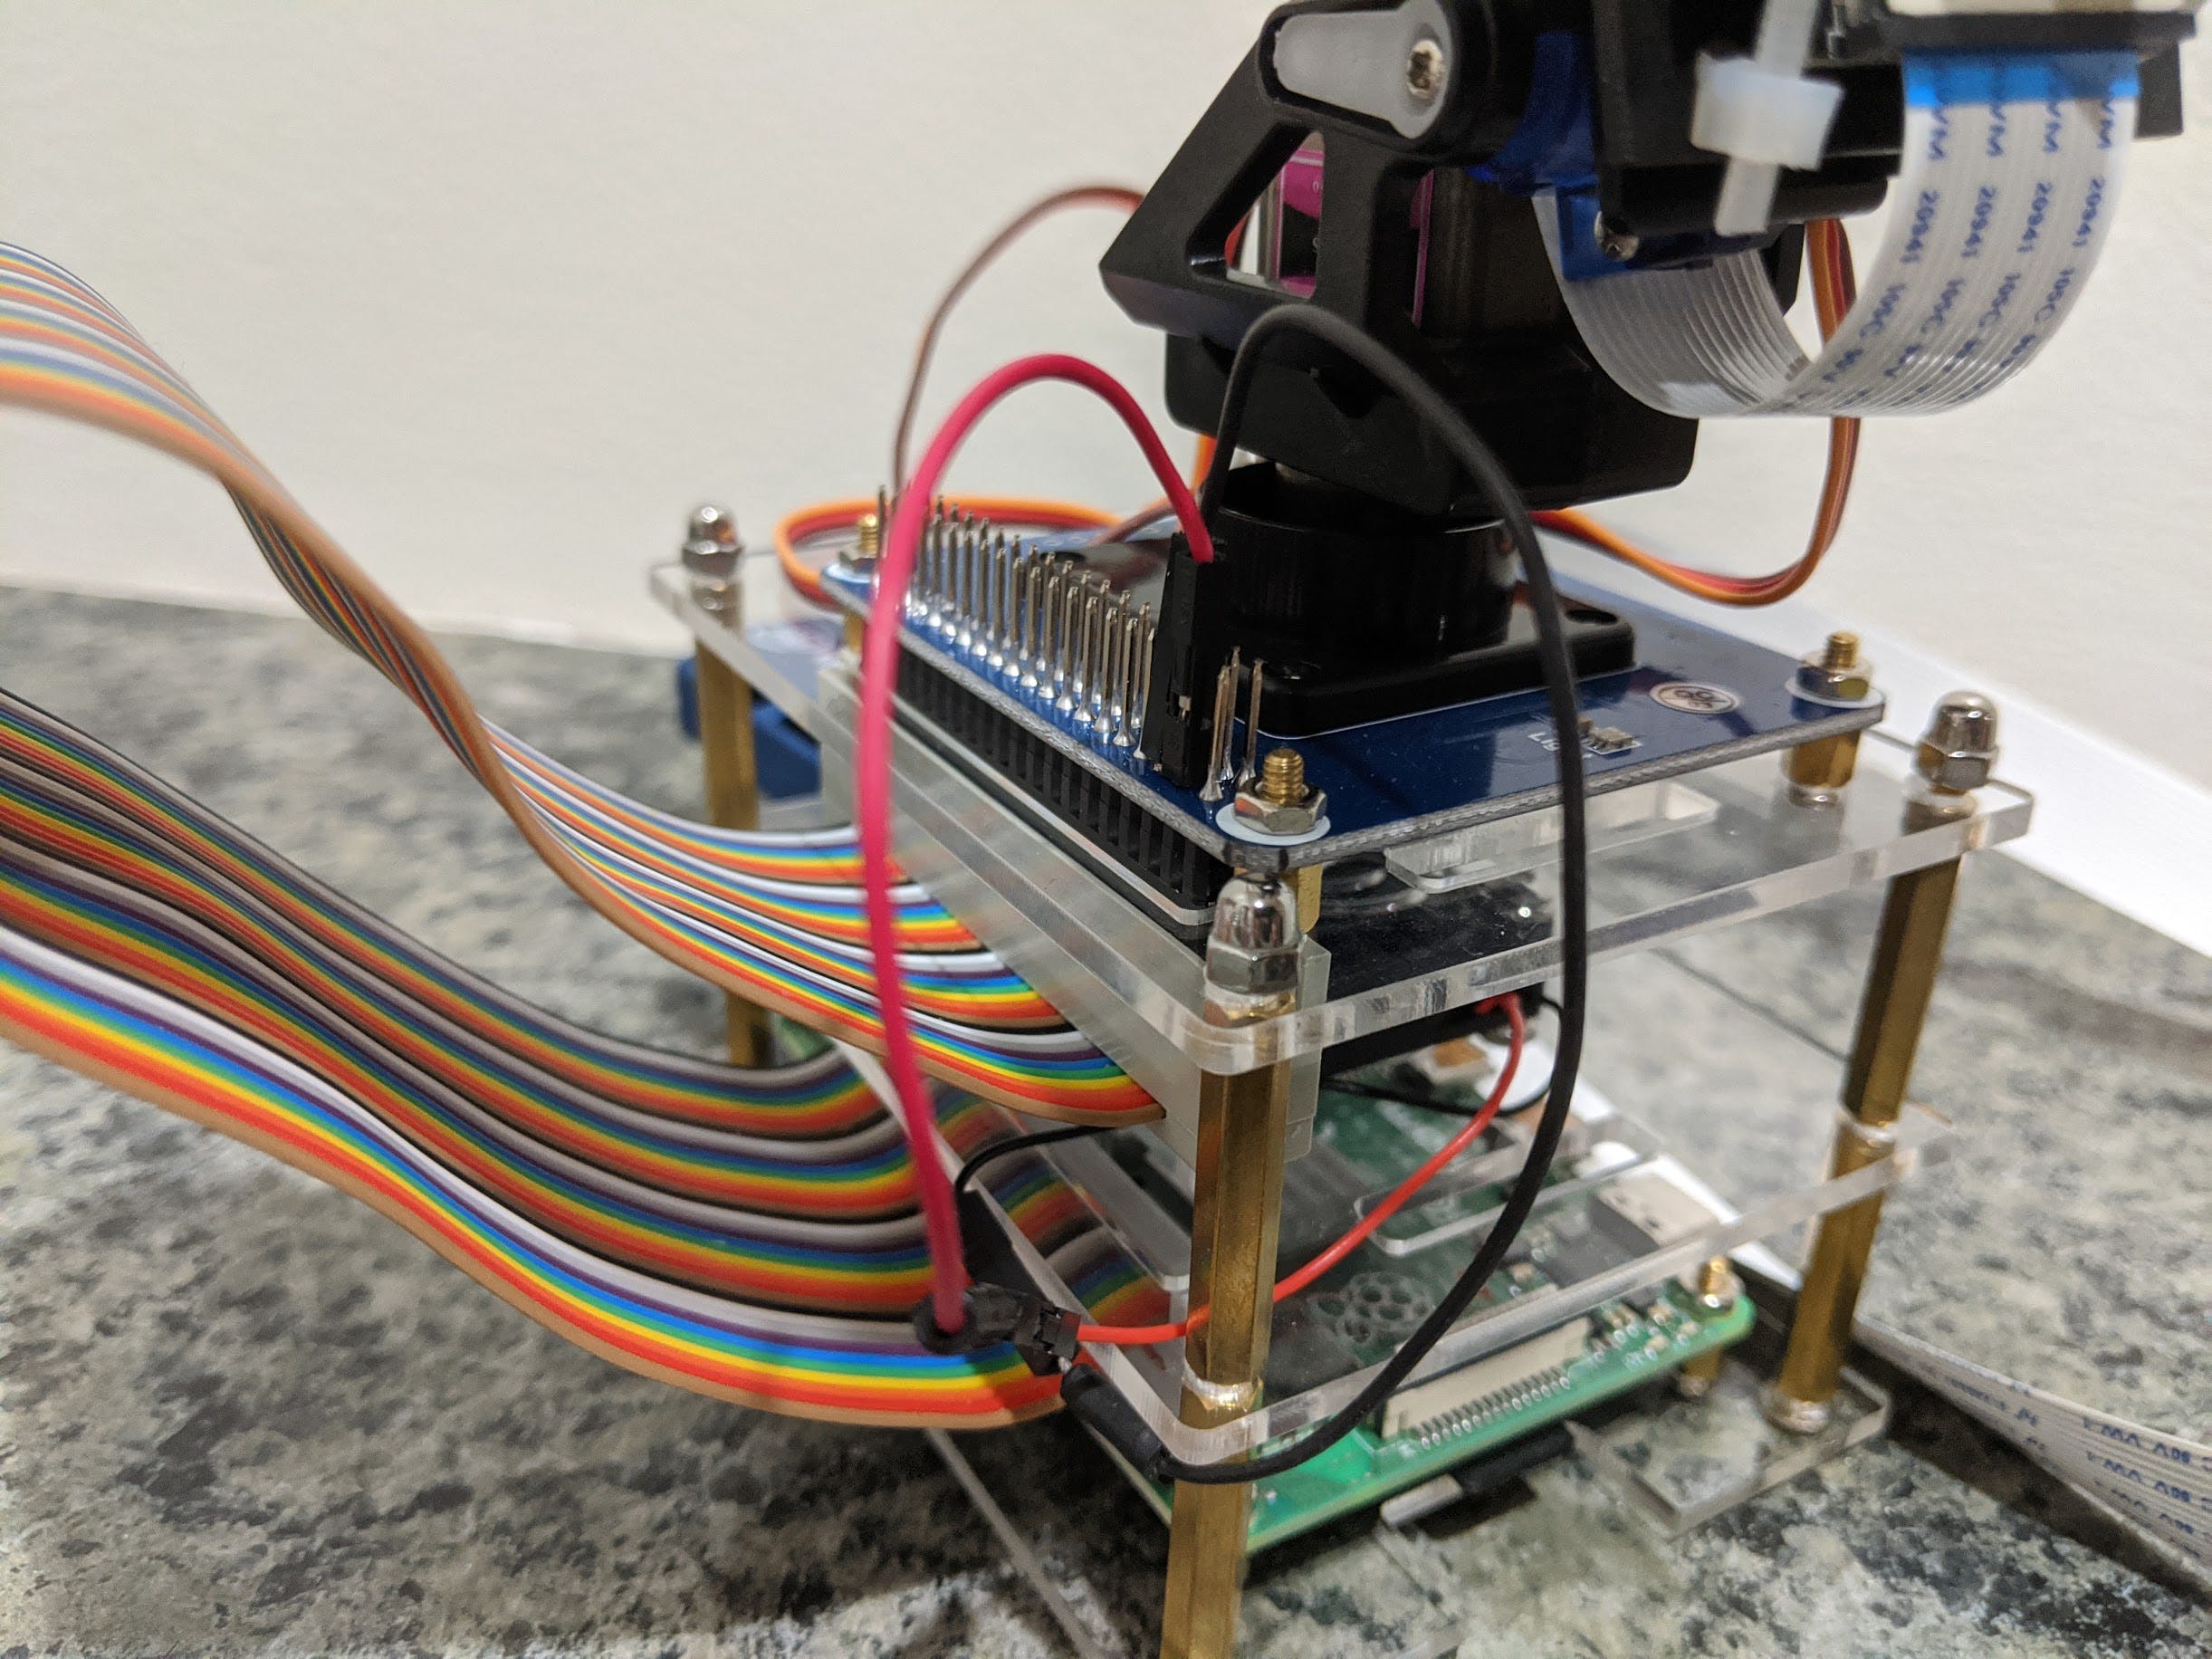
组装的最后一部分包括将风扇连接到 5v 和接地 GPIO 引脚,将英特尔 Movidius 计算棒插入其中一个 USB3.0 端口,连接微型 HDMI、键盘和鼠标(如果它们需要使用),并将 GPIO 带状电缆的公端连接到平移/倾斜帽。fam 的正极(红色)线应连接到 GPIO2 或 GPIO4,地线(黑色)应连接到 GPIO6。可以在参考部分找到 RPI4 的 GPIO 引出线。
设置亚马逊网络服务
本教程中使用的所有服务均符合AWS 免费套餐的使用条件。如果您没有 AWS 控制台访问权限,则需要在AWS 网站上创建一个帐户。本节将提供有关设置 AWS SNS、API 网关和 Lambda 的详细信息。
AWS 简单通知服务 (SNS)
SNS 是一种高度可用、持久、安全、完全托管的发布/订阅消息传递服务,可以配置为向订阅 SNS 主题的设备发送 SMS 或电子邮件消息。对于这个项目,将创建一个 SNS 主题,并将一个移动设备配置为该主题的订阅者。这是接收从 walle-ng 事件触发的消息所必需的。在 AWS 控制台中,转到 Simple Notification Services 并执行以下操作:
简单通知服务 (SNS) --> 主题 --> 创建主题
设置以下设置:
名称:walle-sns-topic
显示名称:警报
点击 --> 创建主题
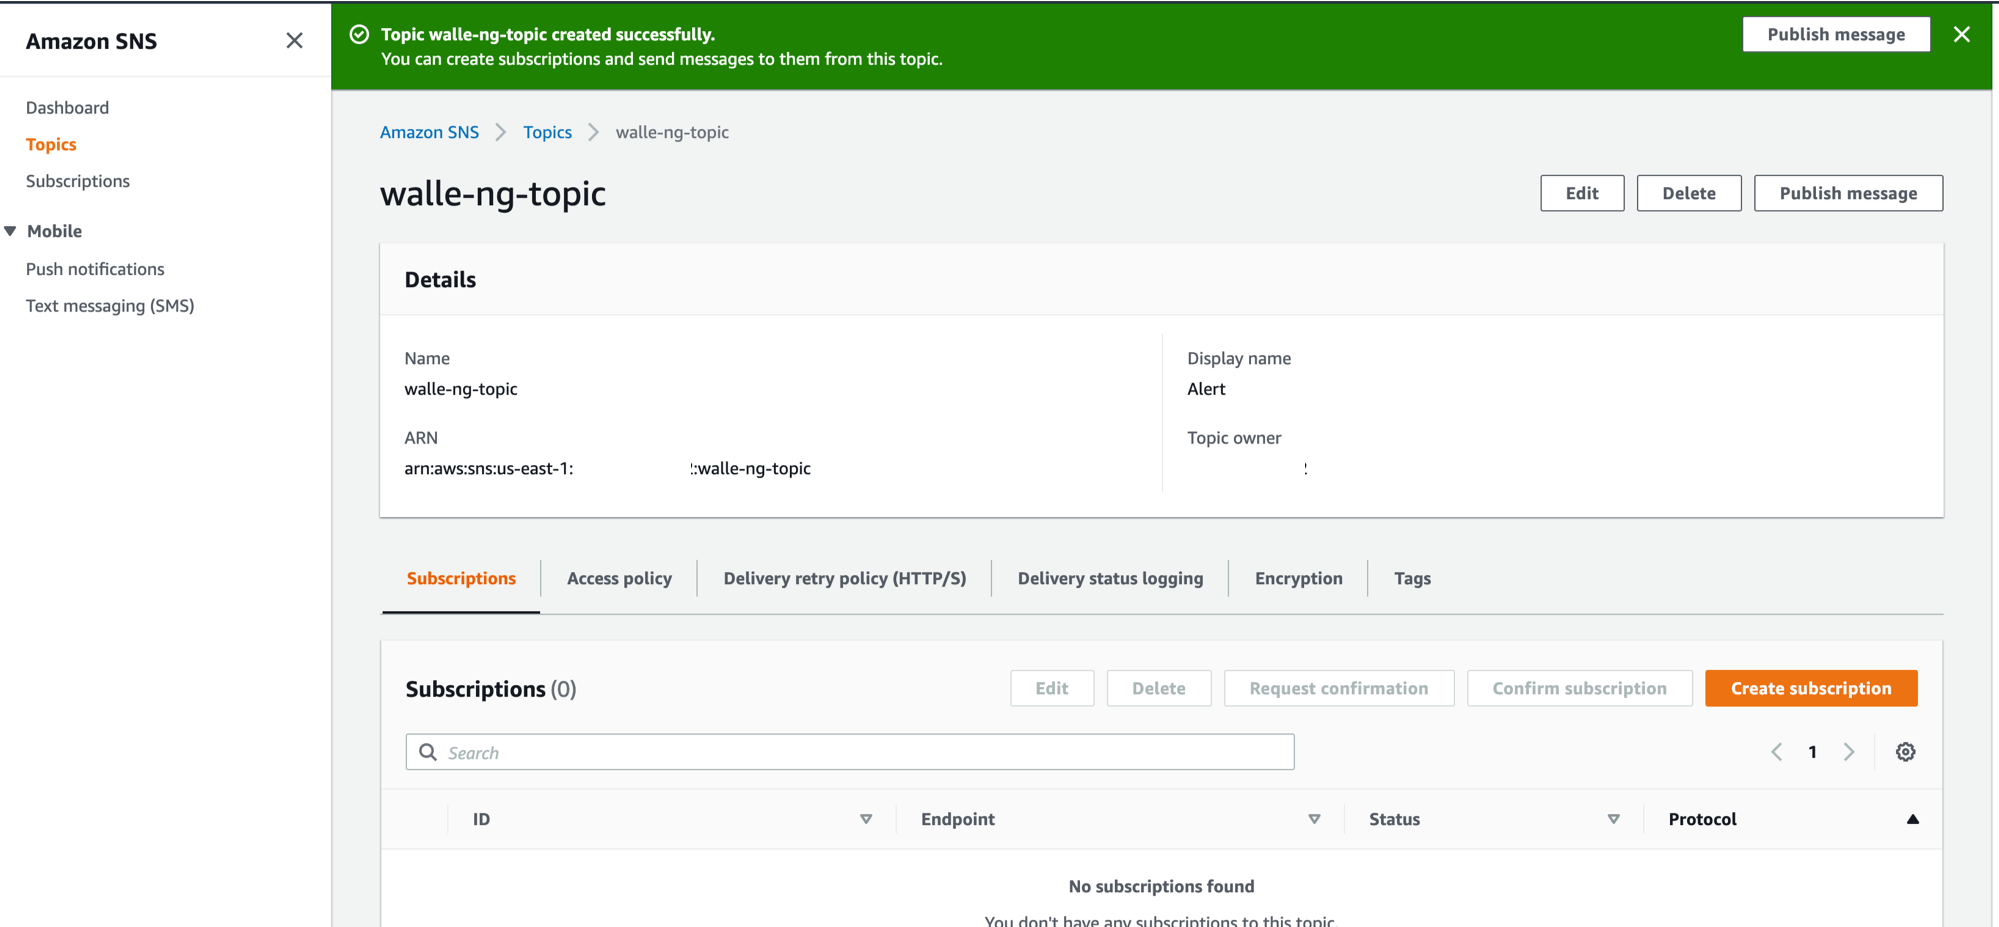
创建主题后,应该可以看到类似于下图的视图。复制与 walle-sns-topic 关联的 ARN。在这个例子中,它是arn:aws:sns:us-east-1:646789677679:walle-ng-topic。
创建对该主题的订阅:
点击 --> 创建订阅
主题 ARN:选择 walle-sns-topic(如果尚未选择)
协议:短信(或电子邮件,如果您愿意)
端点:+15556667777(输入电话号码,如果选择了电子邮件,则输入电子邮件)
点击 --> 创建订阅
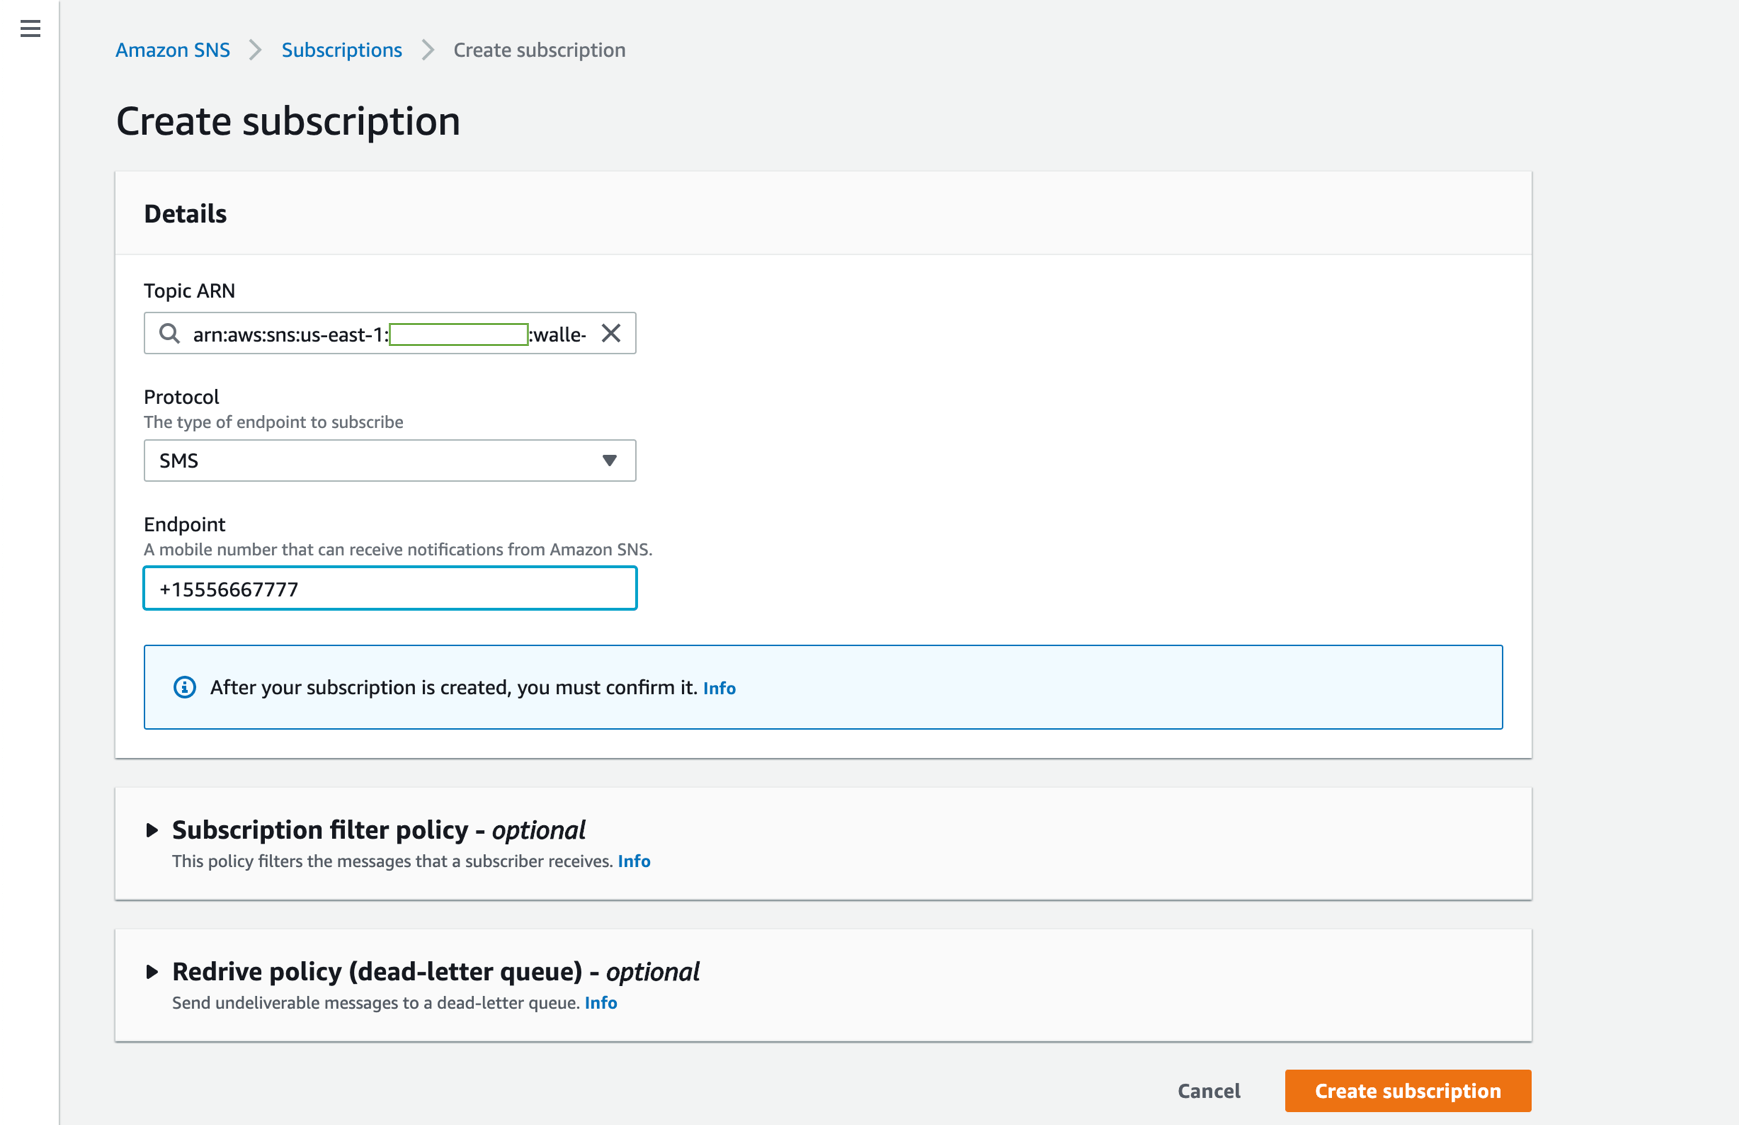
应设置 SNS 以向移动设备发送 SMS 消息。建议发布测试消息以验证设置。要发布测试消息,请执行以下操作:
在边栏中,选择主题 --> walle-ng-topic
点击-->发布消息
主题:测试
消息正文:测试测试
点击-->发布消息
AWS 拉姆达
AWS Lambda 让您无需预置或管理服务器即可运行代码。它是无服务器的,只有在向 API 网关发出 POST 请求时才会运行。Lambda 将负责解析来自 walle-ng 的 POST 请求并发布 SNS 消息。在 AWS 控制台中,转到 Lambda 并执行以下操作:
Lambda --> 创建函数 --> 选择“Author from scratch”
在基本信息部分,设置以下操作:
函数名称:walle-ng-lambda
运行时:Python3.6
角色名称:walle-ng-role
权限:基本 Lambda、Amazon SNS 发布策略
点击 --> 创建函数
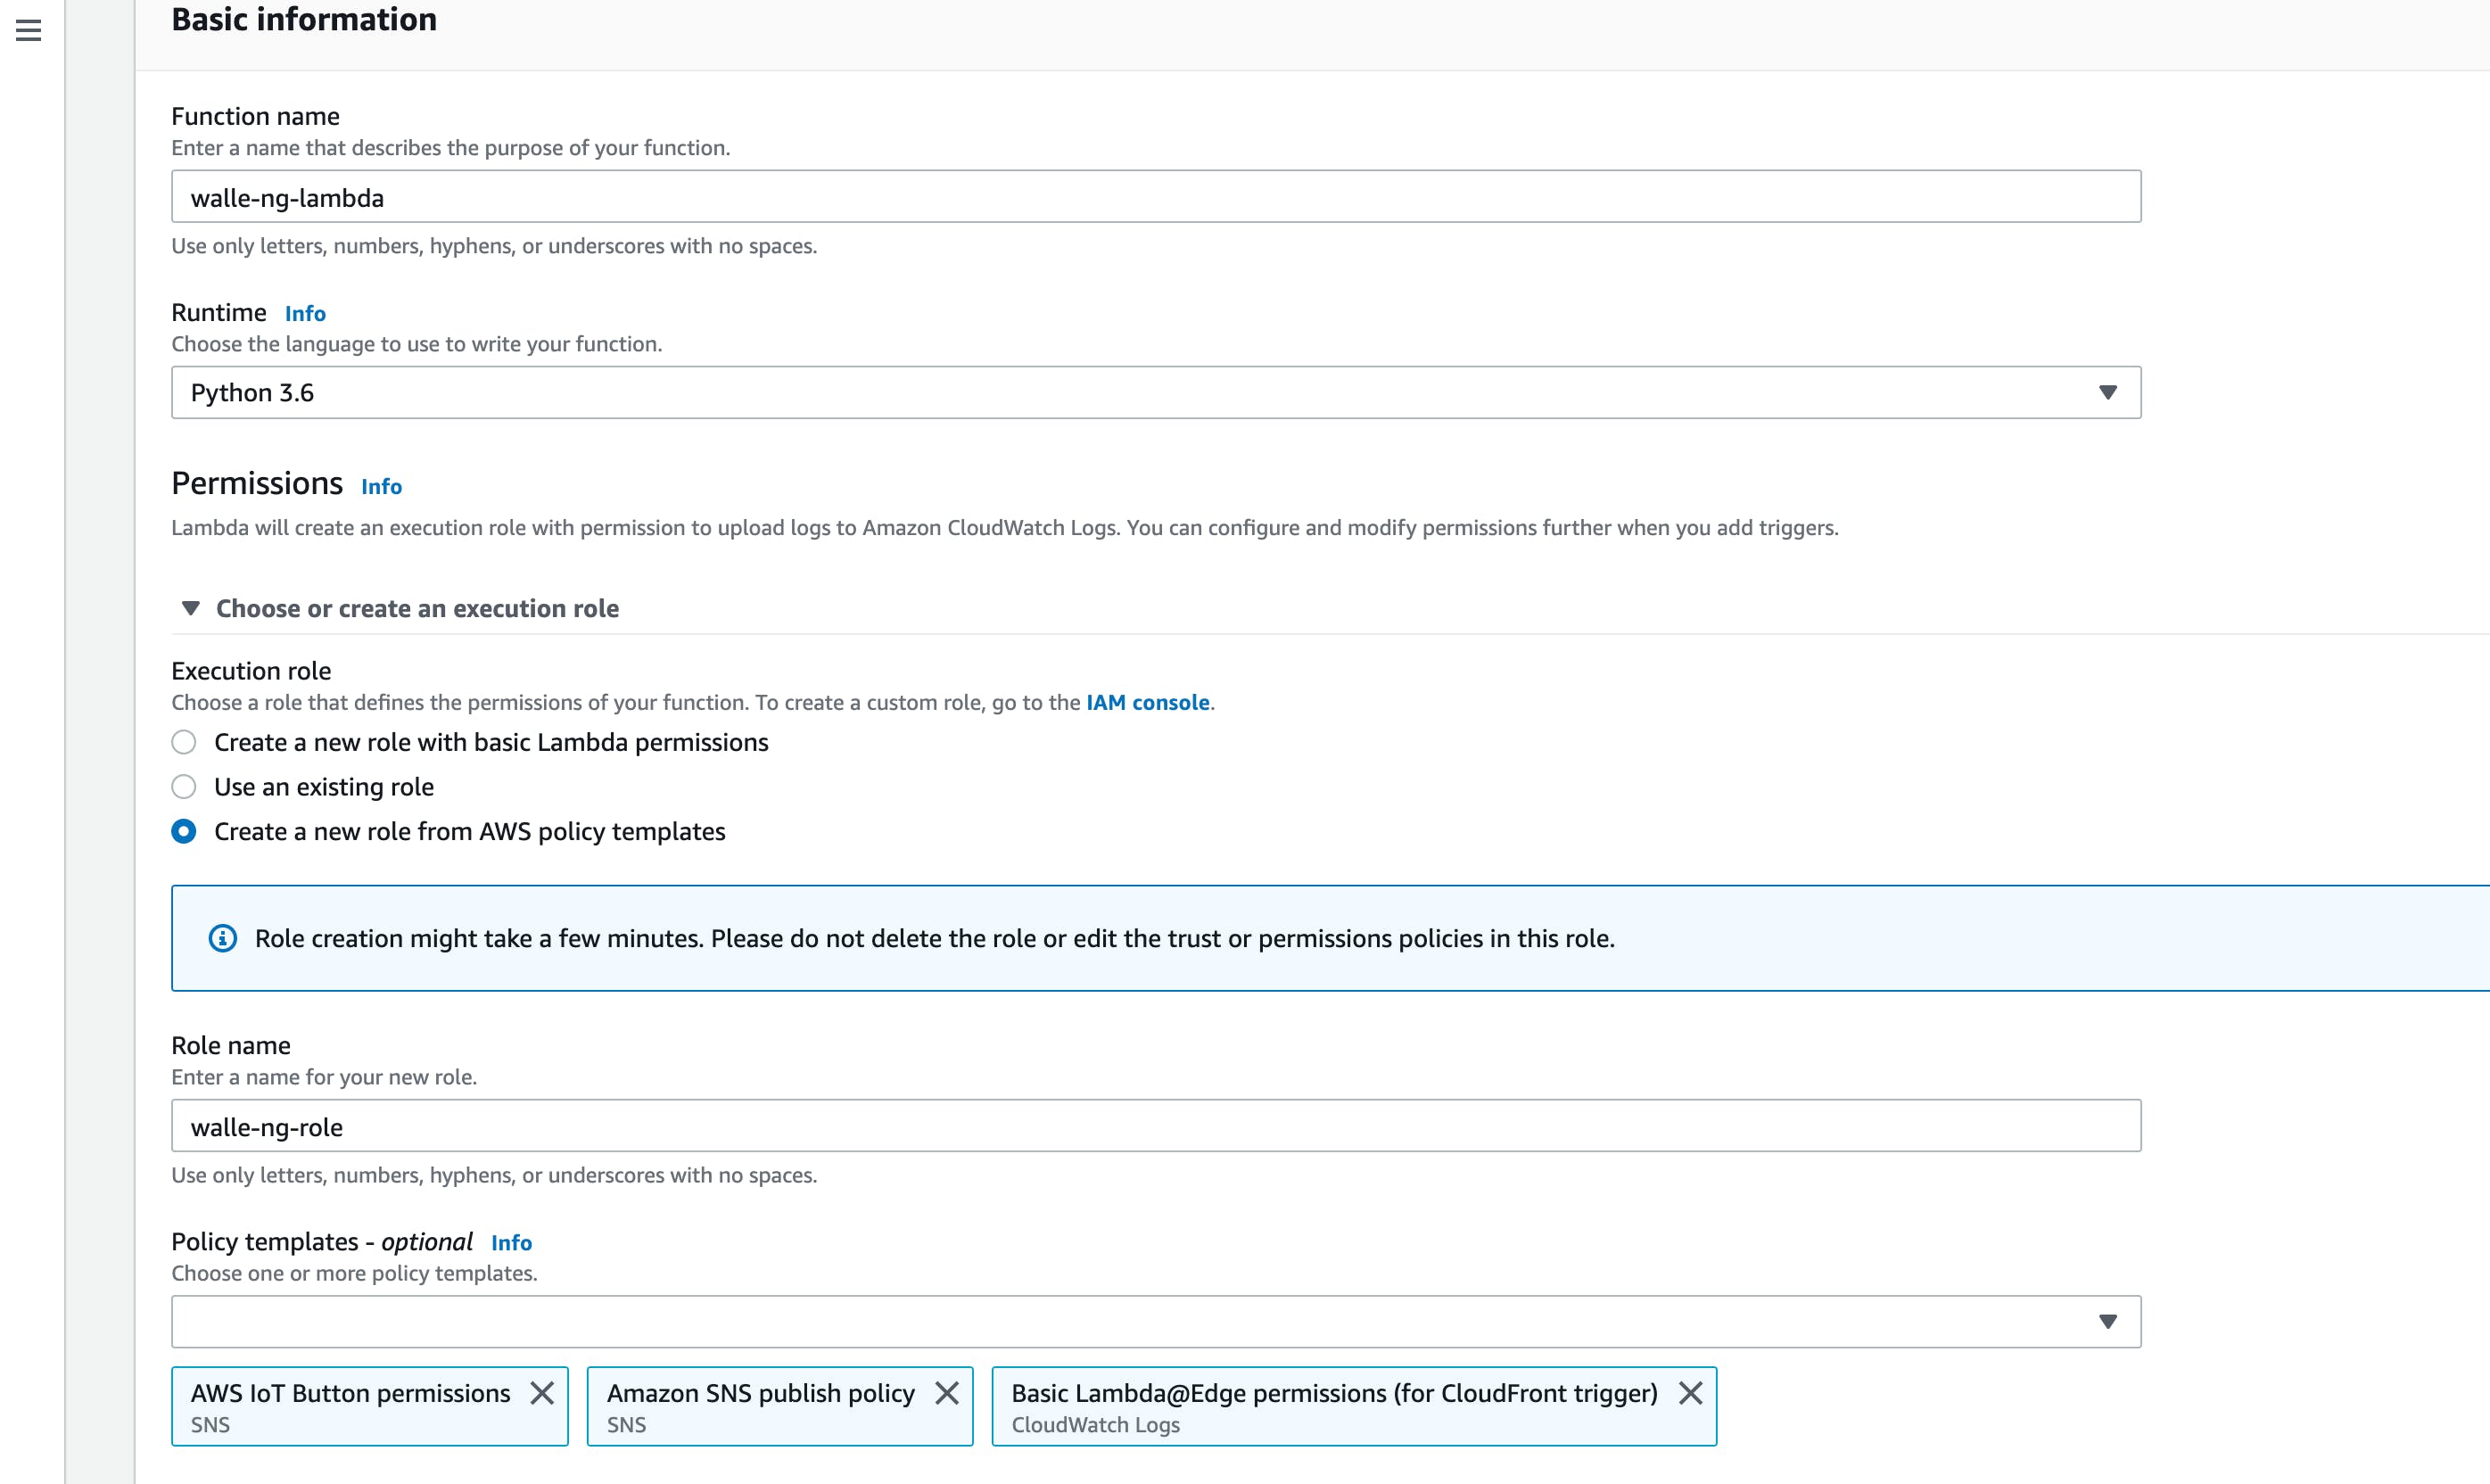
创建 Lambda 函数后,向下滚动到该Function code部分并将下面的代码复制/粘贴到lambda_function.py脚本中。在 下TOPIC_ARN_SMS,将值更改为您在创建 时记下的 ARN walle-ng-topic。对于此示例,将更改为arn:aws:sns:us-east-1:646789677679:walle-ng-topic.
完成后,单击 --> 保存。
import boto3
import urllib.parse
import logging
logger = logging.getLogger()
logger.setLevel(logging.INFO)

TOPIC_ARN_SMS = ""
SMS_SUBJ = "Alert"
SMS_MESG = "Observed unknown person(s)"

'''Setup SNS resource'''
def publish_sms_msg(topic_arn=TOPIC_ARN_SMS, sms_mesg=SMS_MESG, sms_subj=SMS_SUBJ):
    sns = boto3.resource('sns')
    publish_sms(sns, topic_arn, sms_mesg, sms_subj)

'''Send the SMS'''
def publish_sms(sns, topic_arn, sms_mesg, sms_subj):
    topic = sns.Topic(topic_arn)
    topic.publish(Message=sms_mesg, Subject=sms_subj)

'''Event handler'''
def lambda_handler(event, context):
    if event['httpMethod'] == 'POST':
        msg = event['body']
        msg = urllib.parse.parse_qs(msg)
        if msg['message']:
            alert = msg['message'][0]
            logger.info(alert)
            publish_sms_msg(sms_mesg=alert)
            return {
                'statusCode': 200,
                'headers': {
                    'Content-Type': 'application/json'
                },
                'body': 'OK'
            }
        else:
            return {
                'statusCode': 499,
                'headers': {
                    'Content-Type': 'application/json'
                },
                'body': 'Go Away!'
            }
    else:
        return {
            'statusCode': 499,
            'headers': {
                'Content-Type': 'application/json'
            },
            'body': 'Go Away!'
        }
最终输出应类似于以下内容:
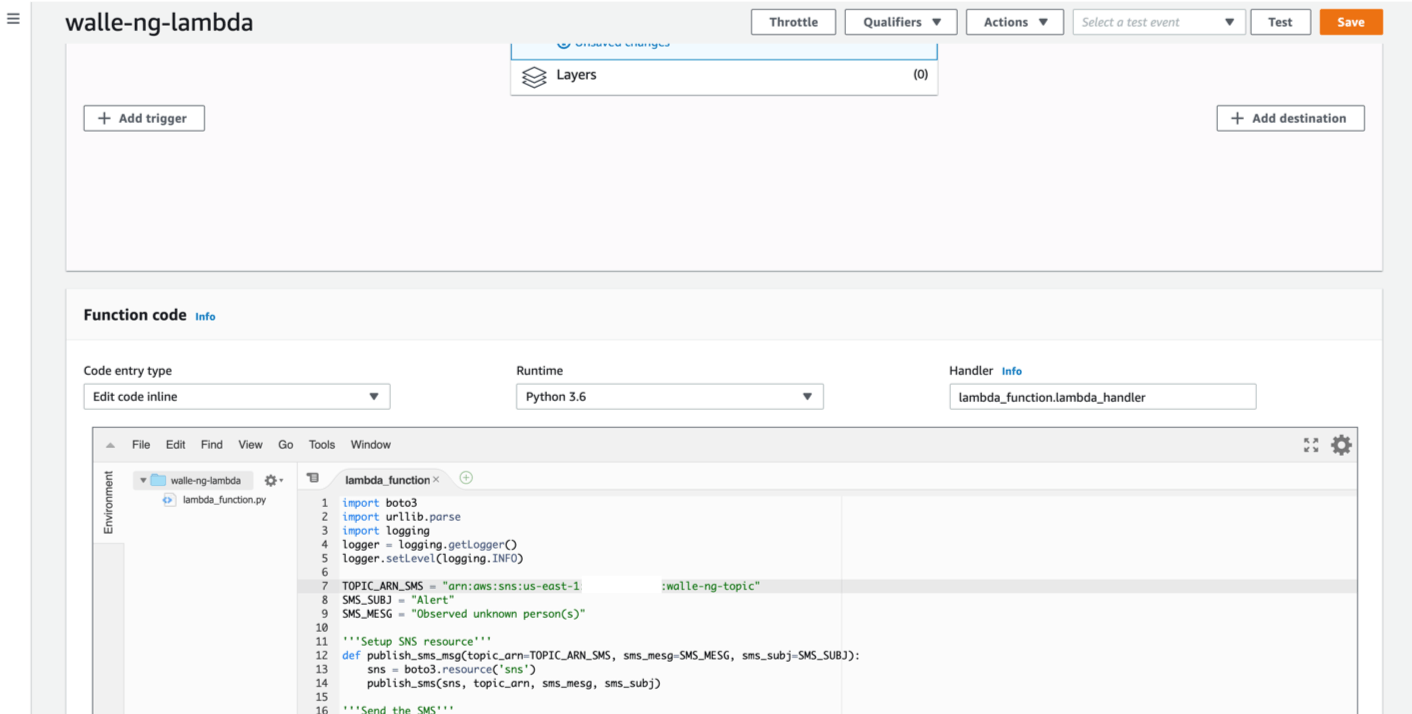
在下一步中,通过执行测试验证是否正确设置了 Lambda 函数。在 Lambda 控制台中执行以下操作:
点击 --> 测试
检查 --> 创建新测试
事件名称 --> SMSTest
将 JSON 替换为以下内容并单击 --> 创建
{
    'httpMethod': 'POST',
    'body': 'message=Observed+test'
}
单击 --> 操作 --> 发布新版本
点击 --> 测试
您应该会收到一条发送到订阅 SNS 主题的电话号码的 SMS 消息。一条成功的消息表示 Lambda 已正确配置以使用 SNS。
AWS API 网关
Amazon API Gateway 是一项完全托管的服务,可让开发人员轻松发布、维护、监控、保护和操作自定义 API。API 网关将被配置为接受包含来自 walle-ng 的消息的 POST 请求。为了向与 API 通信的端点设备增加一层安全性,将生成一个 API 密钥,并将 walle-ng 配置为在每次调用时使用 API。在 AWS 控制台中,转到 API 网关并执行以下操作:
API 网关 --> 创建 API
设置以下内容:
API 名称:walle-ng-api
描述:Walle-ng API
点击-->创建api
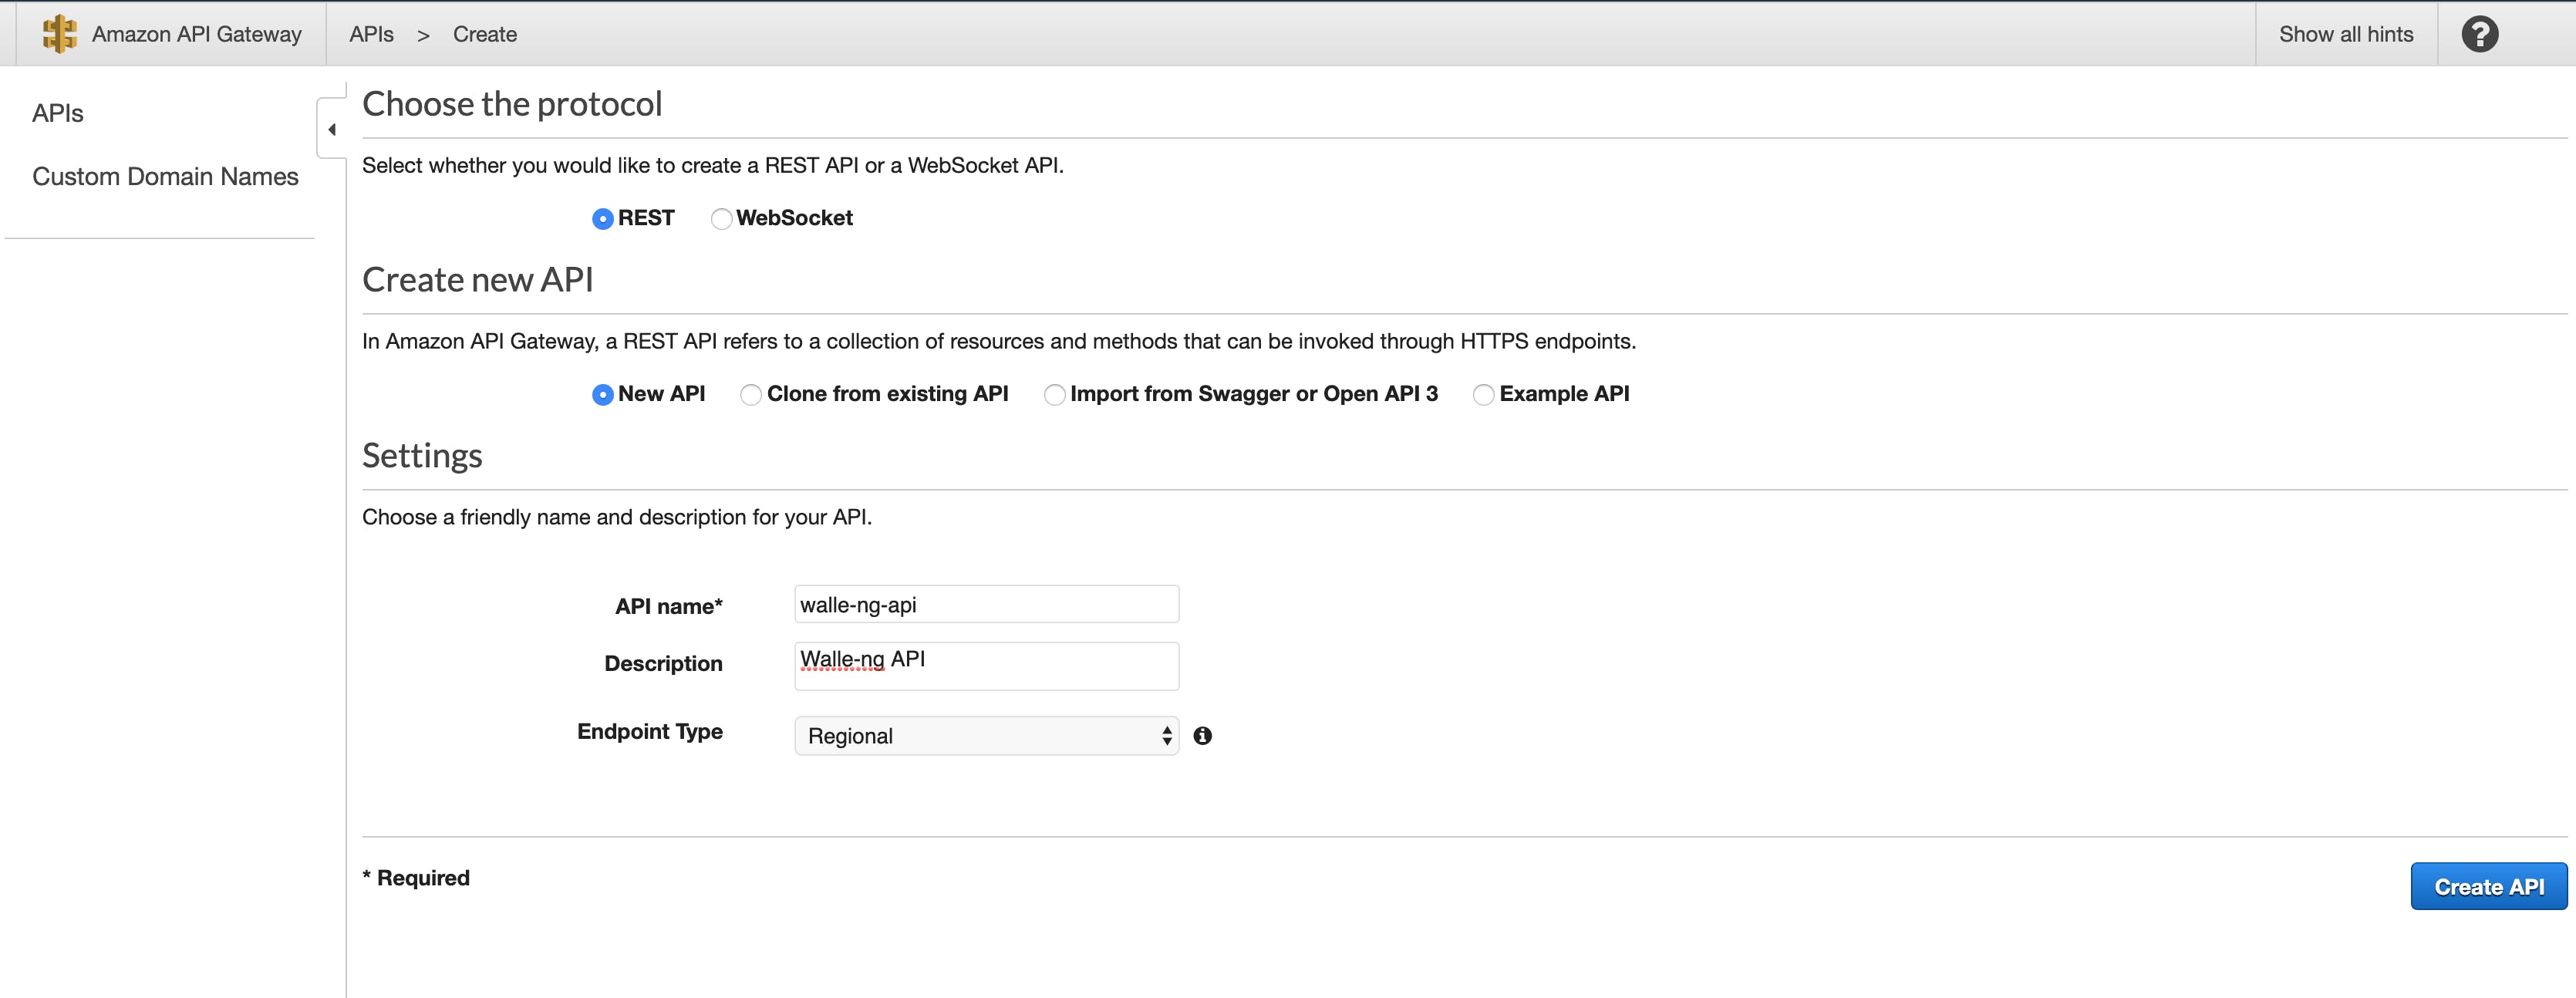
选择 walle-ng-api --> Actions --> Create Resource
设置以下内容:
资源名称:Walle API网关
资源路径:walle-api-gateway
检查 --> 启用 API 网关 CORS
点击 --> 创建资源
单击 --> 操作 --> 创建方法
选择 --> POST(完成后,按下下拉列表旁边的复选标记按钮)
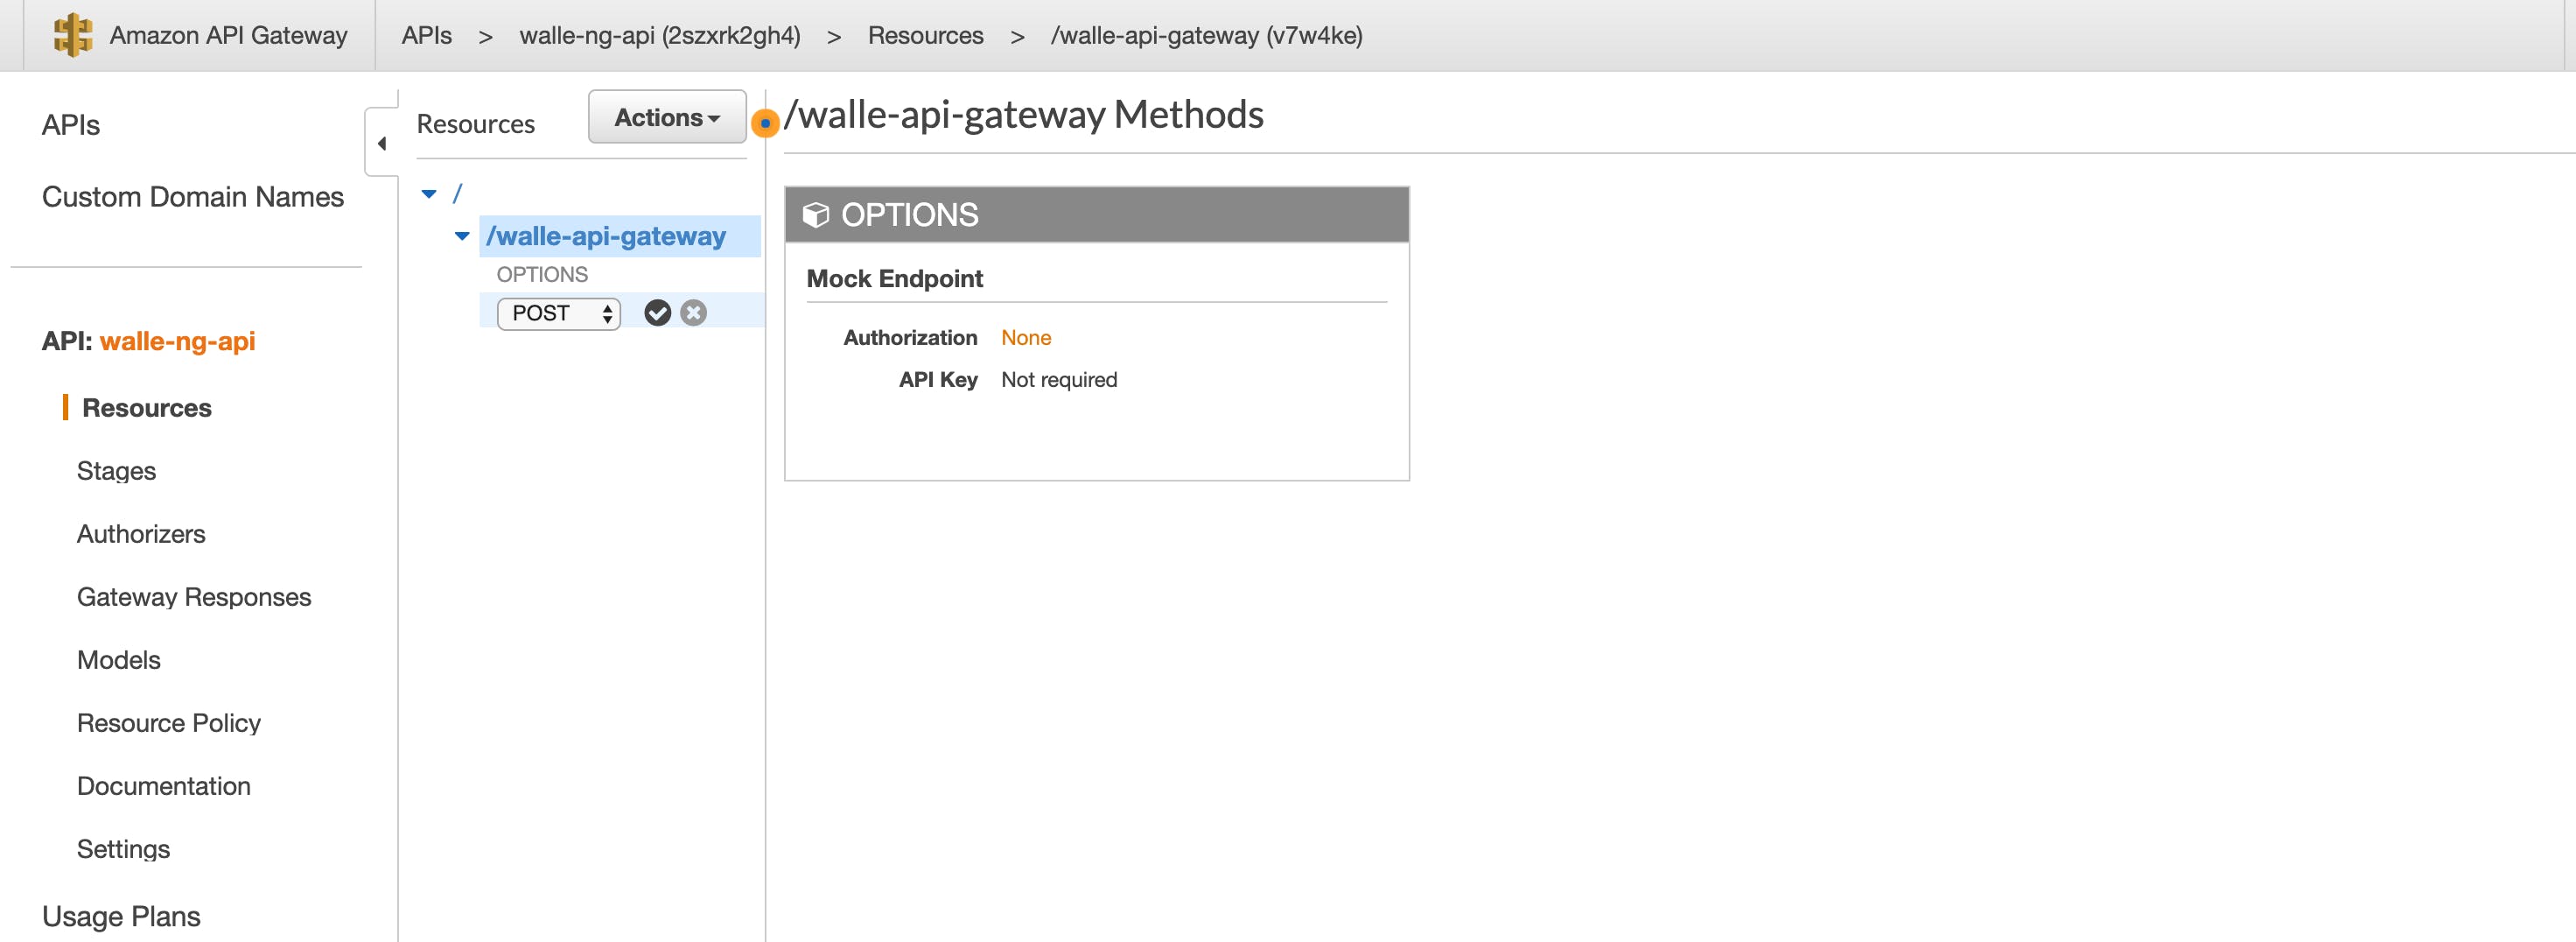
在 POST 设置窗口中,设置以下内容:
集成类型:Lambda
检查 --> 使用 Lambda 代理集成
Lambda 函数:walle-ng-lambda
点击 --> 保存
向 Lambda 函数添加权限单击 --> 确定
在左侧边栏中,选择 API Keys
单击 --> API 密钥 --> 操作 --> 创建 API 密钥
设置以下内容:
名称:walle-api-key
说明:Walle API Key
创建密钥后,选择 api 密钥名称 --> 显示(API 密钥旁边)。记下 API 密钥,以便将来参考。

在左侧边栏中,选择 APIs --> walle-ng-api
设置以下内容:
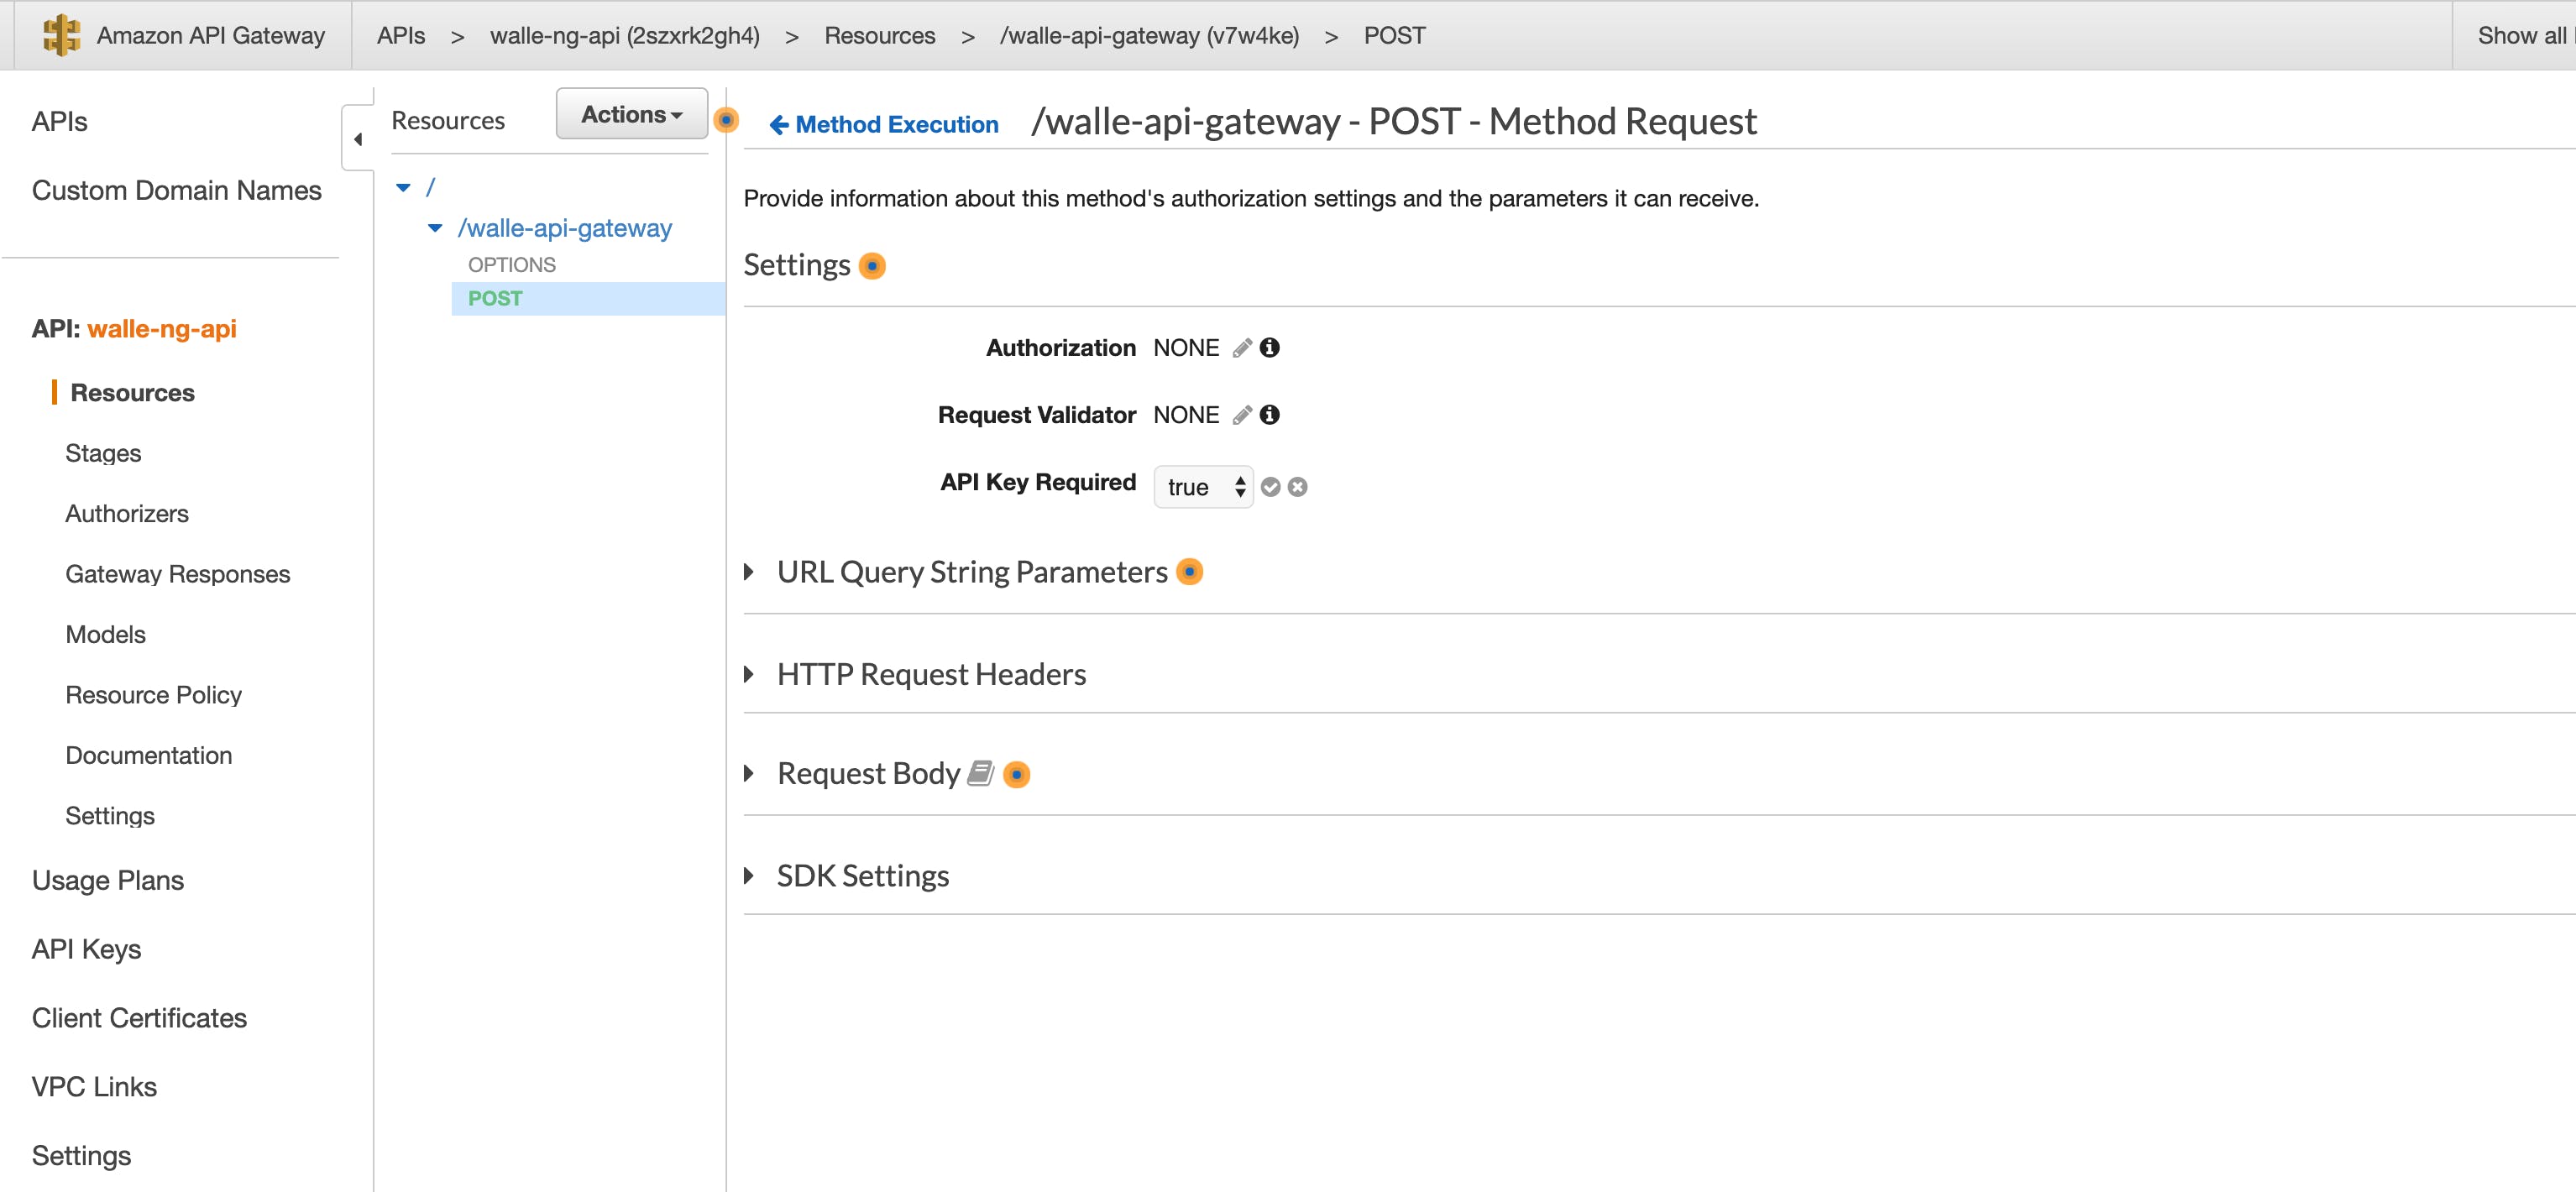
点击 --> POST --> 方法请求
单击 --> 需要 API 密钥 --> True --> 单击复选标记以保存
单击 --> 选项 --> 方法请求
单击 --> 需要 API 密钥 --> True --> 单击复选标记以保存
单击 --> 操作 --> 启用 CORS --> 启用 CORS 并替换现有的 CORS 标头 --> 是,替换现有值
在 Deploy API 中设置以下值:
单击 --> 操作 --> 部署 API
舞台 --> 舞台
阶段名称 --> 产品
单击 --> 部署
记下调用 URL。该值将在 Walle 客户端配置中使用。在此示例中,调用 URL 是https://2szxrk2gh4.execute-api.us-east-1.amazonaws.com/prod。为了生成 POST 请求将发送到的 URL,请添加walle-ng-api到调用 URL 的末尾。此示例的最终 URL 为https://2szxrk2gh4.execute-api.us-east-1.amazonaws.com/prod/walle-ng-api。
在继续 Raspberry Pi 安装部分之前,请确保端点 URL 和 API 密钥区域在记事本中可用。在 walle-ng 安装期间,脚本会询问这些值以使设置更容易。
树莓派安装
此时,目标是成功将 Raspbian OS 刷入 micro SD 卡,启用 SSH,并扩展文件系统。系统运行后,将安装项目依赖项和工具以获得工作的“walle-ng”设备。
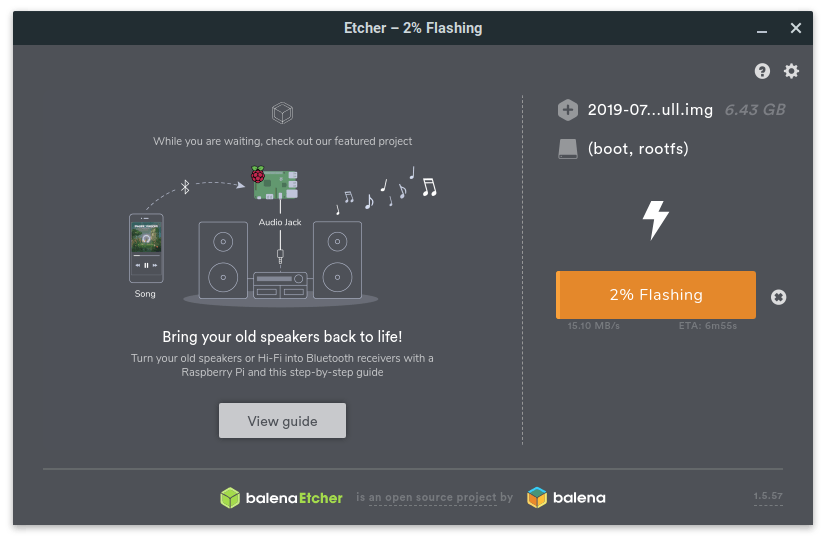
首先将 Raspbian Desktop 下载到您的计算机。使用Unetbootin、BalenaEtcher或Rufus和您的微型 SD 卡创建一个可引导的 USB 驱动器。有关此主题的帮助,请参阅本教程底部的参考部分。
# Alternative download using bash. In a shell, run:
wget https://downloads.raspberrypi.org/raspbian/images/raspbian-2019-09-30/2019-09-26-raspbian-buster.zip
shasum -a 256 2019-09-26-raspbian-buster.zip
unzip 2019-09-26-raspbian-buster.zip
使用 Balena Etcher 将 Raspbian OS 刷入 micro SD 卡的示例:
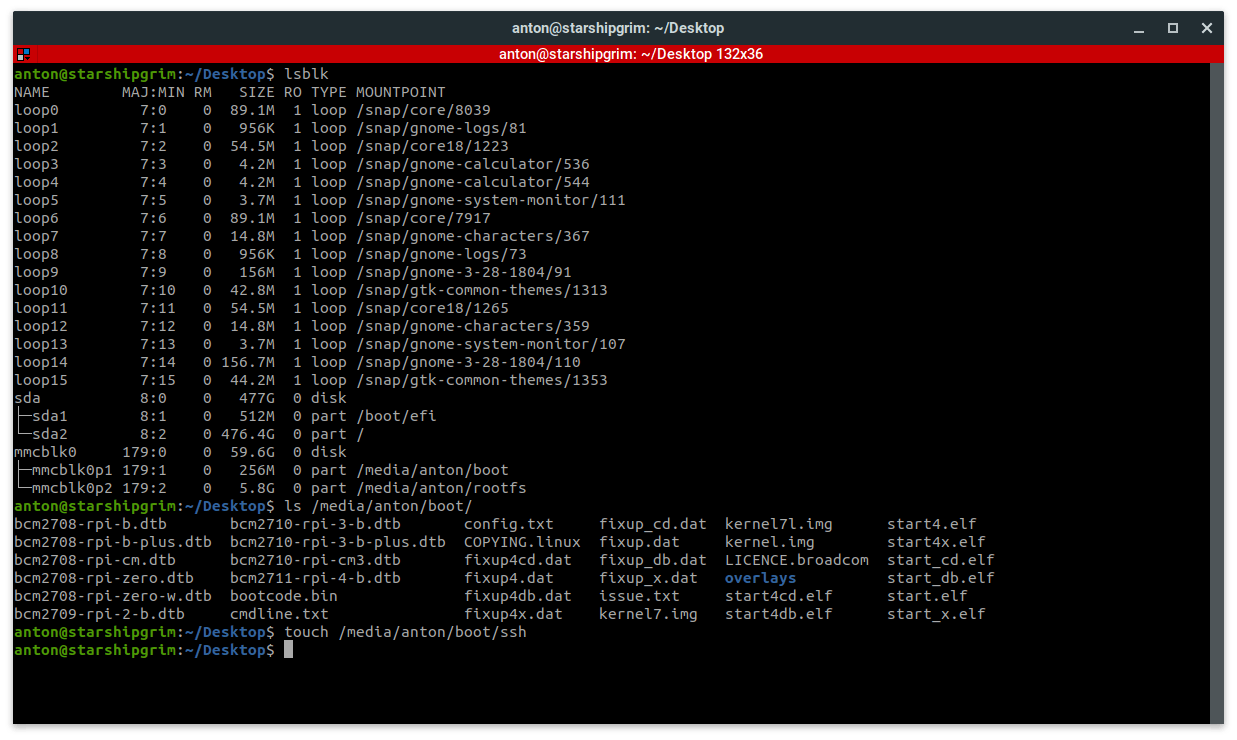
接下来,将 micro SD 卡重新插入计算机,并在启动分区中添加一个名为“ssh”的空文件。在 Linux 中,发出lsblk命令以显示可用的驱动器和安装点。创建空文件的问题。touch /media/anton/boot/ssh注意:此路径会有所不同,因此请修改它以反映主机上安装的 micro SD 卡的路径。创建文件后,卸载可引导驱动器并将微型 SD 卡插入 Raspberry Pi。注意:如果您打算使用键盘、鼠标和外接显示器,则可以跳过此步骤并在登录树莓派时启用 SSH。
# Show partitions (after inserting the micro SD card)
lsblk

# View files in the boot partition
ls -la /media/anton/boot

# Create an empty ssh file in the boot partition and verify
touch /media/anton/boot/ssh
ls -la /media/anton/boot
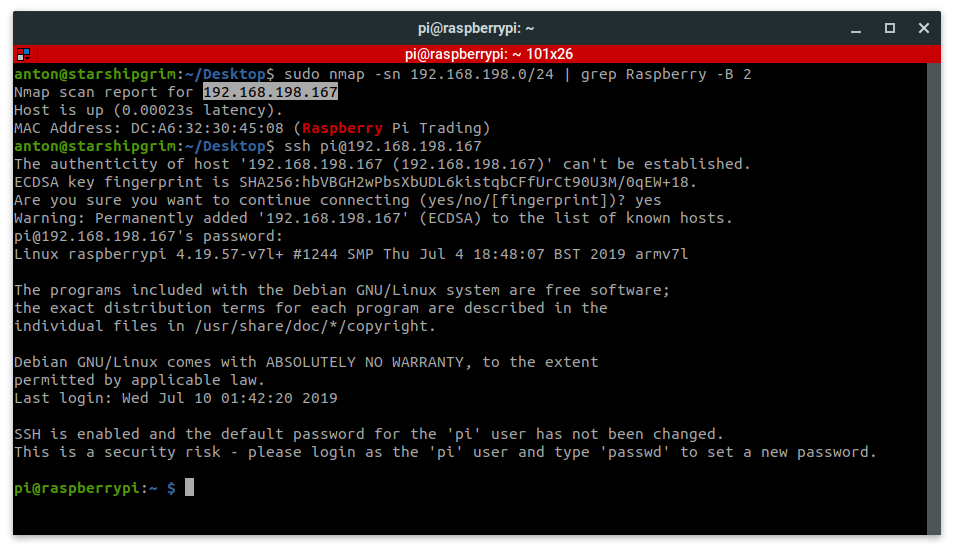
为 Raspberry Pi 通电并通过 SSH,或通过 GUI 登录。如果您需要快速找到本地 LAN 上 Raspberry Pi 的 IP 地址,请使用 Nmap 来定位它。新图像的默认密码是raspberry. 建议更改默认密码以增强树莓派的安全性。
# Locate Pi on the network
sudo nmap -sn 192.168.198.0/24 | grep Raspberry -B 2

# SSH to Pi using the password raspberry
ssh pi@192.168.198.167

# Change the root password
passwd
如何使用 nmap 和 SSH 连接到 Raspberry Pi 的示例:
。
# Open a terminal on the Pi Desktop
cd ~/Walle-ng
python3 walle-ng.py
作为登录 Pi 桌面的替代方法,您可以在主机上使用 SSH 并运行以下命令来查看流:
# SSH to the Pi with the -X option to view the steam on your host machine
ssh -X pi@192.168.198.167
cd ~/Walle-ng
python3 walle-ng.py
定制墙
walle-ng 的所有设置都在config.cfg位于 config 目录的文件中设置。更详细的参数解释如下:
[General]
# Input video device, default is 0
input_video    =0

# Output steam file. This writes the video stream to /tmp and can be read by other applications
output_video   =/tmp/output.mpeg

# Show the video stream in a seperate window on the desktop. Set to False for headless installs.
do_output      =True

# Auto-pause after each frame
do_timelapse   =False

# Crop the input stream to this width
crop_width     =0

# Crop the input stream to this height
crop_height    =0

# Output log file for debugging
log_file       =/home/pi/Walle-ng/walle-ng.log

[Faces]
# Path to headshots for performing face identification
# Images should be in the format of Name-0.jpg, Name-1.png
db_path        =/home/pi/Walle-ng/dataset

# Use Face Detection model to find faces on the face images, otherwise use full images.
do_detector    =False

[Model]
# Face detection model path
model_fd      =/home/pi/Walle-ng/models/face-detection-retail-0005.xml

# Landmark regression model path
model_ld      =/home/pi/Walle-ng/models/landmarks-regression-retail-0009.xml

# Face reidentification model path
model_rd      =/home/pi/Walle-ng/models/face-reidentification-retail-0095.xml

[Inference]
# Inference device, can be [CPU,GPU,FPGA,MYRIAD,HETERO]
# To use Movidius, set to MYRIAD
device_fd      =MYRIAD
device_lm      =MYRIAD
device_rd      =MYRIAD

# Probability threshold for face detections
thresh_fd      =0.6

# Cosine distance threshold between two vectors for face identification
thresh_rd      =0.3

# Scaling ratio for bboxes passed to face recognition
scale_ratio    =1.15

# Show verbose debugging to logs
do_verbose     =False

# Show stats
do_stats       =False

# Allow growing the face database, in addition allow dumping new faces on disk. In that
# case the user will be asked if he wants to add a specific image to the images gallery.
# The user should specify the name for the image in the open window and press `Enter`.
# If it's not, then press `Escape`. The user may add new images for the same person by
# setting the same name in the open window.
do_grow        =False

[AWS]
# AWS API Gateway endpoint URL. This should point to the POST request URL
notify_url     =

# AWS API Gateway API Key
api_key        =

# Enable/Disable notifications, True = Enabled
do_notify      =True
声明:本文内容及配图由入驻作者撰写或者入驻合作网站授权转载。文章观点仅代表作者本人,不代表电子发烧友网立场。文章及其配图仅供工程师学习之用,如有内容侵权或者其他违规问题,请联系本站处理。 举报投诉
- 相关下载
- 相关文章


