
资料下载


教程第4部分:带有OV7670相机模块的TinyML
分享资料个
描述
这是我在 TensorFlow 下与 Google Summer of Code (GSoC) 合作的第二个项目。互联网上没有合适的文档来构建自定义图像识别 TinyML 模型,因此我的 GSoC 导师 Paul Ruiz 建议我尝试解决它。您还可以通过以下方式构建图像识别 TinyML 应用程序。快乐修补!
单击此处查看我的第一个 GSoC 项目!
项目背后的想法:
我想解决一个变量较少的问题,因为有关如何使用相机模块和处理其数据的文档不是很好。我选择构建一个 MNIST TinyML 模型,因为在这种情况下,我不需要担心训练数据集,它可以让我专注于项目的重要部分,以启动和运行项目。但是,既然我已经了解了构建自定义图像识别项目的所有部分,我已经记录了如何使用相机模块收集训练数据集。
博客的主题/基调?
我想警告您,这个博客可能有点难以理解。对此有一个正确的解释:使用基于加速度计的应用程序,只需在串行监视器或绘图仪上打印出一个轴的加速度计值,就可以很容易地进行健全性检查。相比之下,对图像识别应用程序进行健全性检查至少要烦人 10 倍,因为检查一段代码是否正在执行所需的操作无法实时可视化。
一些评论
由于单元测试的复杂性,这篇博客可能有点难以理解。我想通过读者的反馈来解决解释中的任何差距。因此,请在下方评论您对嵌入式系统图像识别相关的任何疑问和问题。
TinyML 有意义吗?
我建议您通读TinyML 书的作者 Pete Warden 撰写的这篇精彩文章,以了解为什么在微控制器上运行机器学习模型是有意义的,并且是机器学习的未来。
即使 TinyML 有意义,图像识别在 TinyML 上有意义吗?
我们将在此处使用的 OV7670 相机输出的完整 VGA(640×480 分辨率)对于当前的 TinyML 应用程序来说太大了。uTensor 通过使用 28×28 图像的 MNIST 运行手写检测。TensorFlow Lite for Microcontrollers 示例中的人员检测示例使用 96×96,这已经足够了。即使是最先进的“Big ML”应用程序也通常只使用 320×320 的图像。总之,在微型微控制器上运行图像识别应用程序非常有意义
本教程简而言之:
- 整合时间!
- 项目的问题/如何改进项目
- 构建您自己的图像识别项目的一些有用建议
- 使用 OV7670 摄像头模块收集训练数据
- 结论

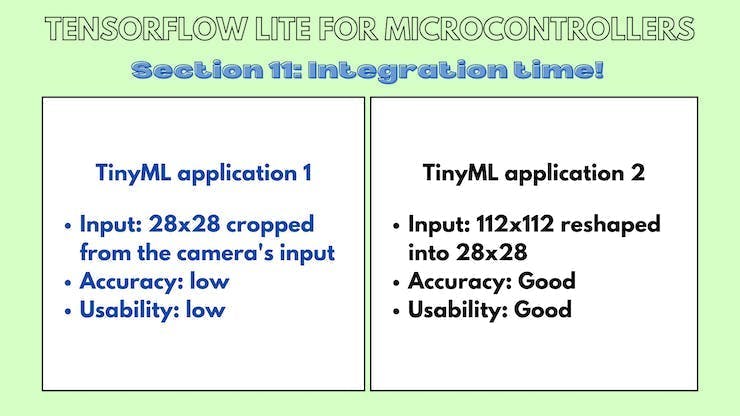
11.积分时间
11.a TinyML 模型:裁剪输入数据
本小节的 Github 链接。
代码解释:
Camera.readFrame(pixels);
这行代码从相机读取一帧并将其存储在像素数组中。
for(int i =0; i<28;i++){
    for(int j =0;j<28;j++){
       pixel = pixels[176*i +j];
      tft.drawPixel(i,j,pixel);
    }
  }
  delay(1000);
这些代码行循环遍历像素数组,从中裁剪出 28x28 图像并将其显示在屏幕上。
for(int i =0; i<28;i++){
    for(int j =0;j<28;j++){
       pixel = pixels[176*i +j];
       red   = ((pixel >> 11) & 0x1f) << 3;
       green = ((pixel >> 5) & 0x3f) << 2;
       blue  = ((pixel >> 0) & 0x1f) << 3;
      grayscale = (red + blue + green)/3 ;
      if(grayscale <128){
        grayscale =0;
      }
     tflInterpreter->input(0)->data.f[28*i+j] = grayscale / 255;
      Serial.println(grayscale);
    }
  }
这些代码行循环遍历像素数组,从中裁剪出 28x28 图像并将其作为输入发送到 TinyML 模型。
素描:
//MPU6050_model.ino
#include
#include "tensorflow/lite/micro/micro_error_reporter.h"
#include "tensorflow/lite/micro/micro_interpreter.h"
#include "tensorflow/lite/micro/micro_mutable_op_resolver.h"
#include "tensorflow/lite/schema/schema_generated.h"
#include "tensorflow/lite/version.h"
#include "model.h"
#include     // Core graphics library
#include  // Hardware-specific library for ST7735
#include
#include

const tflite::Model*  tflModel = nullptr;
tflite::ErrorReporter*  tflErrorReporter = nullptr;
TfLiteTensor* tflInputTensor = nullptr;
TfLiteTensor* tflOutputTensor = nullptr;
tflite::MicroInterpreter* tflInterpreter = nullptr;

#define TFT_CS        A7
#define TFT_RST        7 // Or set to -1 and connect to Arduino RESET pin
#define TFT_DC         A6

constexpr int tensorArenaSize = 140 * 1024;
uint8_t tensorArena[tensorArenaSize];
float out[10];

uint16_t pixels[176*144];
uint16_t color, pixel;
uint8_t red, blue, green;
float grayscale;

Adafruit_ST7735 tft = Adafruit_ST7735(TFT_CS, TFT_DC, TFT_RST);

void setup() {

  Serial.begin(115200);
  while (!Serial)
    delay(10);

  tft.initR(INITR_BLACKTAB);
  delay(100);
   if (!Camera.begin(QCIF, RGB565, 1)) {
    Serial.println("Failed to initialize camera!");
    while (1);
  }
  Serial.println(F("Initialized"));

  static tflite::MicroErrorReporter micro_error_reporter;
  tflErrorReporter = µ_error_reporter;

   tflModel = tflite::GetModel(model);
   if (tflModel->version() != TFLITE_SCHEMA_VERSION) {
   TF_LITE_REPORT_ERROR(tflErrorReporter,
        "Model provided is schema version %d not equal "
        "to supported version %d.",
        tflModel->version(), TFLITE_SCHEMA_VERSION);
    return;
  }

  static tflite::MicroMutableOpResolver<6> micro_op_resolver;
  micro_op_resolver.AddMaxPool2D();
  micro_op_resolver.AddConv2D();
  micro_op_resolver.AddDepthwiseConv2D();
  micro_op_resolver.AddFullyConnected();
  micro_op_resolver.AddReshape();
  micro_op_resolver.AddSoftmax();

  static tflite::MicroInterpreter static_interpreter(tflModel, micro_op_resolver, tensorArena, tensorArenaSize, tflErrorReporter);
  tflInterpreter = &static_interpreter;

  TfLiteStatus allocate_status = tflInterpreter->AllocateTensors();
  if (allocate_status != kTfLiteOk) {
    TF_LITE_REPORT_ERROR(tflErrorReporter, "AllocateTensors() failed");
    return;
  }
  tflInputTensor = tflInterpreter->input(0);

  tft.fillScreen(ST77XX_BLACK);
  delay(100);

  tft.fillScreen(ST77XX_BLACK);


}

void loop() {
  Camera.readFrame(pixels);

  for(int i =0; i<28;i++){
    for(int j =0;j<28;j++){
       pixel = pixels[176*i +j];
      tft.drawPixel(i,j,pixel);
    }
  }
  delay(1000);
  for(int i =0; i<28;i++){
    for(int j =0;j<28;j++){
       pixel = pixels[176*i +j];
       red   = ((pixel >> 11) & 0x1f) << 3;
       green = ((pixel >> 5) & 0x3f) << 2;
       blue  = ((pixel >> 0) & 0x1f) << 3;
      grayscale = (red + blue + green)/3 ;
      if(grayscale <128){
        grayscale =0;
      }
     tflInterpreter->input(0)->data.f[28*i+j] = grayscale / 255;
      Serial.println(grayscale);
    }
  }

  delay(1000);
  TfLiteStatus invokeStatus = tflInterpreter->Invoke();
  out[0] = tflInterpreter->output(0)->data.f[0];
  out[1] = tflInterpreter->output(0)->data.f[1];
  out[2] = tflInterpreter->output(0)->data.f[2];
  out[3] = tflInterpreter->output(0)->data.f[3];
  out[4] = tflInterpreter->output(0)->data.f[4];
  out[5] = tflInterpreter->output(0)->data.f[5];
  out[6] = tflInterpreter->output(0)->data.f[6];
  out[7] = tflInterpreter->output(0)->data.f[7];
  out[8] = tflInterpreter->output(0)->data.f[8];
  out[9] = tflInterpreter->output(0)->data.f[9];

    float maxVal = out[0];
  int maxIndex = 0;
  for(int k =0; k < 10;k++){
    if (out[k] > maxVal) {
         maxVal = out[k];
         maxIndex = k;
      }
  }
  Serial.print("Number ");
  Serial.print(maxIndex);
  Serial.println(" detected");
  Serial.print("Confidence: ");
  Serial.println(maxVal);

}
11.b TinyML 模型:重塑输入数据
本小节的 Github 链接。
代码解释:
Camera.readFrame(pixels);
这行代码从相机读取一帧并将其存储在像素数组中。
for(int i =0; i<112;i++){
    for(int j =0;j<112;j++){

      tft.drawPixel(i,j,pixels[176*i+j]);
      Serial.print("");
    }
  }
这些代码行循环遍历像素数组,从中裁剪出 112x112 图像并将其显示在屏幕上。
Serial.println("");
  for(int i =0; i< 28; i++)
   {
    for(int j =0; j < 28; j++)
    {
       int sum =0;
       for(int k =0; k<4;k++)
       {
        for(int l =0; l<4; l++)
        {
          sum += pixels[4*(176*i+j) + 176 * k + l];
        }
       }
      sum = sum /16;
      //arr1[i*28+j] = sum;
      tflInterpreter->input(0)->data.f[28*i+j] = float(sum / 255.0);
      Serial.print(sum);
      Serial.print(", ");
    }
    Serial.println("");
 }
这些代码行通过像素数组循环裁剪 112x112 图像,将其重新整形为 28x28 图像,并将其发送到 TinyML 模型。
素描:
//MPU6050_model.ino
#include
#include "tensorflow/lite/micro/micro_error_reporter.h"
#include "tensorflow/lite/micro/micro_interpreter.h"
#include "tensorflow/lite/micro/micro_mutable_op_resolver.h"
#include "tensorflow/lite/schema/schema_generated.h"
#include "tensorflow/lite/version.h"
#include "model.h"
#include     // Core graphics library
#include  // Hardware-specific library for ST7735
#include
#include

const tflite::Model*  tflModel = nullptr;
tflite::ErrorReporter*  tflErrorReporter = nullptr;
TfLiteTensor* tflInputTensor = nullptr;
TfLiteTensor* tflOutputTensor = nullptr;
tflite::MicroInterpreter* tflInterpreter = nullptr;

#define TFT_CS        A7
#define TFT_RST        7 // Or set to -1 and connect to Arduino RESET pin
#define TFT_DC         A6

constexpr int tensorArenaSize = 140 * 1024;
uint8_t tensorArena[tensorArenaSize];
float out[10];

uint16_t pixels[176*144];
uint16_t color, pixel;
uint8_t red, blue, green;
int grayscale;

Adafruit_ST7735 tft = Adafruit_ST7735(TFT_CS, TFT_DC, TFT_RST);

void setup() {

  Serial.begin(9600);
  while (!Serial)
    delay(10);

  tft.initR(INITR_BLACKTAB);
  delay(1000);
   if (!Camera.begin(QCIF, RGB565, 1)) {
    Serial.println("Failed to initialize camera!");
    while (1);
  }
  Serial.println(F("Initialized"));

  static tflite::MicroErrorReporter micro_error_reporter;
  tflErrorReporter = µ_error_reporter;

   tflModel = tflite::GetModel(model);
   if (tflModel->version() != TFLITE_SCHEMA_VERSION) {
   TF_LITE_REPORT_ERROR(tflErrorReporter,
        "Model provided is schema version %d not equal "
        "to supported version %d.",
        tflModel->version(), TFLITE_SCHEMA_VERSION);
    return;
  }

  static tflite::MicroMutableOpResolver<6> micro_op_resolver;
  micro_op_resolver.AddMaxPool2D();
  micro_op_resolver.AddConv2D();
  micro_op_resolver.AddDepthwiseConv2D();
  micro_op_resolver.AddFullyConnected();
  micro_op_resolver.AddReshape();
  micro_op_resolver.AddSoftmax();

  static tflite::MicroInterpreter static_interpreter(tflModel, micro_op_resolver, tensorArena, tensorArenaSize, tflErrorReporter);
  tflInterpreter = &static_interpreter;

  TfLiteStatus allocate_status = tflInterpreter->AllocateTensors();
  if (allocate_status != kTfLiteOk) {
    TF_LITE_REPORT_ERROR(tflErrorReporter, "AllocateTensors() failed");
    return;
  }
  tflInputTensor = tflInterpreter->input(0);

  tft.fillScreen(ST77XX_BLACK);
  delay(100);


}

void loop() {
  Camera.readFrame(pixels);
  tft.fillScreen(ST77XX_BLACK);
  for(int i =0; i<112;i++){
    for(int j =0;j<112;j++){

      tft.drawPixel(i,j,pixels[176*i+j]);
      Serial.print("");
    }
  }
 // delay(1000);
  for(int i =0; i<112;i++){
    for(int j =0;j<112;j++){
       pixel = pixels[176*i +j];
       red   = ((pixel >> 11) & 0x1f) << 3;
       green = ((pixel >> 5) & 0x3f) << 2;
       blue  = ((pixel >> 0) & 0x1f) << 3;
      grayscale = (red + blue + green)/3 ;
      if(grayscale <160){
        grayscale =0;
      }
      pixels[176*i +j] = grayscale;

     //tflInterpreter->input(0)->data.f[28*i+j] = grayscale / 255;
    }
    }

  Serial.println("");
  for(int i =0; i< 28; i++)
   {
    for(int j =0; j < 28; j++)
    {
       int sum =0;
       for(int k =0; k<4;k++)
       {
        for(int l =0; l<4; l++)
        {
          sum += pixels[4*(176*i+j) + 176 * k + l];
        }
       }
      sum = sum /16;
      //arr1[i*28+j] = sum;
      tflInterpreter->input(0)->data.f[28*i+j] = float(sum / 255.0);
      Serial.print(sum);
      Serial.print(", ");
    }
    Serial.println("");
   }

  delay(1000);
  TfLiteStatus invokeStatus = tflInterpreter->Invoke();
  out[0] = tflInterpreter->output(0)->data.f[0];
  out[1] = tflInterpreter->output(0)->data.f[1];
  out[2] = tflInterpreter->output(0)->data.f[2];
  out[3] = tflInterpreter->output(0)->data.f[3];
  out[4] = tflInterpreter->output(0)->data.f[4];
  out[5] = tflInterpreter->output(0)->data.f[5];
  out[6] = tflInterpreter->output(0)->data.f[6];
  out[7] = tflInterpreter->output(0)->data.f[7];
  out[8] = tflInterpreter->output(0)->data.f[8];
  out[9] = tflInterpreter->output(0)->data.f[9];

    float maxVal = out[0];
  int maxIndex = 0;
  for(int k =0; k < 10;k++){
    if (out[k] > maxVal) {
         maxVal = out[k];
         maxIndex = k;
      }
  }
  Serial.print("Number ");
  Serial.print(maxIndex);
  Serial.println(" detected");
  Serial.print("Confidence: ");
  Serial.println(maxVal);

}
12.项目存在的问题/如何改进项目
12.a LCD显示的色彩空间与ov7670不匹配
当显示来自相机实时馈送的图像时,会弹出各种颜色渐变,我不完全确定为什么会发生这种情况,但我猜测这是由于转换之间的颜色空间信息丢失所致。

12.b LCD 在打印每个像素后刷新
我使用的方法基本上是逐像素打印。Adafruit_st7735 的问题在于它会在打印像素后自动发送缓冲区。我认为在库中注释掉发送缓冲区的代码行是一个简单的修复。
12.c相机指向哪里
构建此示例时的主要痛点之一是试图找出相机指向的位置。如果一块小的 3D 打印矩形塑料片可以帮助大致观察相机所注视的位置,这将在收集训练数据和测试应用程序时大有帮助。


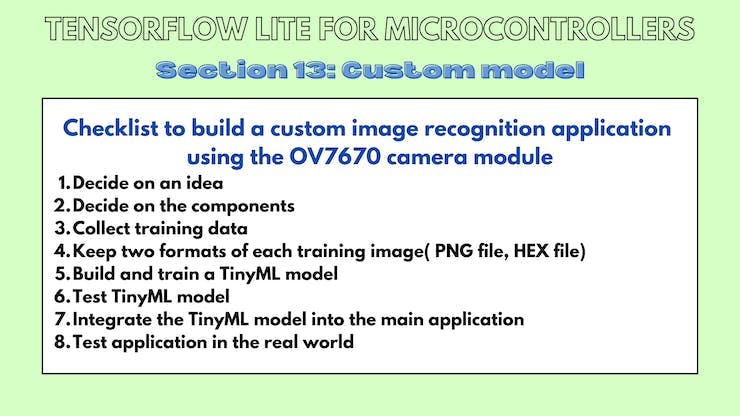
13. 构建您自己的图像识别项目的一些有用建议
为什么是这个部分?
您可能已经对构建此应用程序的数千个步骤和弯路感到困惑,因此这里列出了可简化构建下一个图像识别应用程序的事项。
- 决定一个想法
- 决定组件
- 收集训练数据
- 每个训练图像保留两种格式(PNG文件,HEX文件)
- 构建和训练 TinyML 模型
- 测试 TinyML 模型
- 将 TinyML 模型集成到主应用程序中
- 在现实世界中测试应用程序
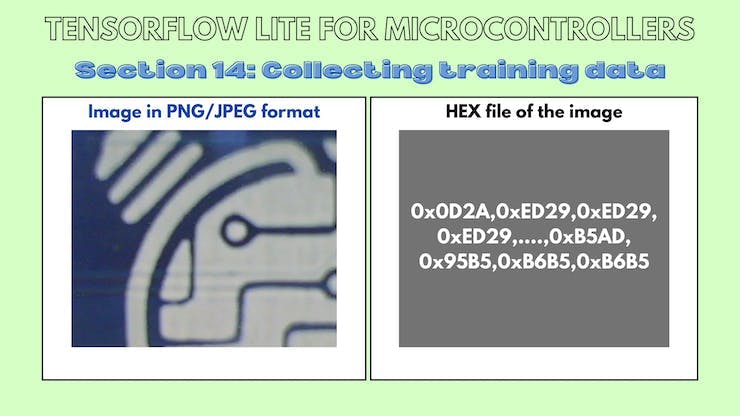
14.使用OV7670摄像头模块采集训练数据
14.a 草图
此草图从相机读取帧并在串行监视器上输出 RGB565 值。
/*
  OV767X - Camera Test Pattern

  This sketch waits for the letter 'c' on the Serial Monitor,
  it then reads a frame from the OmniVision OV7670 camera and
  prints the data to the Serial Monitor as a hex string.

  The website https://rawpixels.net - can be used the visualize the data:
    width: 176
    height: 144
    RGB565
    Little Endian

  Circuit:
    - Arduino Nano 33 BLE board
    - OV7670 camera module:
      - 3.3 connected to 3.3
      - GND connected GND
      - SIOC connected to A5
      - SIOD connected to A4
      - VSYNC connected to 8
      - HREF connected to A1
      - PCLK connected to A0
      - XCLK connected to 9
      - D7 connected to 4
      - D6 connected to 6
      - D5 connected to 5
      - D4 connected to 3
      - D3 connected to 2
      - D2 connected to 0 / RX
      - D1 connected to 1 / TX
      - D0 connected to 10

  This example code is in the public domain.
*/

#include

unsigned short pixels[176 * 144]; // QCIF: 176x144 X 2 bytes per pixel (RGB565)

void setup() {
  Serial.begin(9600);
  while (!Serial);

  Serial.println("OV767X Camera Capture");
  Serial.println();

  if (!Camera.begin(QCIF, RGB565, 1)) {
    Serial.println("Failed to initialize camera!");
    while (1);
  }

  Serial.println("Camera settings:");
  Serial.print("\twidth = ");
  Serial.println(Camera.width());
  Serial.print("\theight = ");
  Serial.println(Camera.height());
  Serial.print("\tbits per pixel = ");
  Serial.println(Camera.bitsPerPixel());
  Serial.println();

  Serial.println("Send the 'c' character to read a frame ...");
  Serial.println();
}

void loop() {
  if (Serial.read() == 'c') {
    Serial.println("Reading frame");
    Serial.println();
    Camera.readFrame(pixels);

    int numPixels = Camera.width() * Camera.height();

    for (int i = 0; i < numPixels; i++) {
        unsigned short p = pixels[i];
        if (p < 0x1000) {
          Serial.print('0');
        }
        if (p < 0x0100) {
         Serial.print('0');
        }
        if (p < 0x0010) {
          Serial.print('0');
        }
        Serial.print(p, HEX);
      }
  }
}
15.结论
我感谢我的 GSoC 导师 Paul Ruiz,他在整个项目中指导我!
声明:本文内容及配图由入驻作者撰写或者入驻合作网站授权转载。文章观点仅代表作者本人,不代表电子发烧友网立场。文章及其配图仅供工程师学习之用,如有内容侵权或者其他违规问题,请联系本站处理。 举报投诉
- 相关下载
- 相关文章


