资料下载

×
创建小型模型监测和抽水系统
消耗积分:0 |
格式:zip |
大小:0.10 MB |
2023-02-10
描述
介绍
农业和粮食生产是社会的一个主要方面,日常生活直接受到它的影响。我们正在寻求创建一个小型模型监测和抽水系统,以帮助维持家庭种植的植物的水位。未来的补充可以是大气水和温度监测。该项目旨在通过仔细平衡植物内的水位以确保不会因浇水过多或浇水不足而造成作物损失,至少是在小范围内解决作物损失问题。
流程/步骤
第 1 步:创建电路
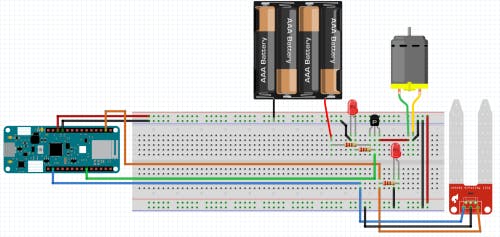
按照链接的 Fritzing 图或面包板图像将电路放在一起。

1 / 2 •设备面包板接线示意图
第 2 步:云交互
在 IoT Cloud 上创建东西以设置用于云连接的仪表板

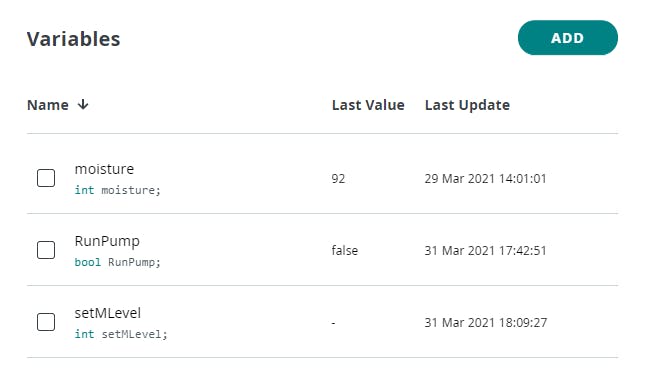
1 / 2 •变量列表
首先在 Arduino IoT Cloud 上创建“事物”。然后创建你的三个变量;给出了信息。查看仪表板图像以查看变量是“只读”还是“读/写”。最后创建仪表板并将变量链接到适当的小部件。
第 3 步:代码 [.ino]
将以下代码复制到 Arduino IDE 中...
/*
 Sketch generated by the Arduino IoT Cloud Thing "AutoGarden"
 https://create.arduino.cc/cloud/things/36881e31-0b15-4ae9-ad3d-c0bee1f0ea06
 Arduino IoT Cloud Variables description
 The following variables are automatically generated and updated when changes are made to the Thing
 int moisture;
 bool RunPump;
 Variables which are marked as READ/WRITE in the Cloud Thing will also have functions
 which are called when their values are changed from the Dashboard.
 These functions are generated with the Thing and added at the end of this sketch.
*/
#include "thingProperties.h"
#define PumpRunner 0 // set the pin for the pump
int val = 0; // returned value from soil moisture sensor
int soilPin = A0; // pin for reading from the soil moisture sensor
int soilPower = 7; // pin for powering the the soil moisture sensor.
int setMLevel;
void setup() {
 // Initialize serial and wait for port to open:
 Serial.begin(9600);
 // This delay gives the chance to wait for a Serial Monitor without blocking if none is found
 delay(1500);
 // Defined in thingProperties.h
 initProperties();
 // Connect to Arduino IoT Cloud
 ArduinoCloud.begin(ArduinoIoTPreferredConnection);
 /*
    The following function allows you to obtain more information
    related to the state of network and IoT Cloud connection and errors
    the higher number the more granular information you’ll get.
    The default is 0 (only errors).
    Maximum is 4
*/
 setDebugMessageLevel(2);
 ArduinoCloud.printDebugInfo();
 pinMode(PumpRunner, OUTPUT);
 pinMode(soilPower, OUTPUT);
 digitalWrite(soilPower, LOW);
}
void loop() {
 ArduinoCloud.update();
 // Your code here
 moisture = readSoil();
 moisture = map(moisture, 0, 700, 0, 100);
 Serial.println(moisture);
 digitalWrite(PumpRunner, LOW);
 delay(1000);
 if(moisture <= setMLevel && moisture >= 10){
   RunPump = true;
 }
 if(RunPump){
   digitalWrite(PumpRunner, HIGH);
   delay(1000); // pump takes a second or two to start up
   digitalWrite(PumpRunner, LOW);
   delay(1000); // one second delay so water can settle
   RunPump = false;
 }
 delay(1000);// remaining delay, go to value minus 3010
}
int readSoil(){
 digitalWrite(soilPower, HIGH);
 delay(10);
 val = analogRead(soilPin);
 digitalWrite(soilPower, LOW);
 return val;
}
第 4 步:属性代码
// Code generated by Arduino IoT Cloud, DO NOT EDIT.
#include <ArduinoIoTCloud.h>
#include <Arduino_ConnectionHandler.h>
const char THING_ID[] = "36881e31-0b15-4ae9-ad3d-c0bee1f0ea06";
const char SSID[]     = SECRET_SSID;    // Network SSID (name)
const char PASS[]     = SECRET_PASS;    // Network password (use for WPA, or use as key for WEP)
void onSetMLevelChange();
void onRunPumpChange();
int moisture;
int setMLevel;
bool RunPump;
void initProperties(){
 ArduinoCloud.setThingId(THING_ID);
 ArduinoCloud.addProperty(moisture, READ, ON_CHANGE, NULL);
 ArduinoCloud.addProperty(setMLevel, READWRITE, ON_CHANGE, onSetMLevelChange);
 ArduinoCloud.addProperty(RunPump, READWRITE, ON_CHANGE, onRunPumpChange);
}
WiFiConnectionHandler ArduinoIoTPreferredConnection(SSID, PASS);
第 5 步:设置 Internet 连接
在 Arduino 编辑器的“秘密”选项卡中,设置您的无线网络 ID 和密码。测试并确保您的设备正确连接到云。
风险
运行这个项目有几个风险。
- 短路的可能性:该项目中用水会造成危险,因此可能会以“试运行”的形式进行测试。
- 项目结果可能无法准确工作,因为传感器读数可能不一致或结果解释不准确。
声明:本文内容及配图由入驻作者撰写或者入驻合作网站授权转载。文章观点仅代表作者本人,不代表电子发烧友网立场。文章及其配图仅供工程师学习之用,如有内容侵权或者其他违规问题,请联系本站处理。 举报投诉
评论(0)
发评论
- 相关下载
- 相关文章


