
资料下载

在连接到STM32的LCD屏幕上显示BLE传感器读数
描述
此蓝牙 LE 项目的目的是读取空气质量传感器数据并将其显示在连接到 STM32 板的 LCD 显示器上。Web 浏览器将读取传感器数据并使用 BleuIO 将其传递给 STM32 板。
一、简介
该项目基于STM32 Nucleo-144 ,它使用 BleuIO控制LCD 显示。
对于这个项目,我们需要两个 BleuIO USB 加密狗,一个连接到 Nucleo 板,另一个连接到运行 Web 脚本的计算机和HibouAir – 空气质量监测设备。当 BleuIO Dongle 连接到 Nucleo 板的 USB 端口时,STM32 将识别它并直接开始广播。这允许计算机端口上的加密狗与网络脚本连接。
通过电脑上的网页脚本,我们可以从 HibouAir 扫描并获取空气质量传感器数据。然后我们将这些数据发送到使用蓝牙连接到 STM32 的 LCD 屏幕上。
在本示例中,我们使用了 STM32 Nucleo-144 开发板和 STM32H743ZI MCU(支持 STM32H743ZI micro mbed 的开发 Nucleo-144 系列 ARM® Cortex®-M7 MCU 32 位嵌入式评估板)。该开发板有一个 USB 主机,用于连接 BleuIO 加密狗。
如果要使用其他设置,则必须确保它支持 USB 主机,并注意 GPIO 设置可能不同,可能需要在 .ioc 文件中重新配置。
关于守则
项目源代码可在 Github 上获得。
https://github.com/smart-sensor-devices-ab/stm32_ble_sensor_lcd.git
克隆项目,或将其下载为 zip 文件并解压缩到您的 STM32CubeIDE 工作区。
如果您将项目下载为 zip 文件,则需要将项目文件夹从“stm32_bleuio_lcd-master”重命名为“stm32_bleuio_lcd”
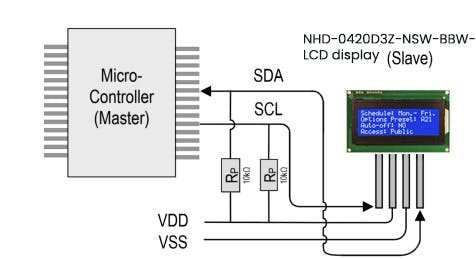
将 SDA 连接到 Nucleo 板上的 PF0,将 SCL 连接到 PF1。
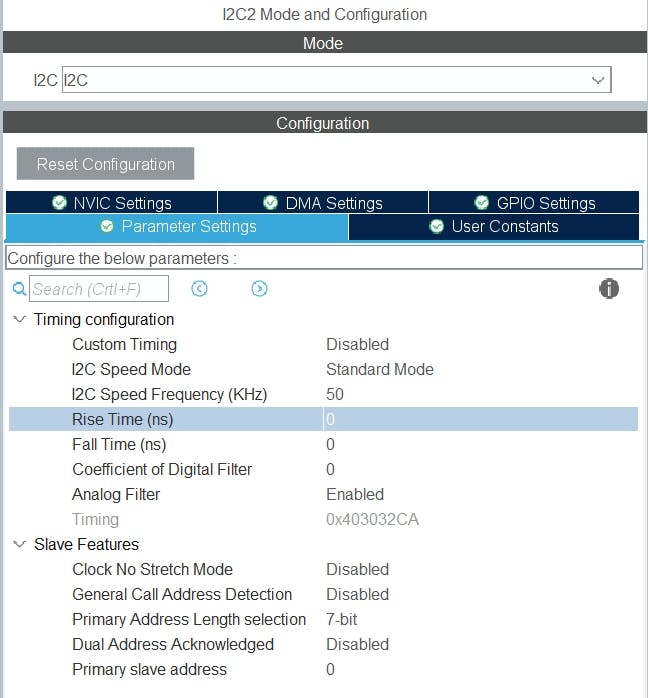
然后在 STM32Cube ioc 文件中设置 I2C2,如下所示。(确保根据 LCD 显示要求将 I2C 速度频率更改为 50 KHz。)


在 USB_HOST\usb_host.c 中的 USBH_CDC_ReceiveCallback 函数中,我们将 CDC_RX_Buffer 复制到一个名为 dongle_response 的外部变量中,该变量可从 main.c 文件访问。
void USBH_CDC_ReceiveCallback(USBH_HandleTypeDef * phost) {
  if (phost == & hUsbHostFS) {
    // Handles the data recived from the USB CDC host, here just printing it out to UART
    rx_size = USBH_CDC_GetLastReceivedDataSize(phost);
    HAL_UART_Transmit( & huart3, CDC_RX_Buffer, rx_size, HAL_MAX_DELAY);

    // Copy buffer to external dongle_response buffer
    strcpy((char * ) dongle_response, (char * ) CDC_RX_Buffer);

    // Reset buffer and restart the callback function to receive more data
    memset(CDC_RX_Buffer, 0, RX_BUFF_SIZE);
    USBH_CDC_Receive(phost, CDC_RX_Buffer, RX_BUFF_SIZE);
  }

  return;
}
在 main.c 中,我们创建了一个简单的解释器,这样我们就可以对从加密狗收到的数据做出反应。
void dongle_interpreter(uint8_t * input) {

  if (strlen((char * ) input) != 0) {
    if (strstr((char * ) input, "\r\nADVERTISING...") != NULL) {
      isAdvertising = true;
    }
    if (strstr((char * ) input, "\r\nADVERTISING STOPPED") != NULL) {
      isAdvertising = false;
    }
    if (strstr((char * ) input, "\r\nCONNECTED") != NULL) {
      isConnected = true;
      HAL_GPIO_WritePin(GPIOE, GPIO_PIN_1, GPIO_PIN_SET);
    }
    if (strstr((char * ) input, "\r\nDISCONNECTED") != NULL) {
      isConnected = false;
      HAL_GPIO_WritePin(GPIOE, GPIO_PIN_1, GPIO_PIN_RESET);
    }

    if (strstr((char * ) input, "L=0") != NULL) {

      isLightBulbOn = false;
      //HAL_GPIO_WritePin(Lightbulb_GPIO_Port, Lightbulb_Pin, GPIO_PIN_RESET);
      lcd_clear();

      writeToDongle((uint8_t * ) DONGLE_SEND_LIGHT_OFF);

      uart_buf_len = sprintf(uart_tx_buf, "\r\nClear screen\r\n");
      HAL_UART_Transmit( & huart3, (uint8_t * ) uart_tx_buf, uart_buf_len, HAL_MAX_DELAY);
    }

    if (strstr((char * ) input, "L=1") != NULL) {
      isLightBulbOn = true;
      writeToDongle((uint8_t * ) DONGLE_SEND_LIGHT_ON);

      lcd_clear();

      lcd_write(input);

    }

  }
  memset( & dongle_response, 0, RSP_SIZE);
}
我们将解释器函数放在主循环中。
/* Infinite loop */
/* USER CODE BEGIN WHILE */
while (1) {
  /* USER CODE END WHILE */
  MX_USB_HOST_Process();

  /* USER CODE BEGIN 3 */
  // Simple handler for uart input
  handleUartInput(uartStatus);

  // Inteprets the dongle data
  dongle_interpreter(dongle_response);

  // Starts advertising as soon as the Dongle is ready.
  if (!isAdvertising && !isConnected && isBleuIOReady) {
    HAL_Delay(200);
    writeToDongle((uint8_t * ) DONGLE_CMD_AT_ADVSTART);
    isAdvertising = true;
  }
}
/* USER CODE END 3 */
使用示例项目
我们需要什么
- 两个 BleuIO 加密狗(https://www.bleuio.com/)
- 带有 STM32 微控制器和 USB 端口的板。(Nucleo-144 开发板:NUCLEO-H743ZI2,用于开发此示例。(https://www.st.com/en/evaluation-tools/nucleo-h743zi.html)将加密狗连接到 Nucleo 板可以使用带有 USB A 母对母适配器的“USB A 到 Micro USB B”电缆。)
- STM32CubeIDE(https://www.st.com/en/development-tools/stm32cubeide.html)
- 液晶显示模块 – NHD-0420D3Z-NSW-BBW-V3 ( https://www.digikey.com/en/products/detail/newhaven-display-intl/NHD-0420D3Z-NSW-BBW-V3/2626390?s =N4IgTCBcDAIHIAkAiBaADAFjGpBmAWinAMoDqKAQheQGq4gC6AvkA)
- HibouAir – 空气质量监测设备 ( https://www.hibouair.com/ )
作为现有项目导入
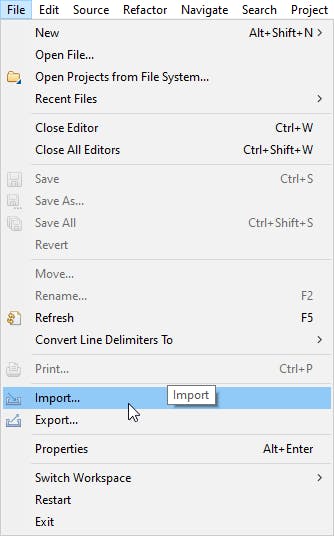
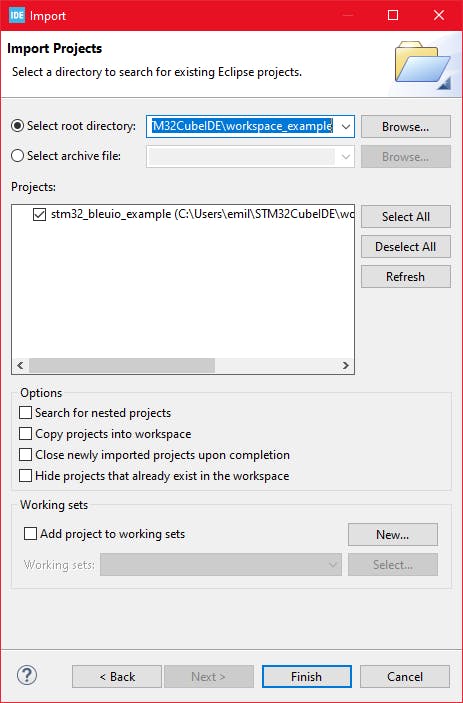
从 STM32CubeIDE 中选择 File>Import…
然后选择 General>Existing Projects into Workspace 然后点击“Next >”
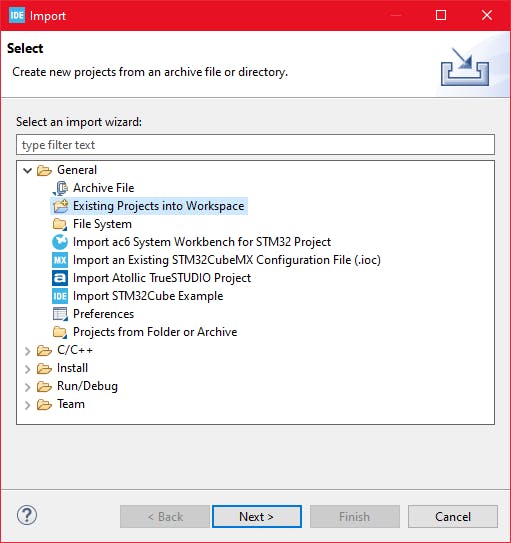
确保您在“选择根目录:”中选择了您的工作区
您应该会看到项目“stm32_bleuio_SHT85_example”,选中它并单击“完成”。
运行示例
将代码上传到 STM32 并运行示例。连接到 STM32 的 USB 加密狗将自动开始广播。
从网络浏览器将传感器数据发送到 LCD 屏幕
将 BleuIO 加密狗连接到计算机。运行 Web 脚本以连接到 STM32 上的另一个 BleuIO 加密狗。现在您可以将传感器数据发送到 LCD 屏幕。
为了让这个脚本工作,我们需要
- BleuIO USB 加密狗连接到计算机。
- BleuIO JavaScript 库
- Chrome 78 或更高版本,您需要在 chrome://flags 中启用#enable-experimental-web-platform-features标志
- 一个网络捆绑器——(包裹 js)
创建一个名为 index.html 的简单 Html 文件,该文件将用作脚本的前端。这个 Html 文件包含一些帮助连接的按钮,从 HibouAir 读取广告数据以获取空气质量传感器数据,并将此数据发送到连接到 stm32 的 LCD 屏幕。
html>
<html lang="en">
  <head>
    <meta charset="UTF-8" />
    <meta http-equiv="X-UA-Compatible" content="IE=edge" />
    <meta name="viewport" content="width=device-width, initial-scale=1.0" />
    <link
      href="https://cdn.jsdelivr.net/npm/bootstrap@5.1.3/dist/css/bootstrap.min.css"
      rel="stylesheet"
      integrity="sha384-1BmE4kWBq78iYhFldvKuhfTAU6auU8tT94WrHftjDbrCEXSU1oBoqyl2QvZ6jIW3"
      crossorigin="anonymous"
    />
    <title>Bluetooth LE Air quality sensor data to LCD screentitle>
  head>
  <body class="mt-5">
    <div class="container mt-5">
      <img
        src="https://www.bleuio.com/blog/wp-content/themes/bleuio/images/logo.png"
      />
      <h1 class="mb-5">Bluetooth LE Air quality sensor data to LCD screenh1>

      <div class="row">
        <div class="col-md-4 pt-5">
          <button class="btn btn-success mb-2" id="connect">Connectbutton>
          <form method="post" id="sendDataForm" name="sendMsgForm" hidden>
            <div class="mb-3">
              <label for="sensorID" class="form-label">Sensor IDlabel>
              <input
                type="text"
                class="form-control"
                name="sensorID"
                id="sensorID"
                required
                maxlength="60"
                value="0578E0"
              />
            div>

            <button type="submit" class="btn btn-primary">Get Databutton>
          form>
          <br />
          <button class="btn btn-danger" id="clearScreen" disabled>
            Clear screen
          button>
        div>
        <div class="col-md-8">
          <img src="air_quality_lcd.jpg" class="img-fluid" />
        div>
      div>
    div>

    <script src="script.js">script>
  body>
html>
创建一个名为 script.js 的 js 文件并将其包含在 Html 文件的底部。这个 js 文件使用 BleuIO js 库来编写 AT 命令并与其他加密狗进行通信。
该脚本有一个按钮可以连接到计算机上的 COM 端口。有一个文本字段,您可以在其中写入空气质量监测设备的传感器 ID。连接后,脚本将尝试从传感器获取广告数据并将其转换为有意义的数据。之后,它将这些数据发送到 STM32 板,然后显示在 LCD 屏幕上。
import * as my_dongle from 'bleuio'
import 'regenerator-runtime/runtime'

const dongleToConnect = '[0]40:48:FD:E5:2F:17'
//const sensorID = '0578E0'
document.getElementById('connect').addEventListener('click', function() {
	my_dongle.at_connect()
	document.getElementById("clearScreen").disabled = false;
	document.getElementById("connect").disabled = true;
	document.getElementById("sendDataForm").hidden = false;
})

document.getElementById("sendDataForm").addEventListener("submit", function(event) {
	event.preventDefault()
	const sensorID = document.getElementById('sensorID').value
	getSensorData(sensorID)
	setInterval(function() {
		getSensorData(sensorID)
	}, 10000);


});

const getSensorData = ((sensorID) => {
	my_dongle.ati().then((data) => {
			//make central if not
			if (JSON.stringify(data).includes("Peripheral")) {
				console.log('peripheral')
				my_dongle.at_dual().then((x) => {
					console.log('central now')
				})
			}
		})
		.then(() => {
			// connect to dongle
			my_dongle.at_getconn().then((y) => {
					if (JSON.stringify(y).includes(dongleToConnect)) {
						console.log('already connected')
					} else {
						my_dongle.at_gapconnect(dongleToConnect).then(() => {
							console.log('connected successfully')
						})
					}
				})
				.then(async () => {
					return my_dongle.at_findscandata(sensorID, 6).then((sd) => {
						console.log('scandata', sd)
						let advData = sd[sd.length - 1].split(" ").pop()
						let positionOfID = advData.indexOf(sensorID);
						let tempHex = advData.substring(positionOfID + 14, positionOfID + 18)
						let temp = parseInt('0x' + tempHex.match(/../g).reverse().join('')) / 10;

						let co2Hex = advData.substring(positionOfID + 38, positionOfID + 42)
						let co2 = parseInt('0x' + co2Hex);
						//console.log(temp,co2)
						return {
							'CO2': co2,
							'Temp': temp,
						}
					})
				})
				.then((x) => {
					console.log(x.CO2)
					console.log(x.Temp)
					var theVal = "L=1 SENSOR ID " + sensorID + "    TEMPERATURE " + x.Temp + ' °c    CO2 ' + x.CO2 + ' ppm';
					console.log('Message Send 1 ')
					// send command to show data
					my_dongle.at_spssend(theVal).then(() => {
						console.log('Message Send ' + theVal)
					})
				})

		})
})

document.getElementById('clearScreen').addEventListener('click', function() {
	my_dongle.ati().then((data) => {
			//make central if not
			if (JSON.stringify(data).includes("Peripheral")) {
				console.log('peripheral')
				my_dongle.at_central().then((x) => {
					console.log('central now')
				})
			}
		})
		.then(() => {
			// connect to dongle
			my_dongle.at_getconn().then((y) => {
					if (JSON.stringify(y).includes(dongleToConnect)) {
						console.log('already connected')
					} else {
						my_dongle.at_gapconnect(dongleToConnect).then(() => {
							console.log('connected successfully')
						})
					}
				})
				.then(() => {
					// send command to clear the screen
					my_dongle.at_spssend('L=0').then(() => {
						console.log('Screen Cleared')
					})
				})

		})
})
要连接到 STM32 上的 BleuIO 加密狗,请确保 STM32 已通电并连接了 BleuIO 加密狗。
获取 MAC 地址
按照步骤获取连接到STM32的加密狗的MAC地址
- Open this site https://bleuio.com/web_terminal.html and click connect to dongle.
- Select the appropriate port to connect.
- Once it says connected, type ATI. This will show dongle information and current status.
- If the dongle is on peripheral role, set it to central by typing AT+CENTRAL
- Now do a gap scan by typing AT+GAPSCAN
- Once you see your dongle on the list ,stop the scan by pressing control+c
- Copy the ID and paste it into the script (script.js) line #4
运行网页脚本
您将需要一个网络捆绑程序。您可以使用parcel.js
安装 parcel js 后,转到 web 脚本的根目录并输入“parcel index.html” 。这将启动您的开发环境。
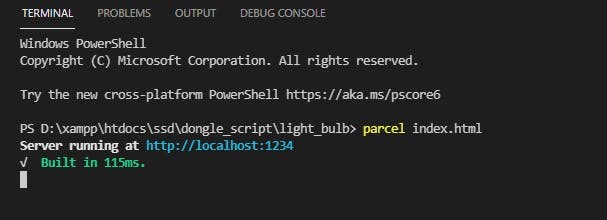
在浏览器上打开脚本。对于这个例子,我们打开http://localhost:1234
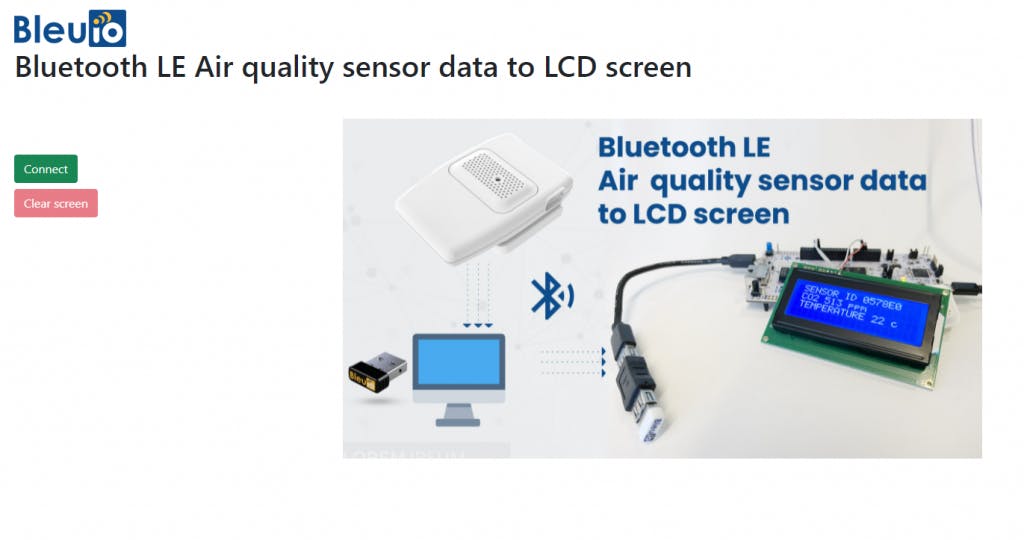
您可以轻松连接到加密狗并在 LCD 屏幕上查看空气质量数据。响应将显示在浏览器控制台屏幕上。
网络脚本看起来像这样
输出
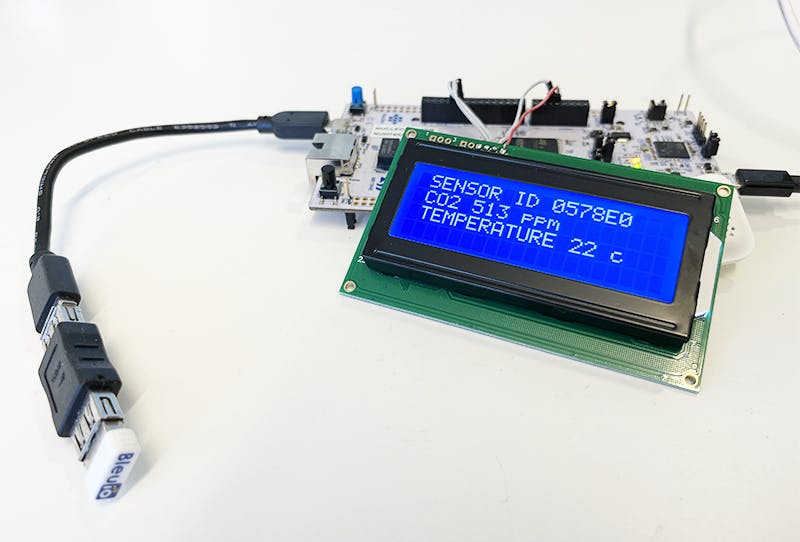
信息将显示在液晶显示屏上。
声明:本文内容及配图由入驻作者撰写或者入驻合作网站授权转载。文章观点仅代表作者本人,不代表电子发烧友网立场。文章及其配图仅供工程师学习之用,如有内容侵权或者其他违规问题,请联系本站处理。 举报投诉
- 相关下载
- 相关文章


