
资料下载


如何使用BleuIO的多连接功能
分享资料个
描述
蓝牙低功耗技术提供了一种连接智能设备的合适方式。物联网(IoT)或物联网(Internet of Things)这个词带来了新技术,在连接时代改变和创造世界。物联网表示一切都已连接,而蓝牙使工作变得更加容易。一台中央设备可以启动并保持与多个低功耗蓝牙外围设备的连接。
BleuIO 是一种蓝牙低功耗解决方案,可以以最快、最简单的方式创建新的 BLE 5.0 应用程序。使用此 BleuIO 的多连接功能,我们可以轻松连接到多个 BLE 设备并在它们之间传输数据。
本文将解释如何使用 BleuIO 的多连接功能,连接多个 BLE 设备并在它们之间传输数据。我们将为这个项目使用三个 BleuIO 加密狗:一个中央和两个外围。中央加密狗将连接到外围设备并同时发送数据。
我们将创建一个简单的 python 脚本来帮助我们完成任务。
要求 :
- 3 个 BleuIO 加密狗。
- Python 2.7 或 Python 3.4 及更新版本
- pyserial 3.5
任务:
步骤1:
让我们创建一个名为py_serial_transfer.py的 python 文件并复制以下代码。
源代码也可以在 GitHub 上获得
https://github.com/smart-sensor-devices-ab/ble_multi_connection_example.git
#!/usr/bin/python
# -*- coding: utf-8 -*-
import serial
import time
import string
import random

target_dongle_mac_address = '[0]40:48:FD:E5:2D:AF'  # Change this to the 1st peripheral's mac address.
target_dongle_mac_address2 = '[0]40:48:FD:E5:2D:B5'  # Change this to the 2nd peripheral's mac address.
your_com_port = 'COM7'  # Change this to the com port your dongle is connected to.

connecting_to_dongle = True
trying_to_connect = False
trying_to_connect2 = False


def id_generator(size=10, chars=string.ascii_uppercase + string.digits):
    return ''.join(random.choice(chars) for _ in range(size))


print 'Connecting to dongle...'

# Trying to connect to dongle until connected. Make sure the port and baudrate is the same as your dongle.
# You can check in the device manager to see what port then right-click and choose properties then the Port Settings
# tab to see the other settings

while connecting_to_dongle:
    try:
        console = serial.Serial(
            port=your_com_port,
            baudrate=57600,
            parity='N',
            stopbits=1,
            bytesize=8,
            timeout=0,
            )
        if console.is_open.__bool__():
            connecting_to_dongle = False
    except:
        print 'Dongle not connected. Please reconnect Dongle.'
        time.sleep(5)

print 'Connected to Dongle.'

connected = '0'
connected2 = '0'
while 1 and console.is_open.__bool__():
    console.write(str.encode('AT+DUAL'))
    console.write('\r'.encode())
    time.sleep(0.1)
    print 'Putting dongle in Dual role and trying to connect to other dongle.'
    while connected == '0':
        time.sleep(0.5)
        if not trying_to_connect:
            console.write(str.encode('AT+GAPCONNECT='))
            console.write(str.encode(target_dongle_mac_address))
            console.write('\r'.encode())
            trying_to_connect = True
        dongle_output2 = console.read(console.in_waiting)
        time.sleep(2)
        print 'Trying to connect to Peripheral 1...'
        if not dongle_output2.isspace():
            if dongle_output2.decode().__contains__('\r\nCONNECTED.'):
                connected = '1'
                print 'Connected to 1st device!'
                time.sleep(5)
            if dongle_output2.decode().__contains__('\r\nDISCONNECTED.'
                    ):
                connected = '0'
                print 'Disconnected!'
                trying_to_connect = False
            dongle_output2 = ' '
    while connected2 == '0':
        time.sleep(0.5)
        if not trying_to_connect2:
            console.write(str.encode('AT+GAPCONNECT='))
            console.write(str.encode(target_dongle_mac_address2))
            console.write('\r'.encode())
            trying_to_connect2 = True
        dongle_output2 = console.read(console.in_waiting)
        time.sleep(2)
        print 'Trying to connect to Peripheral 2...'
        if not dongle_output2.isspace():
            if dongle_output2.decode().__contains__('\r\nCONNECTED.'):
                connected2 = '1'
                print 'Connected to 2nd device!'
                time.sleep(5)
            if dongle_output2.decode().__contains__('\r\nDISCONNECTED.'
                    ):
                connected2 = '0'
                print 'Disconnected!'
                trying_to_connect2 = False
            dongle_output2 = ' '
    while connected == '1' and connected2 == '1':
        dongle_output3 = console.read(console.in_waiting)
        delay = 10
        close_time = time.time() + delay
        i = 0
        while True:
            myConIndex = ('0000' if i % 2 == 0 else '0001')
            console.write(str.encode('AT+TARGETCONN='))
            console.write(str.encode(myConIndex))
            console.write('\r'.encode())
            console.write(str.encode('AT+SPSSEND='))
            console.write(str.encode(id_generator() + '-' + myConIndex))
            console.write('\r'.encode())
            time.sleep(0.2)
            i += 1
            if time.time() > close_time:
                break
        console.write(str.encode('AT+SPSSEND=[DONE]\r'))
        time.sleep(0.2)
        print 'Sending complete!\r\n'
        print 'Exiting script...'
        exit()
该脚本将用于中央 BleuIO 加密狗。我们需要找到每个加密狗的端口号和外设mac地址。
第2步:
在您的 PC 上连接三个 BleuIO 加密狗。您可以在三台不同的 PC 或 Raspberry Pi 上执行此过程。
为此项目,我已将中央和外围设备连接到一台 PC。
连接加密狗后,打开设备管理器(windows)找到每个加密狗的端口。
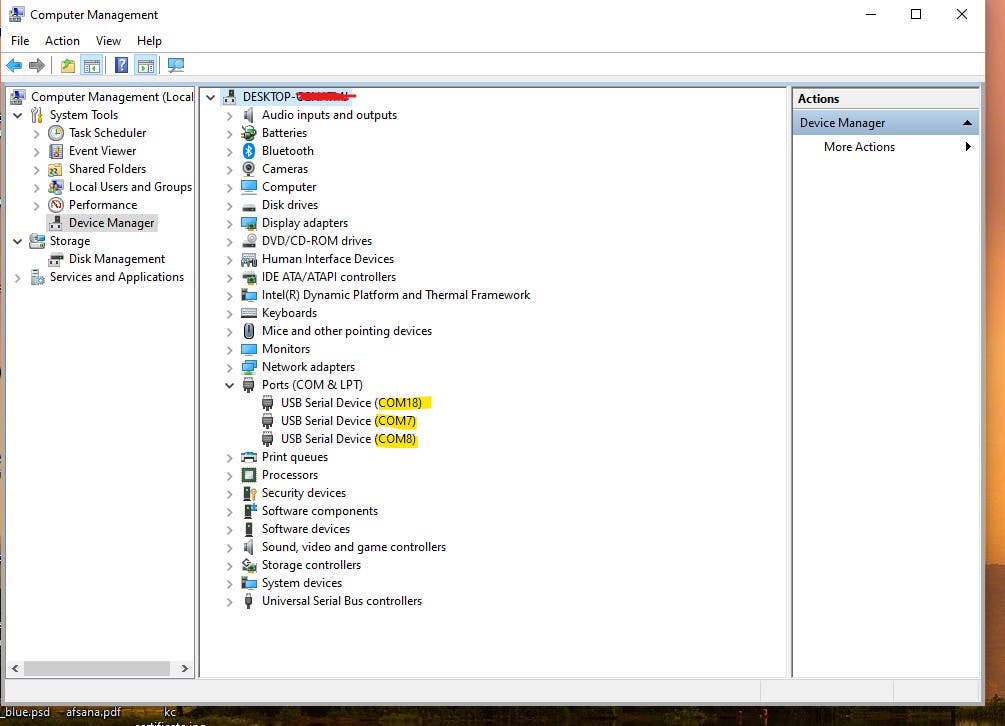
在我的 PC 上,我在端口 7、8 和 18 上连接了 BleuIO 加密狗。
让我们以 COM7 为中心,COM8 和 COM18 为外围。
现在打开脚本并在第 12 行设置端口号。
我们还需要知道外围加密狗的 MAC 地址。
为此,我们可以简单地使用AT+ADVSTART命令宣传加密狗。
- 去https://bleuio.com/web_terminal.html
- 单击连接到 BleuIO 加密狗
- 为外围设备选择端口
- 输入AT+ADVSTART
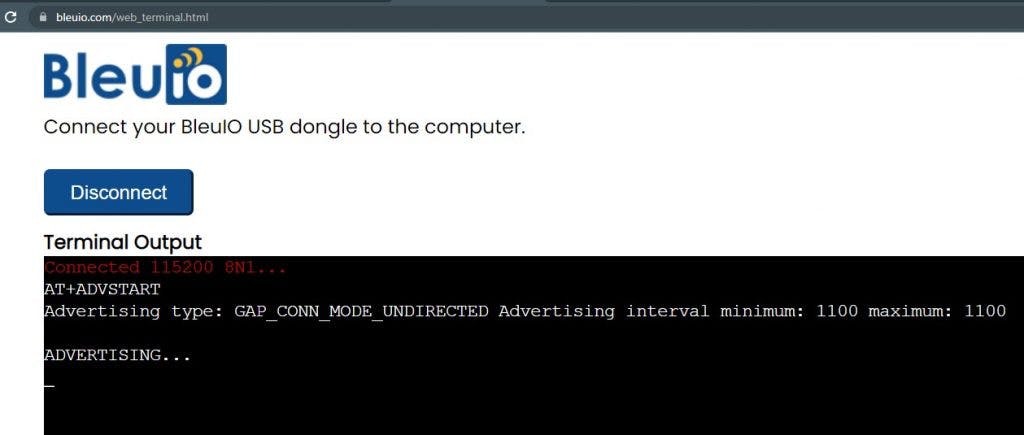
对其他外围加密狗执行相同的过程。
现在这两个外围加密狗都在做广告。我们可以从中心进行间隙扫描以找到他们的 MAC 地址。
- 去https://bleuio.com/web_terminal.html
- 单击连接到 BleuIO 加密狗
- 选择您的中心端口
- 键入AT+DUAL (这将使加密狗处于双重角色)
- 键入AT+GAPSCAN
现在寻找名为BleuIO 的加密狗。
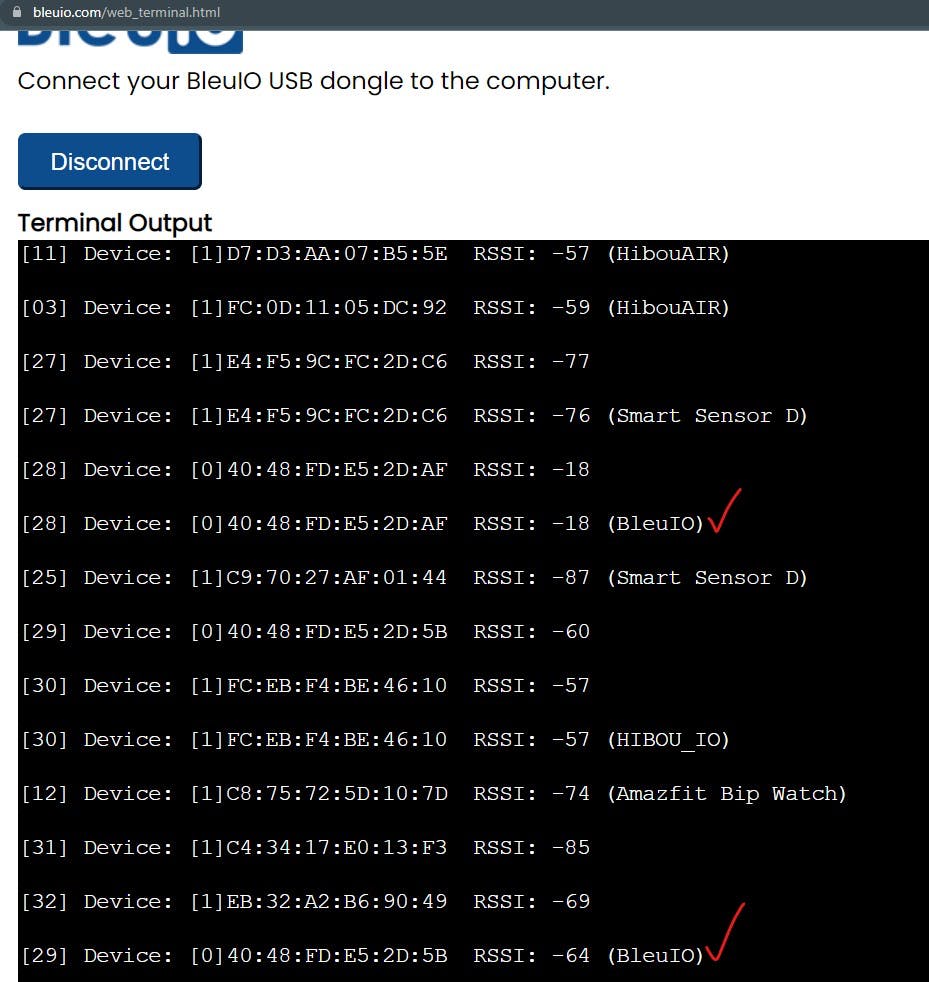
使用外设 mac 地址更新脚本(第 6、9 行)
第 3 步:
现在让我们运行脚本。
声明:本文内容及配图由入驻作者撰写或者入驻合作网站授权转载。文章观点仅代表作者本人,不代表电子发烧友网立场。文章及其配图仅供工程师学习之用,如有内容侵权或者其他违规问题,请联系本站处理。 举报投诉
- 相关下载
- 相关文章


