
资料下载

烘干机状态响应的Alexa技能开源分享
描述
注意(2018 年 2 月 24 日)- 该设备已更新,包括对“我的衣服干了吗?”的烘干机状态响应的 Alexa 技能。请参阅下面的 2.0 版说明。
我联排别墅的洗衣房在楼下,我的听力不如以前了。所以,我不能总是听到烘干机警报响起来通知衣服已经干了。因为我也不喜欢皱巴巴的衣服,所以我需要知道烘干机停止的时间,这样我才能把东西挂起来。
因此,我将 Arduino Yun 与加速度计配对,并对 Arduino 进行编码以将状态发布到ThingSpeak频道。我添加了 Alexa Skill 和 Lambda 函数来启用“Alexa:我的衣服干了吗?” 检查 ThingSpeak 通道干燥器状态并通过 Echo 提供语音响应的查询。
最后,Arduino 代码包括与Cayenne myDevices的集成,以便在烘干机停止振动时发送短信提醒。(当开发人员可以使用 Alexa 语音通知时,这将更新为也使用该功能。)该设备包括一个按钮,供用户启动监视器(触发“开启”通知)和一个 LED,以直观地指示监视器何时可用。主动感应振动。
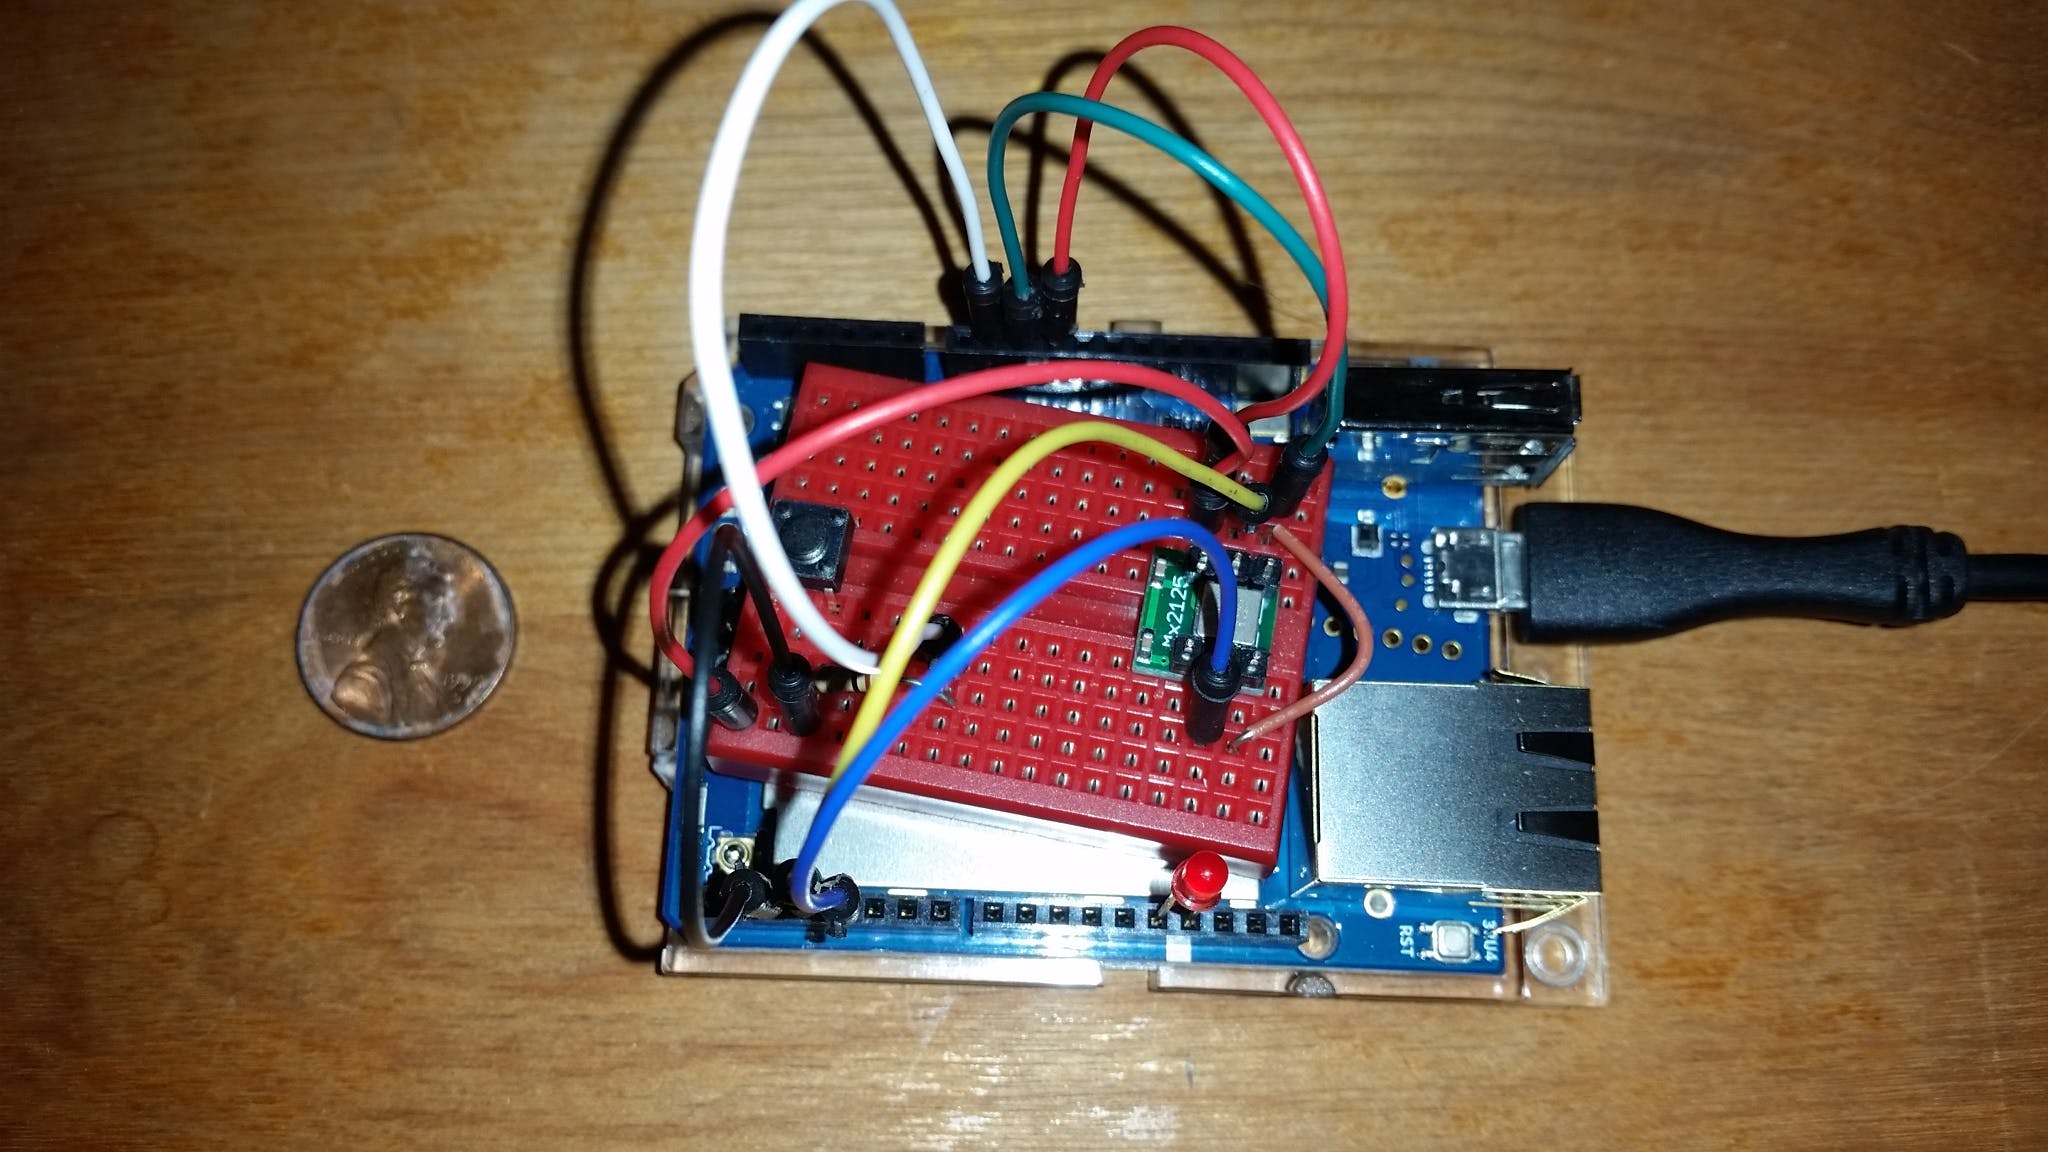
版本 1.0 - 带短信提醒的烘干机监控器
(有关 ThingSpeak 和 Alexa Skill 的 2.0 版新增内容,请参见下文。)
步骤 1.1:连接加速度计、按钮和LED
Memsic 2125 加速度计有 6 个引脚:
- X轴输出;连接到 Yun pin 3
- Y轴输出;连接到 Yun pin 4
- X轴接地;连接到 Yun GND
- Y轴接地;连接到 Yun GND
- +5V;连接到 Yun 5V
- T Out(用于测量补偿的温度读数;未用于该项目)
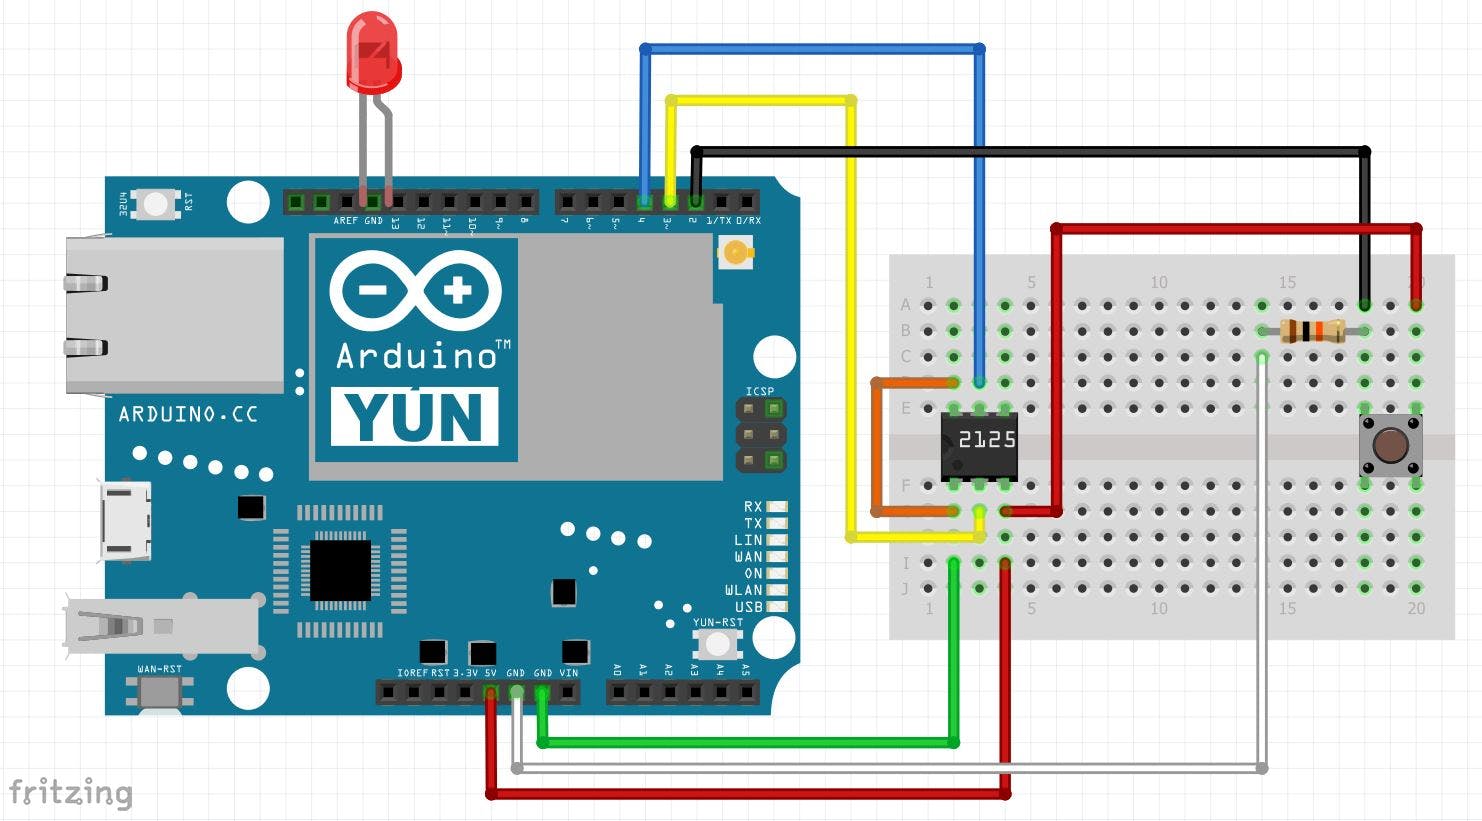
瞬时按钮和10K欧姆电阻连接到GND、5V和Yun pin 2,如下图。
指示灯 LED直接插入 Yun 引脚 13(阳极,长腿)和 GND(阴极)。(注意:还可以添加一个 220 欧姆电阻器与 LED 阳极串联,以限制 LED 的磨损。)
通过 USB 为 Yun 供电。
而已!
步骤 1.2:Cayenne myDevices 帐户
访问Cayenne myDevices网站创建一个免费帐户并获取 Arduino 代码的身份验证令牌。
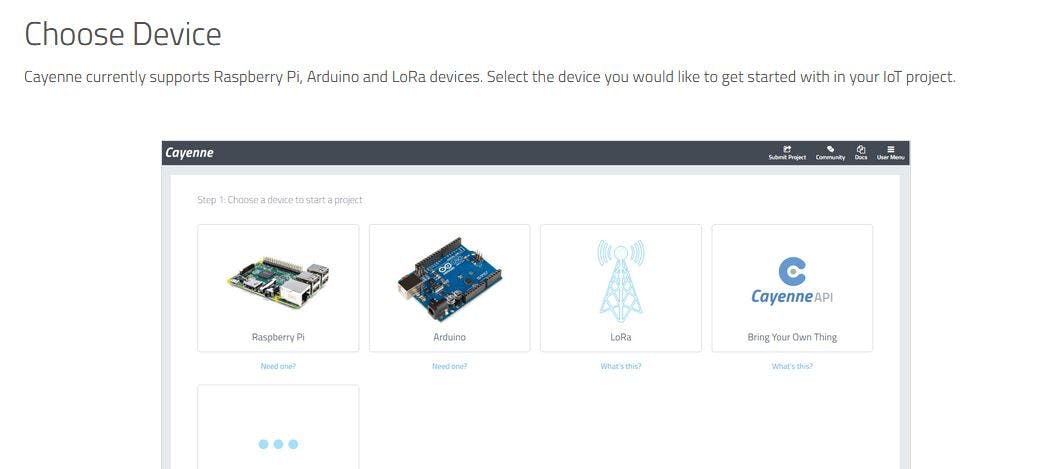
创建帐户后,选择Add New... > Device/Widget并选择 Arduino microcontroller 选项...
...然后选择 Arduino Yun草图...
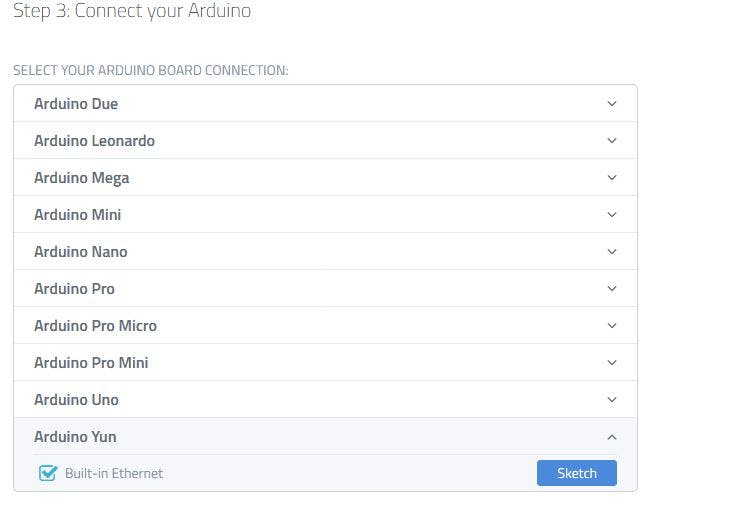
...获取包含您的身份验证令牌和适用于 Yun 的正确 Cayenne 库的代码片段:
//#define CAYENNE_DEBUG       // Un-comment to show debug messages
#define CAYENNE_PRINT Serial  // Comment this out to disable prints and save space
#include
// Cayenne authentication token. This should be obtained from the Cayenne Dashboard.
char token[] = "";
void setup()
{
	Serial.begin(9600);
	Cayenne.begin(token);
}
void loop()
{
	Cayenne.run();
}
保存此片段以稍后剪切/粘贴到 Arduino 草图中。
步骤 1.3:Arduino IDE 准备
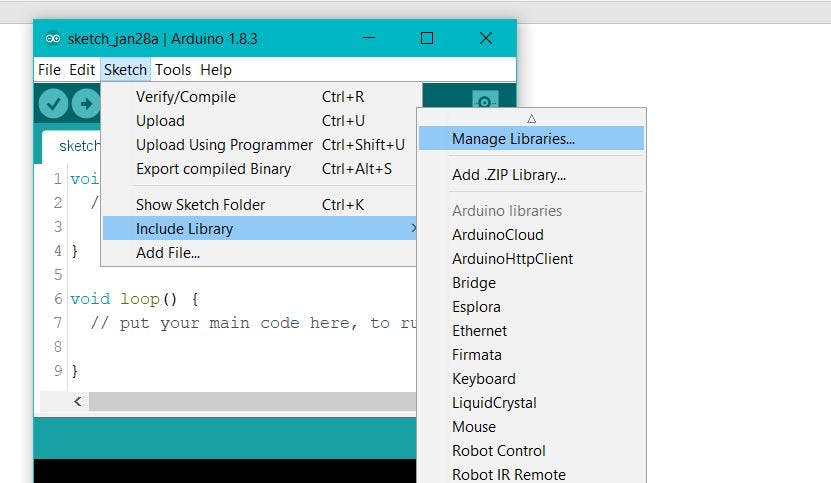
启动 Arduino IDE(下载 IDE的说明可在 Arduino.cc 软件部分找到)并选择Sketch > Include Library > Manage Libraries ...。
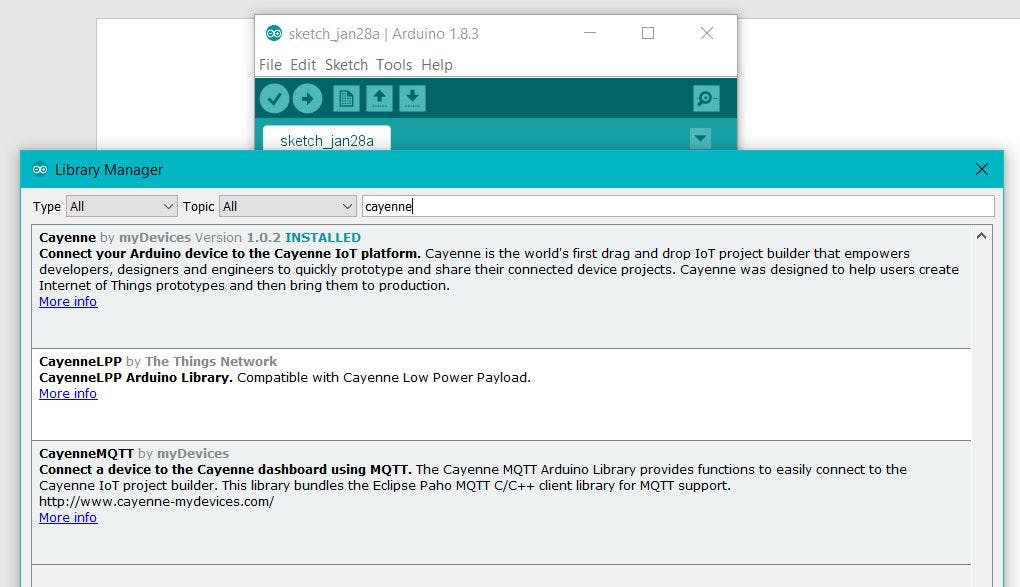
搜索“Cayenne”库并通过 myDevices 安装 Cayenne
步骤 1.4:Arduino Yun 代码
Arduino 代码有几个主要组成部分:
a) Yun需要的Bridge Library
#include
b)第 2 步中的Cayenne 身份验证片段
c) 指定加速度计引脚和变量
// Adjust these to meet your needs
const int buttonPin = 2;            // pin number of the pushbutton
const int xPin = 3;                 // pin number of the X output of the accelerometer
const int yPin = 4;                 // pin number of the Y output of the accelerometer
const int ledPin = 13;              // pin number of the LED
const int waitTime = .1;             // wait time in minutes
const float sensitivityX = 0.002;   // sensitivity of X axis in percent change
const float sensitivityY = 0.002;   // sensitivity of Y axis in percent change
// Variables:
boolean lastButtonState = LOW;
boolean currentButtonState = LOW;
boolean ledState = LOW;
int counter = 0;
float lastPulseX = 0;
float lastPulseY = 0;
waitTime、sensitivityX 和 sensitivityY的参数可以在现场进行调整,以解决不同设备振动强度的变化。
d)初始化 Yun 和 Cayenne
void setup() {
 // Initialize serial communications:
 Serial.begin(9600);
 // Initiate Cayenne communications
 Cayenne.begin(token);
// Initialize the pins:
 pinMode(xPin, INPUT);
 pinMode(yPin, INPUT);
 pinMode(buttonPin, INPUT);
 pinMode(ledPin, OUTPUT);
 Bridge.begin();
}
e)监控加速度计输出
当监控器处于活动状态时,程序将持续检查加速度计读数以查看是否与之前的读数有变化。如果没有检测到变化,监测器就知道振动已经停止。
  // Find the change in the pulse:
  changeX = lastPulseX - pulseX;
  changeY = lastPulseY - pulseY;
  // Calculate the percentage change using absolute values:
  percentX = abs(changeX / lastPulseX);
  percentY = abs(changeY / lastPulseY);
  // If the percentage change is less than the sensitivity (i.e. no movement detected)
  if (percentX < sensitivityX && percentY < sensitivityY)
步骤 1.5:配置 Cayenne 设备仪表板小部件
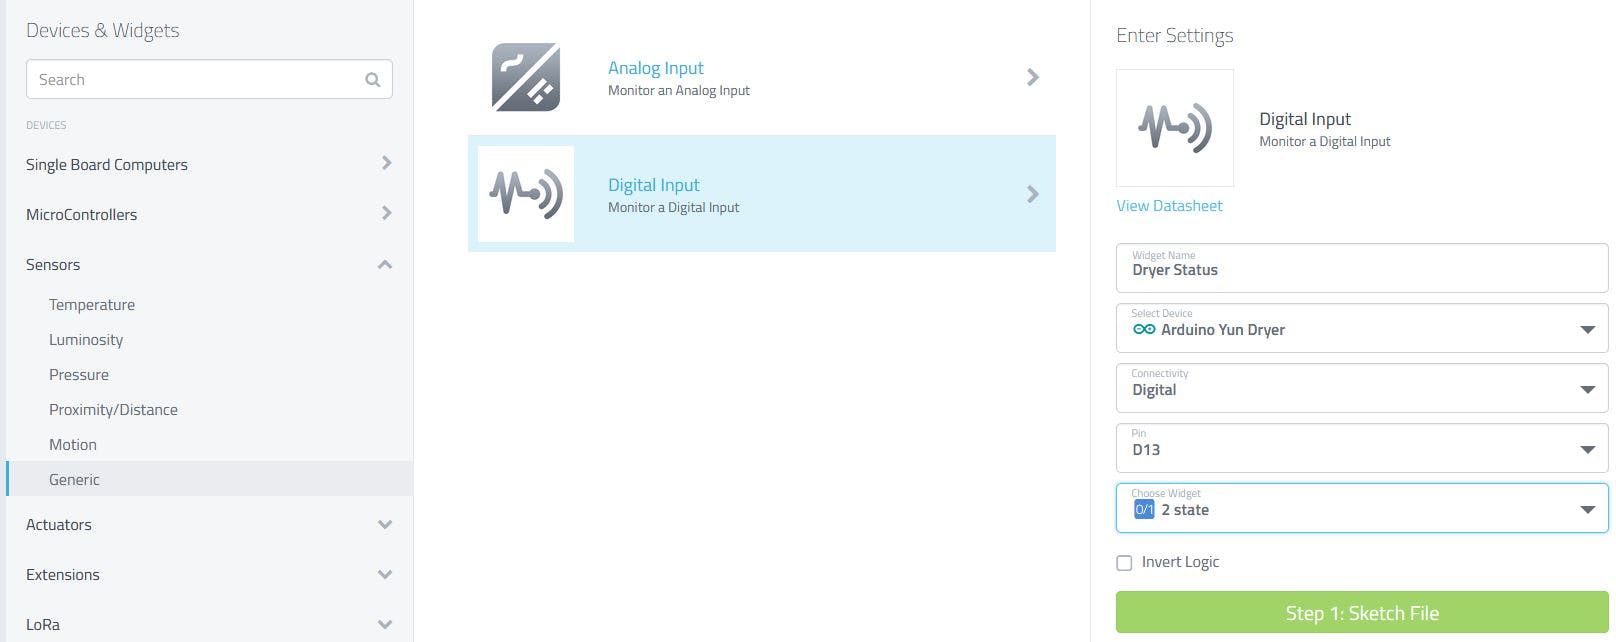
返回 Cayenne 仪表板,选择Add New... > Device/Widget ,然后选择Sensors > Generic > Digital Input 。为您的小部件命名并从上面的第 2 步中选择 Yun 设备。为连接选择“数字”,为小部件选择引脚 D13 和“2 状态”(开/关)。
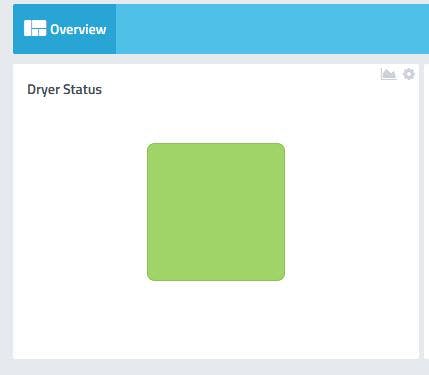
仪表板小部件将指示烘干机的状态:绿色 =“开启”(感应振动)或无颜色 =“关闭”。
步骤 1.6:配置 Cayenne 设备触发器
仍然在 Cayenne 仪表板中,选择Add New... > Trigger。为您的新触发器命名并选择 Yun 设备。如下图配置,并指定您的短信手机号码。(或者,您可以指定电子邮件地址,或同时指定两者。)
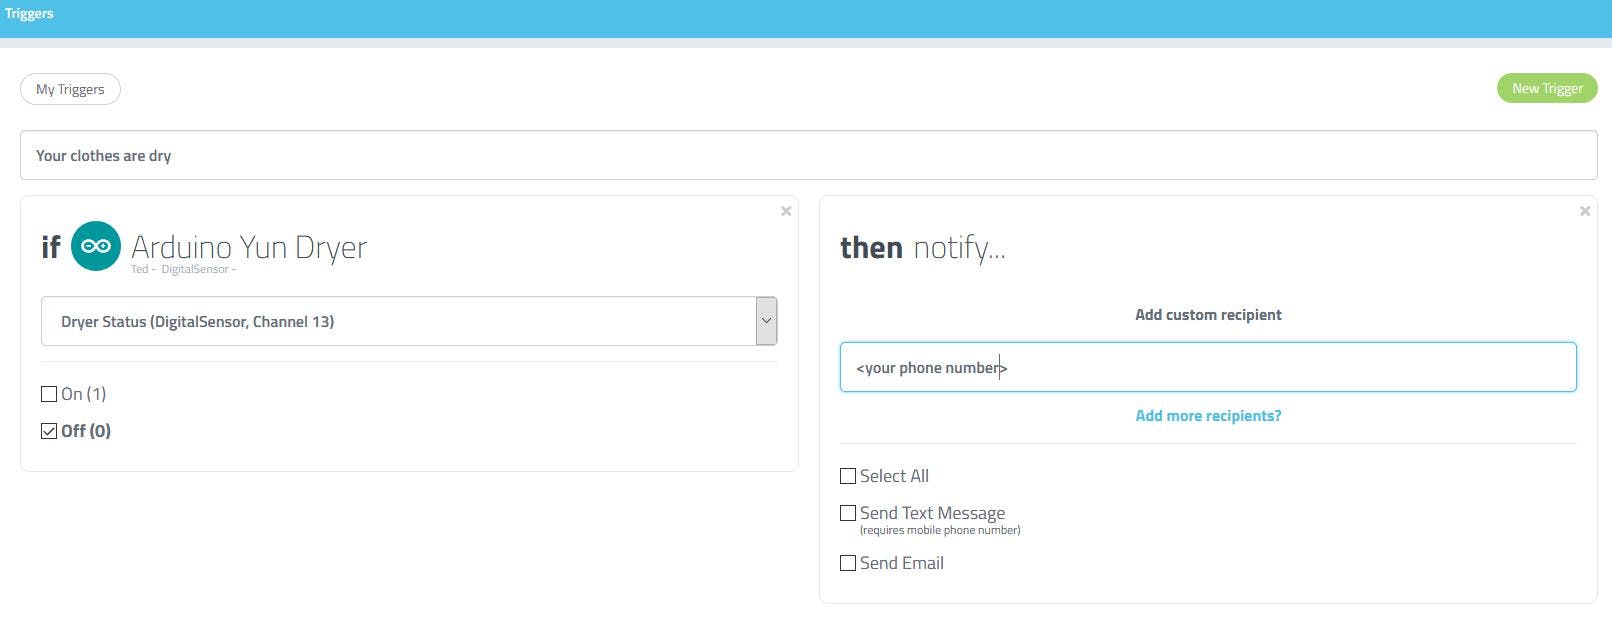
提示:如果您与家里的其他人共用烘干机,您可以设置一个额外的触发器,在烘干机启动时提醒每个人,让他们知道烘干机当前正在使用中。
其他资源:
- Arduino.cc有一个关于设置 Yun 和连接到 wifi 的很好的教程。
- Cayenne有关于为 Arduino 设备配置平台的详细文档。
{注意 (02/24/2018):Cayenne 最近更改了 Arduino API 以需要 MQTT。此项目的代码需要更新才能使用 CayenneMQTT 库。}
2.0 版 - 通过 Alexa Skill + ThingSpeak 添加烘干机状态检查
步骤 2.1 :设置ThingSpeak频道
在 Arduino IDE 中,通过库管理器添加 ThingSpeak 库:

接下来,创建一个ThingSpeak帐户(如果您还没有)并按照创建公共频道的简单说明进行操作:
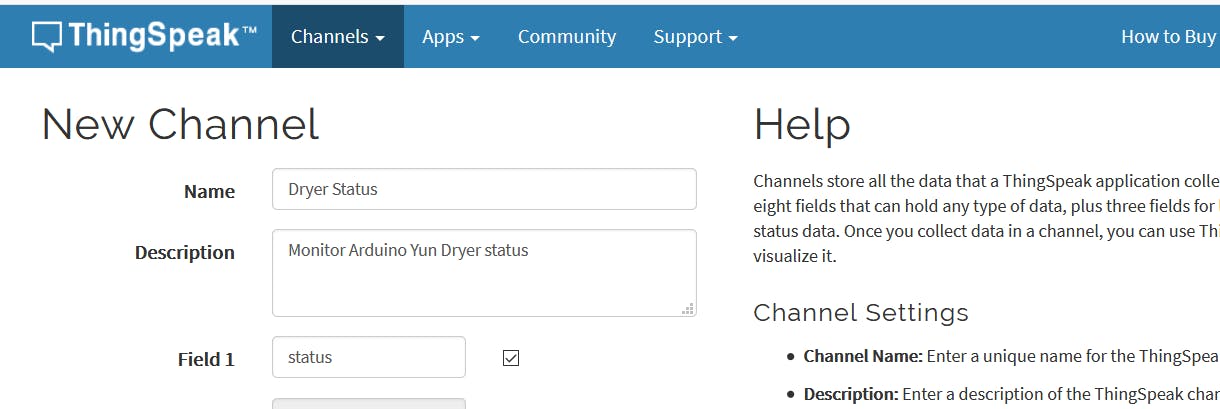
完成频道设置后,记下您的频道 ID和写入 API 密钥。在您的 Arduino 代码中,添加以下行并将占位符替换为您的频道 ID 和写入 API 密钥。
// ThingSpeak - Version: Latest
#include

// ThingSpeak example
#include "YunClient.h"
YunClient client;

unsigned long myChannelNumber = #######;
const char * myWriteAPIKey = "XXXXXXXXXXXXXXXXXXX";
在初始设置部分,添加以下内容:
void setup() {
 // ThingSpeak
 ThingSpeak.begin(client);
}
并在主循环中添加:
     ThingSpeak.setField(1, ledState);
     ThingSpeak.setField(2, percentX);
     ThingSpeak.setField(3, percentY);

     // Write the fields all at once.
     ThingSpeak.writeFields(myChannelNumber, myWriteAPIKey);
     delay(20000); // ThingSpeak will only accept updates every 15 seconds.
当设备被激活时,ThingSpeak 通道现在将在可视化区域显示烘干机状态信息。
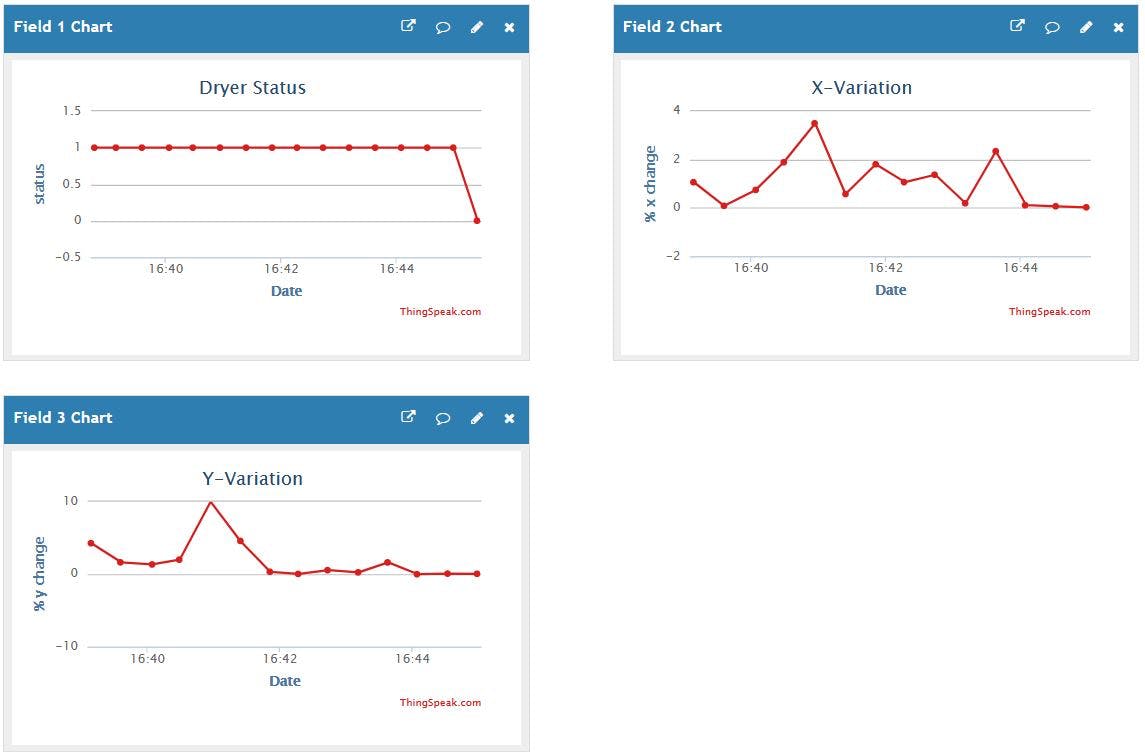
步骤 2.2 :设置Dryer Alert Alexa Skill
Dryer Alert 需要配置 Alexa Skill 以及 AWS Lambda 函数的编码。我们将从 Alexa 技能开始。
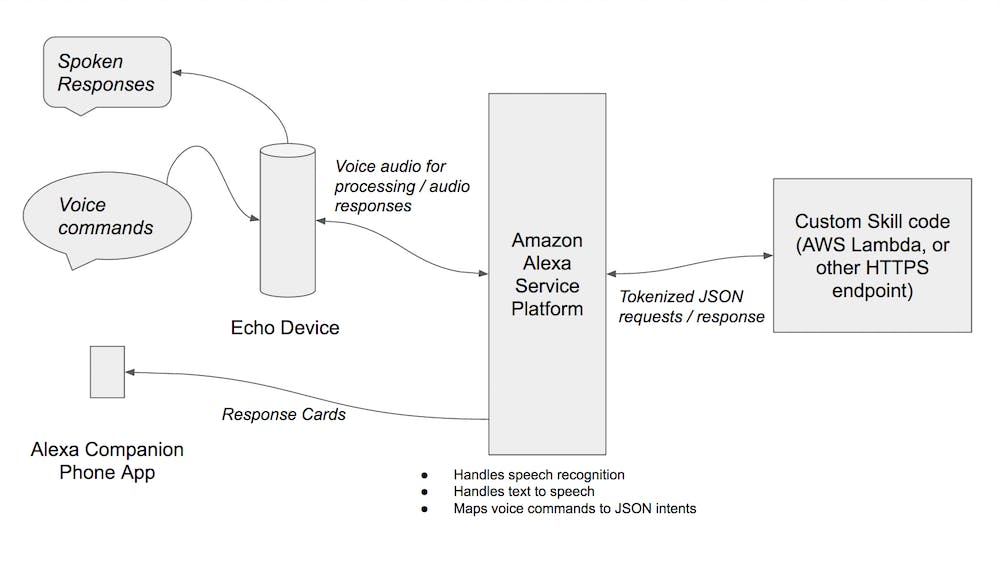
如果您还没有亚马逊开发者账户,请访问Alexa Skills Kit (ASK) 网站并注册。该网站上还有一些很棒的教程,可用于了解创建 Alexa Skill 的基础知识。对于烘干机警报技能,您需要一些基本意图:
{
 "intents": [
   {
     "intent": "DryerStatusIntent"
   },
   {
     "intent": "AMAZON.HelpIntent"
   },
   {
     "intent": "AMAZON.CancelIntent"
   },
   {
     "intent": "AMAZON.StopIntent"
   }
 ]
}
您还需要指定一些语句来触发 AWS Lambda 服务:
DryerStatusIntent are my clothes dry
DryerStatusIntent check the dryer status
DryerStatusIntent what's the dryer status
DryerStatusIntent what is the dryer status
DryerStatusIntent is the dryer on
DryerStatusIntent is the dryer busy
按照ASK教程完成技能配置。记下应用程序 ID;您将需要它来设置 AWS Lambda 函数。
第 3 步:为烘干机状态配置AWS Lambda函数
技能配置完成后,转到AWS 管理控制台(如果需要,创建一个免费帐户)并继续访问Lambda 管理控制台。选择创建函数:

(如果您是 Lambda 新手,请先查看入门教程。)
在 Designer 的添加触发器部分,选择 Alexa Skills Kit 选项并使用上一步中的应用程序 ID 将 Lambda 函数与技能连接起来。
Lambda 函数 Python 代码在下面的代码部分提供。您只需将此代码剪切/粘贴到您的 lambda_function.py 中。对于此项目,您唯一需要更改的是指定您自己的公共 ThingSpeak 频道和您正在监控的相应字段。
# Change these elements to point to your data
channel = 177778
field = 1
#
您还可以更改语音响应以满足您自己的需要。
Lambda 配置完成后,记下右上角的 ARN 编号并返回技能配置页面并在默认端点字段中输入 ARN。这样就完成了集成。
如果您没有 Alexa 设备,可以使用模拟服务Echosim.io 试一试。
未来的改进:
1) 版本 2.1 - 当 Alexa 宣布开发人员支持通知时,添加通知让 Alexa 在烘干机停止时发出警报:Alexa,“你的衣服干了”。
声明:本文内容及配图由入驻作者撰写或者入驻合作网站授权转载。文章观点仅代表作者本人,不代表电子发烧友网立场。文章及其配图仅供工程师学习之用,如有内容侵权或者其他违规问题,请联系本站处理。 举报投诉
- 相关下载
- 相关文章


