资料下载

Alexa EV3糖果机开源分享
描述
我们的家人出于各种原因都喜欢糖果。我们想围绕我们最喜欢的主题创新一些家庭自动化。所以我们制造了一台带有传送带的机器,可以为我们提供糖果。让 Amazon Echo Dot 与 Mindstorms EV3 进行通信,很容易向 Alexa 传授一些技巧,这对我们有益。
希望您按照以下步骤构建我们的模型,然后用您自己的酷想法对其进行扩展。
演示视频
“Alexa,打开糖果机”
“糖果机已启动。有什么可以为您服务的吗?”
“请给我一颗蓝色糖果和一颗绿色糖果”
甚至可以说出以下内容:
“Alexa,告诉糖果机我已经完成了我的作业”
“恭喜!你应该得到一些糖果”
---
通讯概述
1. 用户与 Echo Dot 对话
2. Echo Dot 将音频样本发送到 Alexa Voice Service
3. AVS 将其转换为文本,并将其与我们的 Alexa 技能模型匹配,然后调用我们的 lambda 来处理消息
4. 我们的 lambda 将语音和/或 EV3 命令发送回 Echo Dot
5. Echo Dot 说出消息和/或通过蓝牙向 EV3 发送我们的命令
6. EV3 执行我们的命令
第 1 步:设置开发环境
请遵循LEGO MINDSTORMS 语音挑战:设置页面上的指南,该页面将引导您完成以下步骤:
EV3
- 下载 + 刷写 ev3dev 软件到 microSD 卡
- (这将允许您在 EV3 上运行 python 代码并使用高级硬件功能)
- 将 microSD 卡插入 EV3 + 启动
- 通过 USB 将 EV3 连接到 PC
- (这将加快您的程序传输到 EV3 和实时调试)
个人电脑
- 安装 Visual Studio Code + 其扩展
- 配置 Visual Studio Code 以连接到您的 EV3
- 将示例代码下载到 EV3
第 2 步:将您的 EV3 注册为 Alexa Gadget
由于我们将使用 EV3 作为 Alexa Gadget(即 Alexa 将在 Echo Dot 的蓝牙的帮助下使用 EV3),我们需要按照LEGO MINDSTORMS Voice Challenge: Mission 1页面的步骤注册并连接 EV3 到 Alexa,其中:
亚马逊
- 注册 developer.amazon.com 帐户 + 将 EV3 添加为 Alexa Gadget
EV3
- 在 EV3 上打开蓝牙
- (这是与 Echo Dot 通信所必需的)
- 通过启动示例代码连接到 Echo Dot,并完成配对过程
第 3 步:从 Alexa 技能向 EV3 发送消息
现在按照LEGO MINDSTORMS 语音挑战:任务 3页面的步骤操作,该页面将指导您将 Alexa 技能连接到您的 EV3。完成后,您可以为自己没有任何连接问题而感到自豪。
您不需要构建 EV3STORM,将大型电机连接到端口 B 和 C,将中型电机连接到端口 A 就足够了。请记住,我们只是在此处设置和测试连接。
在这里你会做:
亚历克斯
- 打造全新 Alexa 技能+交互模型
- (教 Alexa 理解什么以及如何理解)
- 将 NodeJS lambda 代码添加到技能中
- (因此 Alexa 可以对您的命令做出反应并在 EV3 上调用事件)
EV3
- Python 代码将处理 EV3 端的事件,并将移动电机
第 4 步:构建糖果机
完成上述设置步骤后,您就可以自己构建糖果机了。您将需要零售 31313 LEGO Mindstorms 套装以及一些额外的 LEGO Technic 元素用于我们的传送带。(请找到硬件列表中列出的额外元素。)
该装置以模块化方式构建。下面的视频显示了模块以及如何构建机器。
请注意:中型电机连接到端口 A,大型电机连接到端口 B,颜色传感器连接到端口 2。
接下来是糖果。
EV3 的颜色传感器可以检测黑色、蓝色、绿色、黄色、红色、白色和棕色。但是,传送带测量为黑色或红色。在剩下的颜色中,我们只有蓝色、绿色和黄色糖果。所以我们将在这个项目中只使用这 3 种颜色。
第 5 步:为糖果机定制 Alexa
在这里,我们正在实施通信概述的#3。
使用与创建 Mindstorms 技能时相同的步骤创建一个名为 CandyMachine 的新技能。
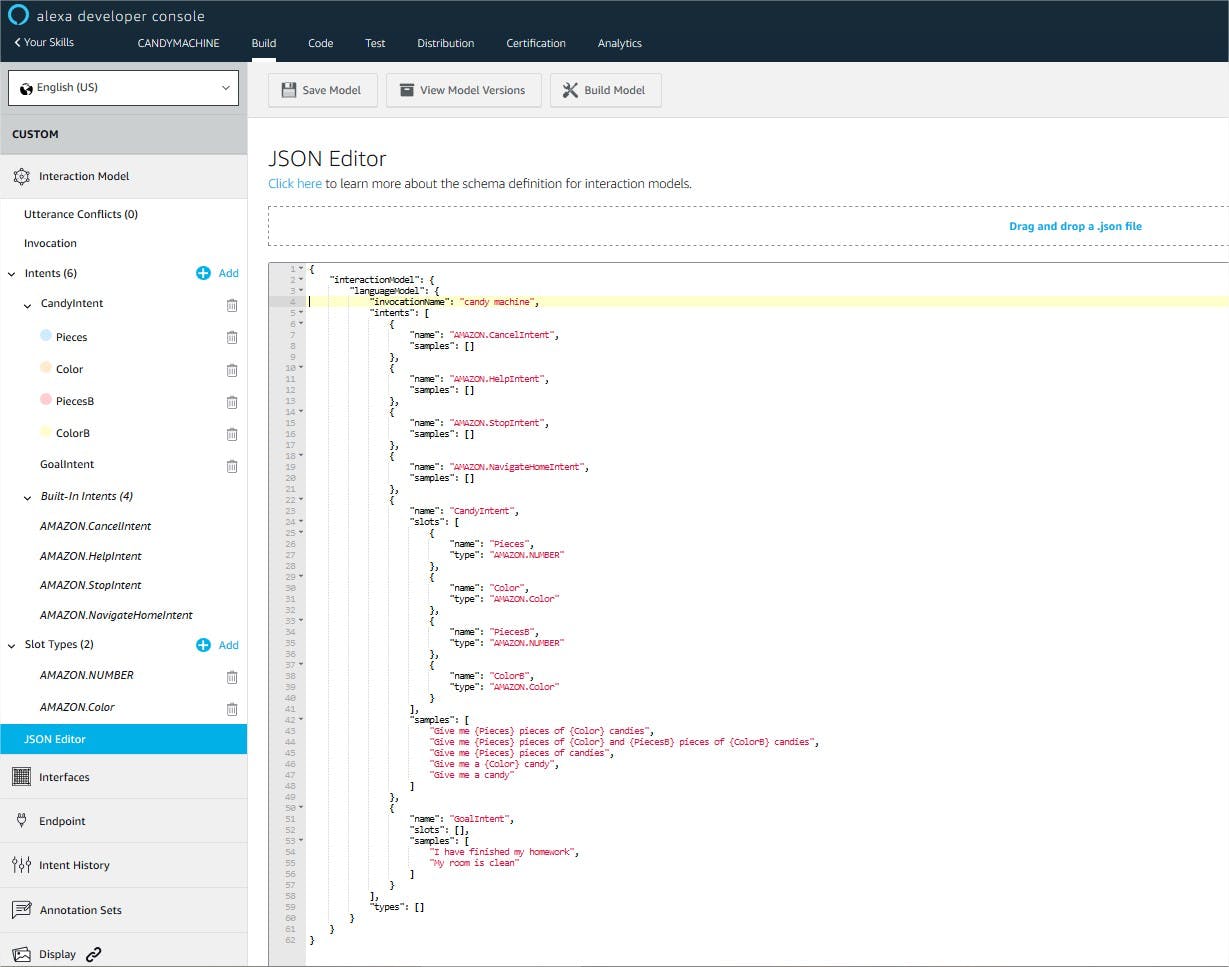
打开此项目中的代码示例(alexa-candymachine-code.zip在此页面底部)并将model.json文件内容复制粘贴到构建/交互模型/JSON 编辑器中,然后保存模型。
这将定义 Alexa 技能的调用名称,aCandyIndent用于请求糖果,aGoalIntent用于实现您的目标。请查看我们定义的短语。

{
    "interactionModel": {
        "languageModel": {
            "invocationName": "candy machine",
            "intents": [
                {
                    "name": "AMAZON.CancelIntent",
                    "samples": []
                },
                {
                    "name": "AMAZON.HelpIntent",
                    "samples": []
                },
                {
                    "name": "AMAZON.StopIntent",
                    "samples": []
                },
                {
                    "name": "AMAZON.NavigateHomeIntent",
                    "samples": []
                },
                {
                    "name": "CandyIntent",
                    "slots": [
                        {
                            "name": "Pieces",
                            "type": "AMAZON.NUMBER"
                        },
                        {
                            "name": "Color",
                            "type": "AMAZON.Color"
                        },
                        {
                            "name": "PiecesB",
                            "type": "AMAZON.NUMBER"
                        },
                        {
                            "name": "ColorB",
                            "type": "AMAZON.Color"
                        }
                    ],
                    "samples": [
                        "Give me {Pieces} pieces of {Color} candies",
                        "Give me {Pieces} pieces of {Color} and {PiecesB} pieces of {ColorB} candies",
                        "Give me {Pieces} pieces of candies",
                        "Give me a {Color} candy",
                        "Give me a candy"
                    ]
                },
                {
                    "name": "GoalIntent",
                    "slots": [],
                    "samples": [
                        "I have finished my homework",
                        "My room is clean"
                    ]
                }
            ],
            "types": []
        }
    }
}
完成此操作后,您需要将 lambda 文件从alexa-candymachine-code.zipAlexa 代码编辑器复制并粘贴到相应的文件:common.js、index.js和. 不要忘记保存它们。这些文件基本上是 Alexa 技能背后的 lambda 代码。逻辑的验证部分和 Alexa 会说的消息在这里,以及我们要发送给 EV3 的命令也在这里。package.jsonutil.js
让我们来看看它们:
// Skill starting event
const LaunchRequestHandler = {
    canHandle(handlerInput) {
        return Alexa.getRequestType(handlerInput.requestEnvelope) === 'LaunchRequest';
    },
    handle: async function(handlerInput) {

        const request = handlerInput.requestEnvelope;
        const { apiEndpoint, apiAccessToken } = request.context.System;
        const apiResponse = await Util.getConnectedEndpoints(apiEndpoint, apiAccessToken);
        if ((apiResponse.endpoints || []).length === 0) {
            return handlerInput.responseBuilder
            .speak(`I couldn't find an EV3 Brick connected to this Echo device. Please check to make sure your EV3 Brick is connected, and try again.`)
            .getResponse();
        }

    // Store the gadget endpointId to be used in this skill session
    const endpointId = apiResponse.endpoints[0].endpointId || [];
    Util.putSessionAttribute(handlerInput, 'endpointId', endpointId);

    return handlerInput.responseBuilder
        .speak("Candy machine activated. What can I do for you?")
        .reprompt("What can I do for you?")
        .getResponse();
    }
};
LaunchRequestHandler如果你说"Alexa, open Candy Machine"就会被调用。这将检查与 EV3 的连接,并在成功时回复用户。
方法.reprompt()在这里很重要。它会让 Alexa 在 Candy Machine 模式下等待下一个命令(保持会话打开)。
// Construct and send a custom directive to the connected gadget with
// data from the CandyIntent.
const CandyIntentHandler = {
    canHandle(handlerInput) {
        return Alexa.getRequestType(handlerInput.requestEnvelope) === 'IntentRequest'
            && Alexa.getIntentName(handlerInput.requestEnvelope) === 'CandyIntent';
        },
    handle: function (handlerInput) {
        const request = handlerInput.requestEnvelope;

        // Parameter is optional, use default if not available
        const pieces = Alexa.getSlotValue(request, 'Pieces') || 1;
        const color = Alexa.getSlotValue(request, 'Color') || "";
        const piecesB = Alexa.getSlotValue(request, 'PiecesB') || 0;
        const colorB = Alexa.getSlotValue(request, 'ColorB') || "";

        ////debug : return handlerInput.responseBuilder.speak(`Please wait while I am serving your ${pieces} pieces of ${color} and ${piecesB} pieces of ${colorB} candies.`).getResponse();

        // Validations - if request is not valid, we will require the user to specify his/her request in more detail.
        let validationSpeechOutput = "";
        let repromptSpeechOutput = "What can I do for you?";

        if (color === "")
            validationSpeechOutput = "I am afraid, you forgot to mention the color";

        else if (color !== "blue" && color !== "green" && color !== "yellow")
            validationSpeechOutput = "Sorry, I don't have this color";

        else if (colorB !== "" && colorB !== "blue" && colorB !== "green" && colorB !== "yellow")
            validationSpeechOutput = "Sorry, I don't have this color";

        else if (pieces > 5 || piecesB > 5)
            validationSpeechOutput = "I am afraid, this is too much for you";

        // (reprompt will keep session open)
        if (validationSpeechOutput !== "")
            return handlerInput.responseBuilder
                .speak(validationSpeechOutput + repromptSpeechOutput)
                .reprompt(repromptSpeechOutput)
                .getResponse();

        // Validations done

        // Get data from session attribute
        const attributesManager = handlerInput.attributesManager;
        const endpointId = attributesManager.getSessionAttributes().endpointId || [];

        // Construct the directive with the payload containing the move parameters
        let directive = Util.build(endpointId, NAMESPACE, NAME_CONTROL,
            {
                type: 'candy',
                pieces: pieces,
                color: color,
                piecesB: piecesB,
                colorB: colorB
            });

        const speechOutput = (piecesB === 0)
            ? `Please wait while I am serving your ${pieces} ${color} candies.`
            : `Please wait while I am serving your ${pieces} ${color} and ${piecesB} ${colorB} candies.`;

        return handlerInput.responseBuilder
            .speak(speechOutput)
            .addDirective(directive)
            .getResponse();
    }
};
CandyIntentHandler将处理用户要求糖果的命令。首先我们用 获取参数Alexa.getSlotValue()。请注意,如果缺少值,我们会设置默认值,因为用户说一些不完整的东西,例如Color缺少。
////debug当我们测试参数或意图样本是否良好时,这是我们的一大帮助。只需取消注释,Alexa 就会告诉你她得到的参数。(您甚至可以使用 Alexa 开发人员控制台的“测试”选项卡执行测试而无需部署。)
接下来是验证。对于几个不完整或未处理的输入,我们会回复一条消息,并使用 保持会话打开.reprompt()。这些情况是用户错过了颜色,或者要求我们没有颜色,或者要求太多糖果。
一旦验证成功,我们将参数传递给 EV3 的糖果处理程序Util.build()
最后,我们还会让用户知道我们正在提供糖果。
// Construct and send a custom directive to the connected gadget with
// data from the GoalIntent.
const GoalIntentHandler = {
    canHandle(handlerInput) {
        return Alexa.getRequestType(handlerInput.requestEnvelope) === 'IntentRequest'
            && Alexa.getIntentName(handlerInput.requestEnvelope) === 'GoalIntent';
    },
    handle: function (handlerInput) {
        const request = handlerInput.requestEnvelope;

    return handlerInput.responseBuilder
        .speak("Congratulations! You deserve some candies.")
        .reprompt("You deserve some candies.")
        .getResponse();
    }
};
作为奖励,我们通过他/她是否达到模型GoalIntentHandler中先前列出的目标之一来激励用户。GoalIntent
在这里,我们只是回复祝贺并保持会话开放。这足以让用户和 Alexa 之间继续进行讨论。
---
在代码编辑器中保存lambda 的所有文件后,您还需要单击Deploy ,因此该解决方案将在云中处于活动状态。
第 6 步:为糖果机定制 EV3
现在 Alexa 已准备好将我们的参数传递给 EV3 Python 代码的糖果处理程序,让我们实现它。这是我们的通信概述中的#6。
首先,您需要编辑candymachine.ini,并将您的 Alexa Gadget ID 和 Secret(您在第 2 步中注册的)粘贴到此文件中。因此 Alexa 将能够通过 Echo Dot 和蓝牙连接到您的 EV3。
[GadgetSettings]
amazonId = xxxxxxxxxxxxxx
alexaGadgetSecret = xxxxxxxxxxxxxxxxxxxxxxxxxxxxxxxxxxxxxxxxxxxxxxxxxxxxxxxxxxxxxxxx
接下来是candmayhine.py用 Python 编写的 EV3 代码:
一开始,我们定义了如何连接外围设备。
from agt import AlexaGadget

from ev3dev2.led import Leds
from ev3dev2.sound import Sound
from ev3dev2.motor import OUTPUT_A, MediumMotor
from ev3dev2.motor import OUTPUT_B, LargeMotor
from ev3dev2.sensor.lego import ColorSensor
同样在初始化中:
def __init__(self):
    """
    Performs Alexa Gadget initialization routines and ev3dev resource allocation.
    """
    super().__init__()

    # Connect motors and color sensor
    self.colorsensor = ColorSensor()
    self.beltmotor = LargeMotor(OUTPUT_B)
    self.ejectmotor = MediumMotor(OUTPUT_A)
    self.sound = Sound()
    self.leds = Leds()
然后当命令到达 Mindstorms Gadget 时,我们将参数拆箱并调用我们自己的方法:
def on_custom_mindstorms_gadget_control(self, directive):
    """
    Handles the Custom.Mindstorms.Gadget control directive.
    :param directive: the custom directive with the matching namespace and name
    """
    try:
        payload = json.loads(directive.payload.decode("utf-8"))
        print("Control payload: {}".format(payload), file=sys.stderr)
        control_type = payload["type"]
        if control_type == "candy":

            # Expected params: [pieces, color, piecesB, colorB]
            self._candy(int(payload["pieces"]), payload["color"], int(payload["piecesB"]), payload["colorB"])

    except KeyError:
        print("Missing expected parameters: {}".format(directive), file=sys.stderr)
这是供应糖果的主要部分:
def _candy(self, pieces: int, color, piecesB: int, colorB, is_blocking=False):
"""
Handles candy commands from the directive.
Sample:
Give me {Pieces} {Color} and {PiecesB} {ColorB} candies
Variations:
1 blue and 2 green
1 blue and 0
所以对于 Python 代码,首先我们使用 EV3 自己的编程语言来实现和测试,像这样:

Python代码就是以此为基础的,所以在一些启动声音之后,我们用大电机转动皮带,同时不断检查颜色传感器的值。如果传感器看到我们选择的糖果颜色,那么我们立即停止传送带,然后将其移动到所需的弹出位置,然后中型电机将弹出我们的糖果。如此重复直到所有第一种颜色的糖果都被弹出。然后再次重复第二种颜色。
当我们将程序翻译成 Python 时,这个站点非常有用:https ://sites.google.com/site/ev3python/learn_ev3_python/using-motors
第7步:有趣!
现在让我们将糖果放入机器中,让乐趣开始吧。
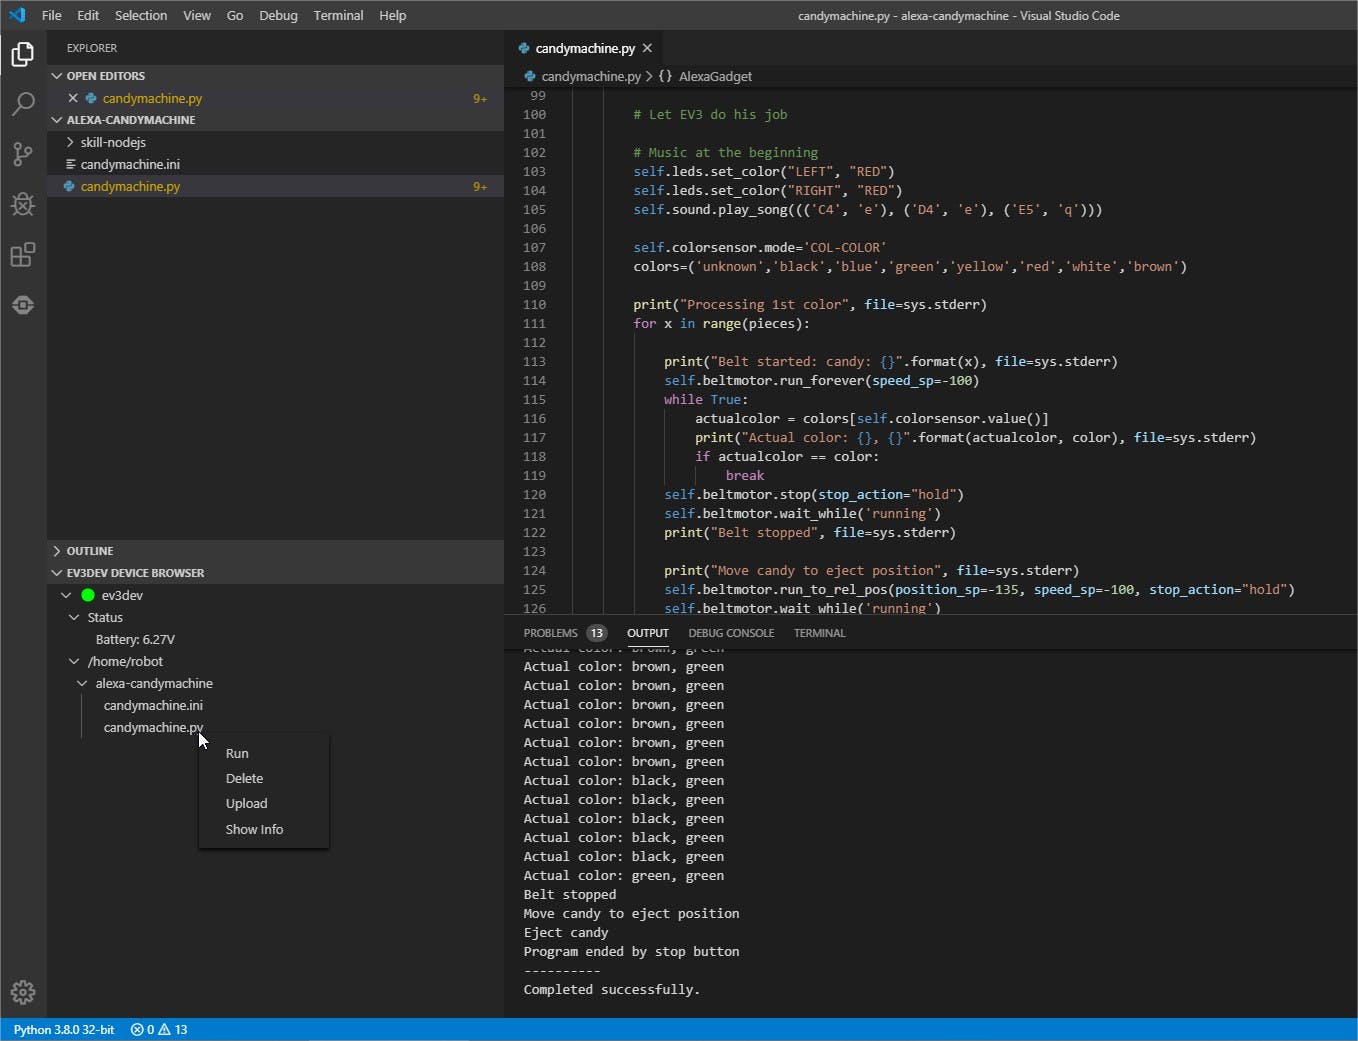
您可以通过使用 Visual Studio Code 将程序下载到 EV3 来启动该程序,然后右键单击您的candymachine.py文件并运行它。然后 Visual Studio Code 将以调试模式启动它,您还将在 PC 上看到 EV3 的控制台输出:

该过程会不断地向控制台注销正在发生的事情,因此您可以在从 Visual Studio Code 运行时检查它,如下所示:
Starting: brickrun --directory="/home/robot/alexa-candymachine" "/home/robot/alexa-candymachine/candymachine.py"
Started.
----------
Attempting to reconnect to Echo device with address: 08:A6:BC:95:53:02
Connected to Echo device with address: 08:A6:BC:95:53:02
GadgetDFD connected to Echo device
Control payload: {'pieces': '2', 'color': 'blue', 'piecesB': '1', 'type': 'candy', 'colorB': 'green'}
Candy command: (2, blue, 1, green)
Processing 1st color
Belt started: candy: 0
Actual color: black, blue
Actual color: black, blue
Actual color: black, blue
...
Actual color: red, blue
Actual color: red, blue
Actual color: red, blue
...
Actual color: black, blue
Actual color: black, blue
Actual color: black, blue
Actual color: blue, blue
Belt stopped
Move candy to eject position
Eject candy
Belt started: candy: 1
Actual color: red, blue
Actual color: red, blue
...
Actual color: black, blue
Actual color: black, blue
Actual color: black, blue
...
Actual color: red, blue
Actual color: red, blue
Actual color: red, blue
...
Actual color: black, blue
Actual color: black, blue
Actual color: black, blue
Actual color: blue, blue
Belt stopped
Move candy to eject position
Eject candy
Processing 2nd color
Belt started: candy: 0
Actual color: red, green
Actual color: red, green
...
Actual color: black, green
Actual color: black, green
Actual color: black, green
...
Actual color: red, green
Actual color: red, green
...
Actual color: black, green
Actual color: black, green
Actual color: black, green
Actual color: green, green
Belt stopped
Move candy to eject position
Eject candy
现在,让我们与 Alexa 聊天:
“Alexa,打开糖果机”
“糖果机已启动。有什么可以为您服务的吗?”
“给我 2 块绿色和 3 块黄色糖果”
“请稍等,我正在为您提供 2 个绿色和 3 个黄色的糖果。”
或者根据 Alexa 技能交互模型:
“Alexa,让糖果机给我一颗糖果”
“给我两颗蓝色糖果”
“给我一颗绿糖”
“给我3块糖果”
“给我6块红糖”
每当您的请求不完整或您请求的内容不可用时,Alexa 将根据 lambda 中实现的逻辑做出相应的响应。
你也可以告诉她你已经达到了你的目标,这样她就可以给你一颗糖果。
“我已经完成了我的家庭作业”
“恭喜!你应该得到一些糖果”
“我的房间很干净”
“恭喜!你应该得到一些糖果”
您可以在下面的视频中看到与她的一些高级对话:
我们希望您喜欢构建我们的糖果机项目!
(于 2019 年 11 月 17 日提交)
声明:本文内容及配图由入驻作者撰写或者入驻合作网站授权转载。文章观点仅代表作者本人,不代表电子发烧友网立场。文章及其配图仅供工程师学习之用,如有内容侵权或者其他违规问题,请联系本站处理。 举报投诉
- 相关下载
- 相关文章


