
资料下载


NEST恒温器的自动离开辅助
vinww特烦恼
分享资料个
描述
介绍
Nest Thermostat 是一款支持 Wi-Fi 的设备,可以使用天气信息和本地传感器数据优化加热和冷却系统的使用。该设备也可以远程控制,因此您可以在下班开车回家时做一些很酷的事情,例如将房子设置为加热/冷却。不过,该设备有点像一个黑匣子,它使用一些底层的机器学习机制(无论如何我都听到了)来创建您特定使用习惯的模型,并尝试确定您是否在家。
问题是 Nest 并不总是正确地确定家/离家。例如,我有两个 Nest 单元控制家里的两个 HVAC 单元(一个在楼上控制我房子的左侧,另一个在楼下控制右侧)。通常,我发现自己在楼上的办公室(位于房子的右侧)工作,并且由于认为我离开房子而关闭了空调。这是一个问题,通常涉及通过移动/Web 应用程序手动启动 Nest 控制器,或者跑出办公室并触发我的其他 Nest 设备之一上的运动传感器。
Nest 是一款支持 Wi-Fi 的设备,所以为什么不在家时使用运动感应或类似的东西告诉它呢?Nest 意识到了这个问题,并出售了一个运动传感器和一个附加监控恒温器,用于控制 Nest 控制器位置以外房间的温度。这些传感器非常昂贵,并且仅与 Nest v3 恒温器兼容(我们中的许多人都有 v2 型号)。Nest v2 已启用 Wi-Fi,因此您会认为存在基于 Wi-Fi 的设备来解决此问题,但事实并非如此。
解决方案
我们真正需要的是一种使用某种形式的基于硬件的触发器(PIR 运动/簧片开关/更复杂的东西)通知 Nest 我们在家的方法。有人会认为If This Then That将通过他们的 Nest 集成支持此功能,但目前没有任何具体设置 Nest 的 Home / Away 状态。这不是破坏交易,我们可以自己动手。
要创建我们自己的更新 Nest Home / Away 状态的机制,我们只需要几个要素:
- 一个有效的 Oauth 令牌,允许我们通过Nest 的开发人员 API发出 API 请求以更新 Home / Away 状态
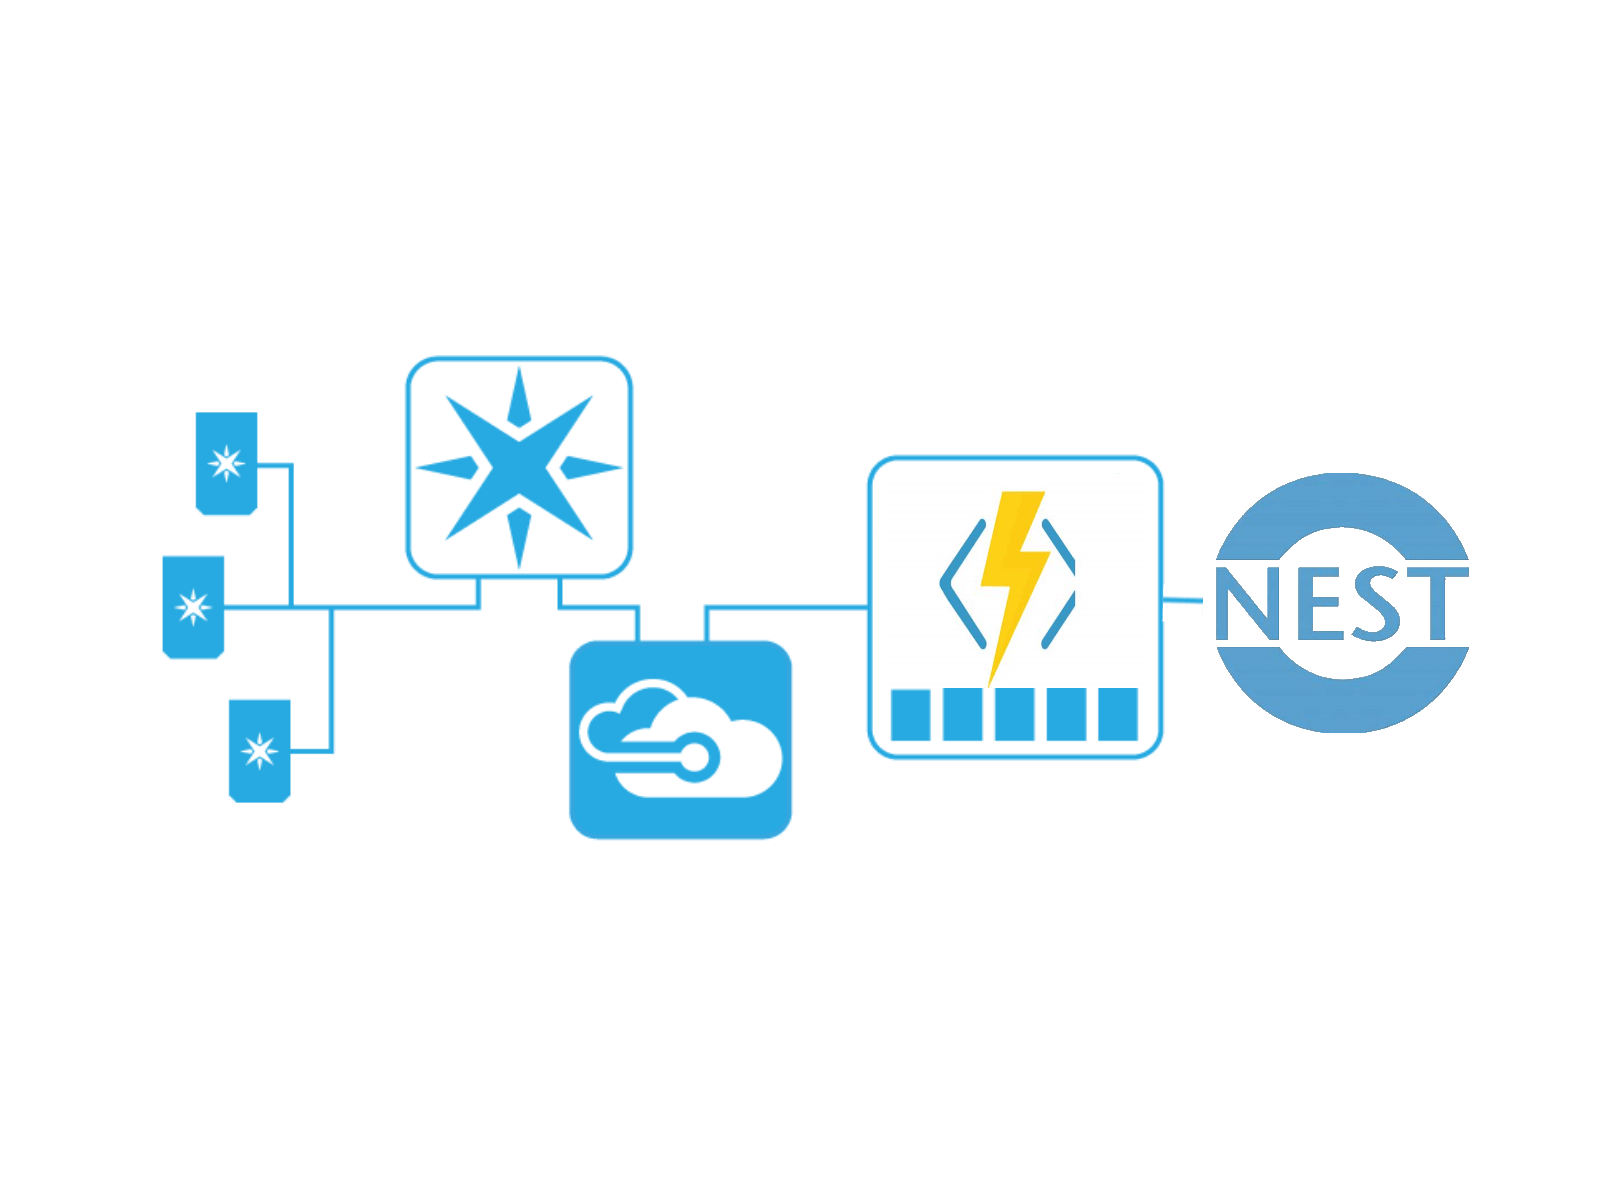
- 可以检测存在并发送事件以触发此 API 调用的设备。我们将使用粒子核心/光子和 PIR 运动传感器以及集成将消息转发到 Azure IoT 中心。
- 对 Nest API 进行实际调用的服务。我们将使用无服务器 Azure 函数来调用 Nest API,当事件通过上述 Azure IoT 中心到达时将触发该 API。
下面提供了概述整体架构的图表:
获取 Oauth Token 以访问 Nest API
1. 您需要创建一个活跃的 Nest 开发者帐户
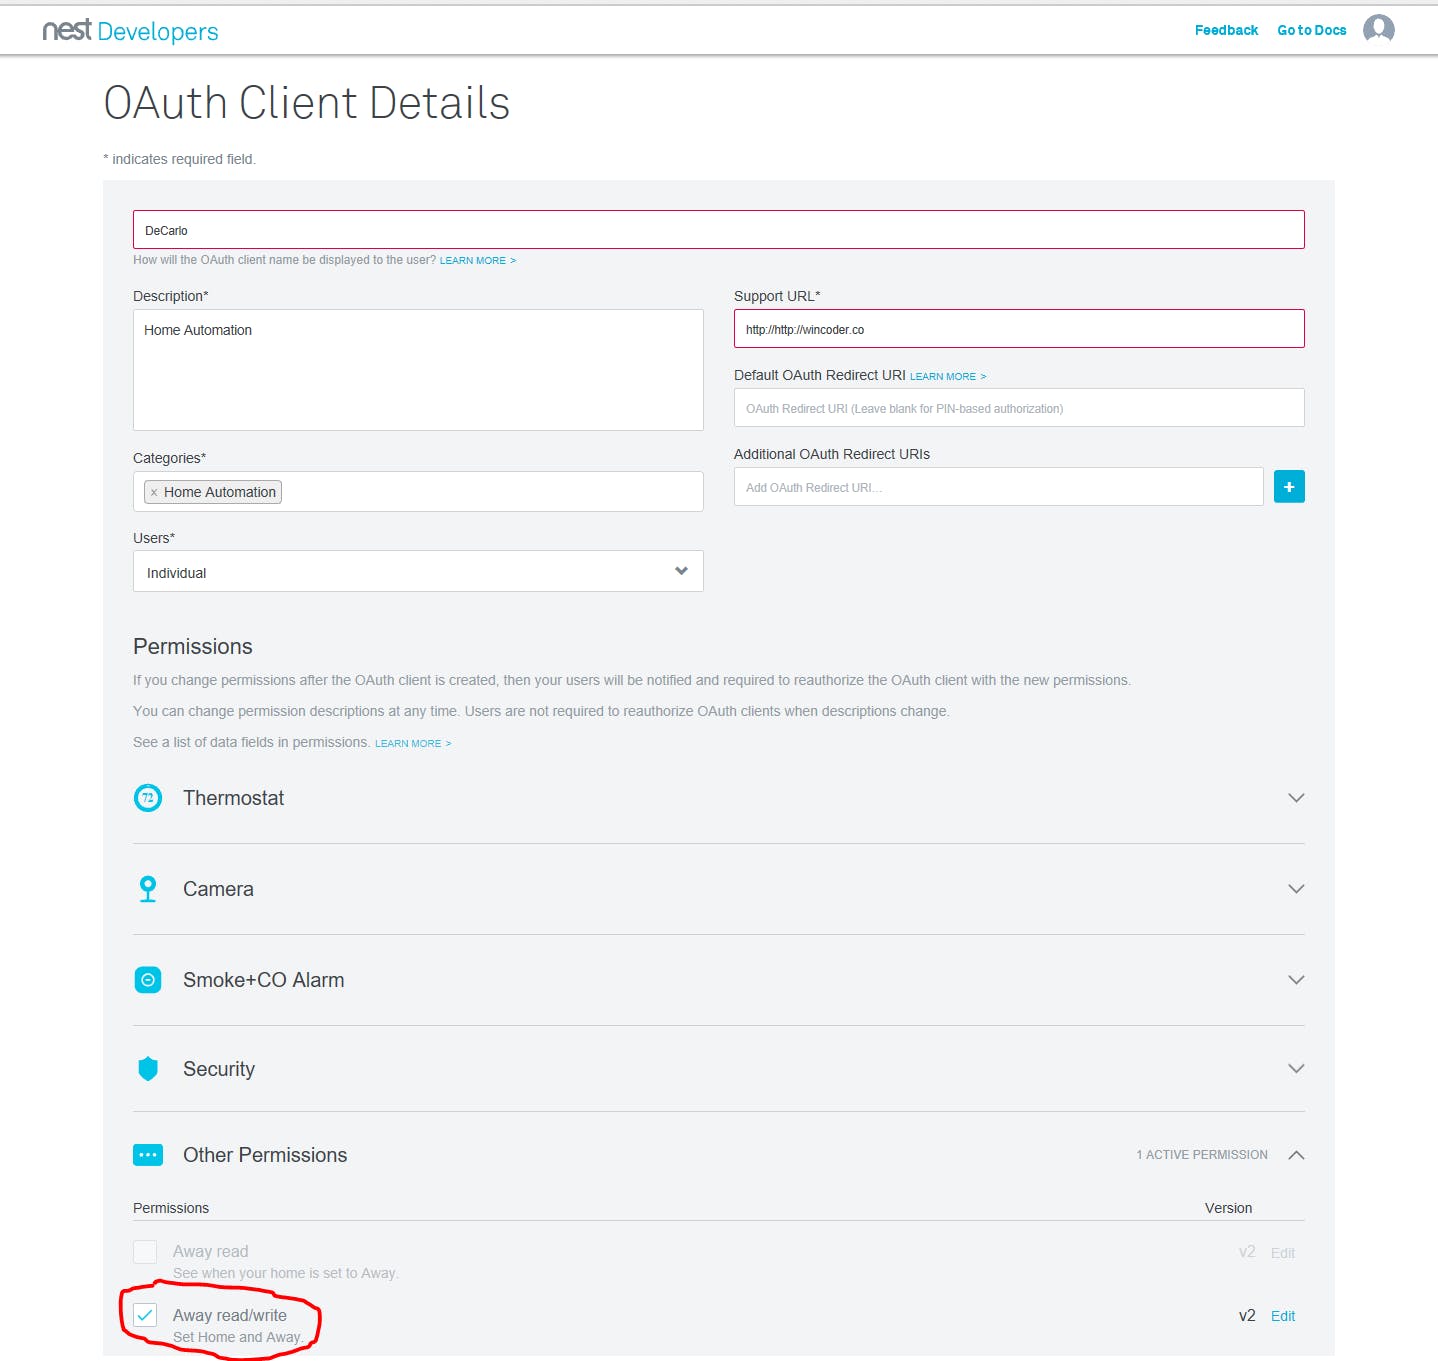
2. 在创建一个新的 OAuth 客户端
确保启用“离开读/写”设置!
3. 从下面的屏幕获取 OAuth 客户端的授权 URL 值,然后选择“允许”。允许您的申请后,您将收到一个密码,请务必将其复制下来。授权 URL 可以从 OAuth 客户端的概览屏幕获取,如下所示。
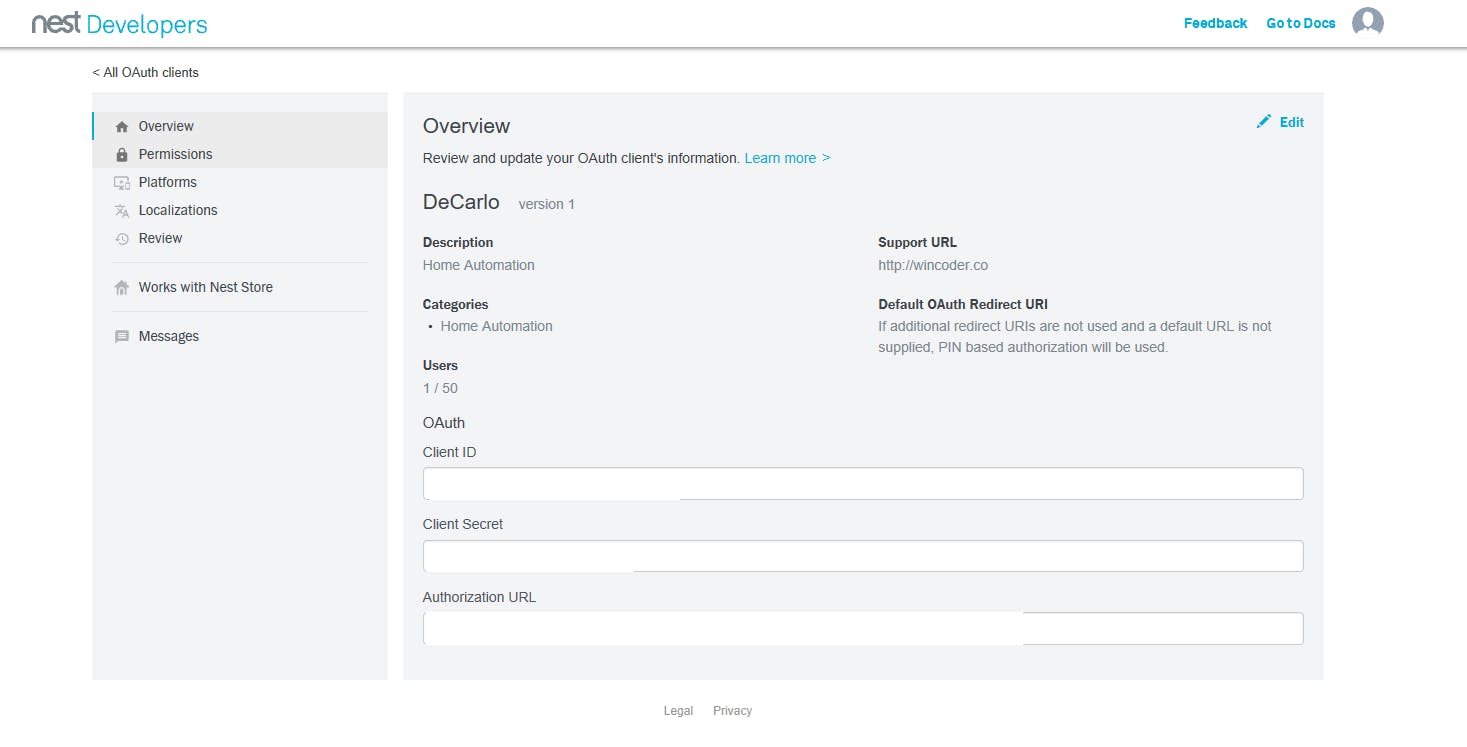
4. 在您获得授权 URL 的概览屏幕中,记下“客户端 ID”和“客户端密码”值。接下来,从安装了“curl”的合适命令提示符处,执行以下命令以获取您的 AUTH_TOKEN:
curl -X POST "https://api.home.nest.com/oauth2/access_token?client_id=<YOUR_CLIENT_ID>&code=<YOUR_PIN_CODE>&client_secret=<YOUR_CLIENT_SECRET>&grant_type=authorization_code"
5. 最后,我们需要获取您想要的 STRUCTURE_ID,这是您的 Home 的表示,它与特定的 Nest 设备相关联。以下将返回一个 json 有效负载。您需要记下 structure_id 属性的值。
curl --location-trusted \ -H "Content-Type: application/json" \ -H "Authorization: Bearer " \ -X GET "https://developer-api.nest.com/
构建硬件
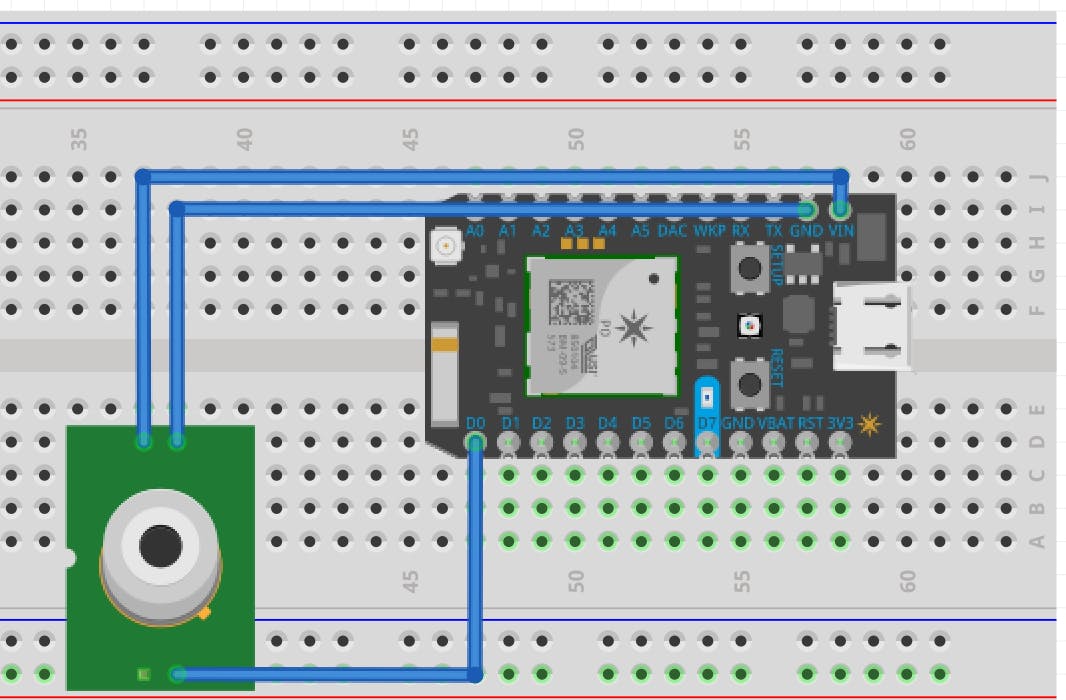
我们将使用提供的 Particle Photon 或 Particle Core 设备以及数字 PIR 传感器来创建一个设备,该设备可以监控运动并能够将事件发布到 Particle.io。
1. 首先获取一个数字 PIR 传感器并根据以下示意图连接到可用的粒子设备:
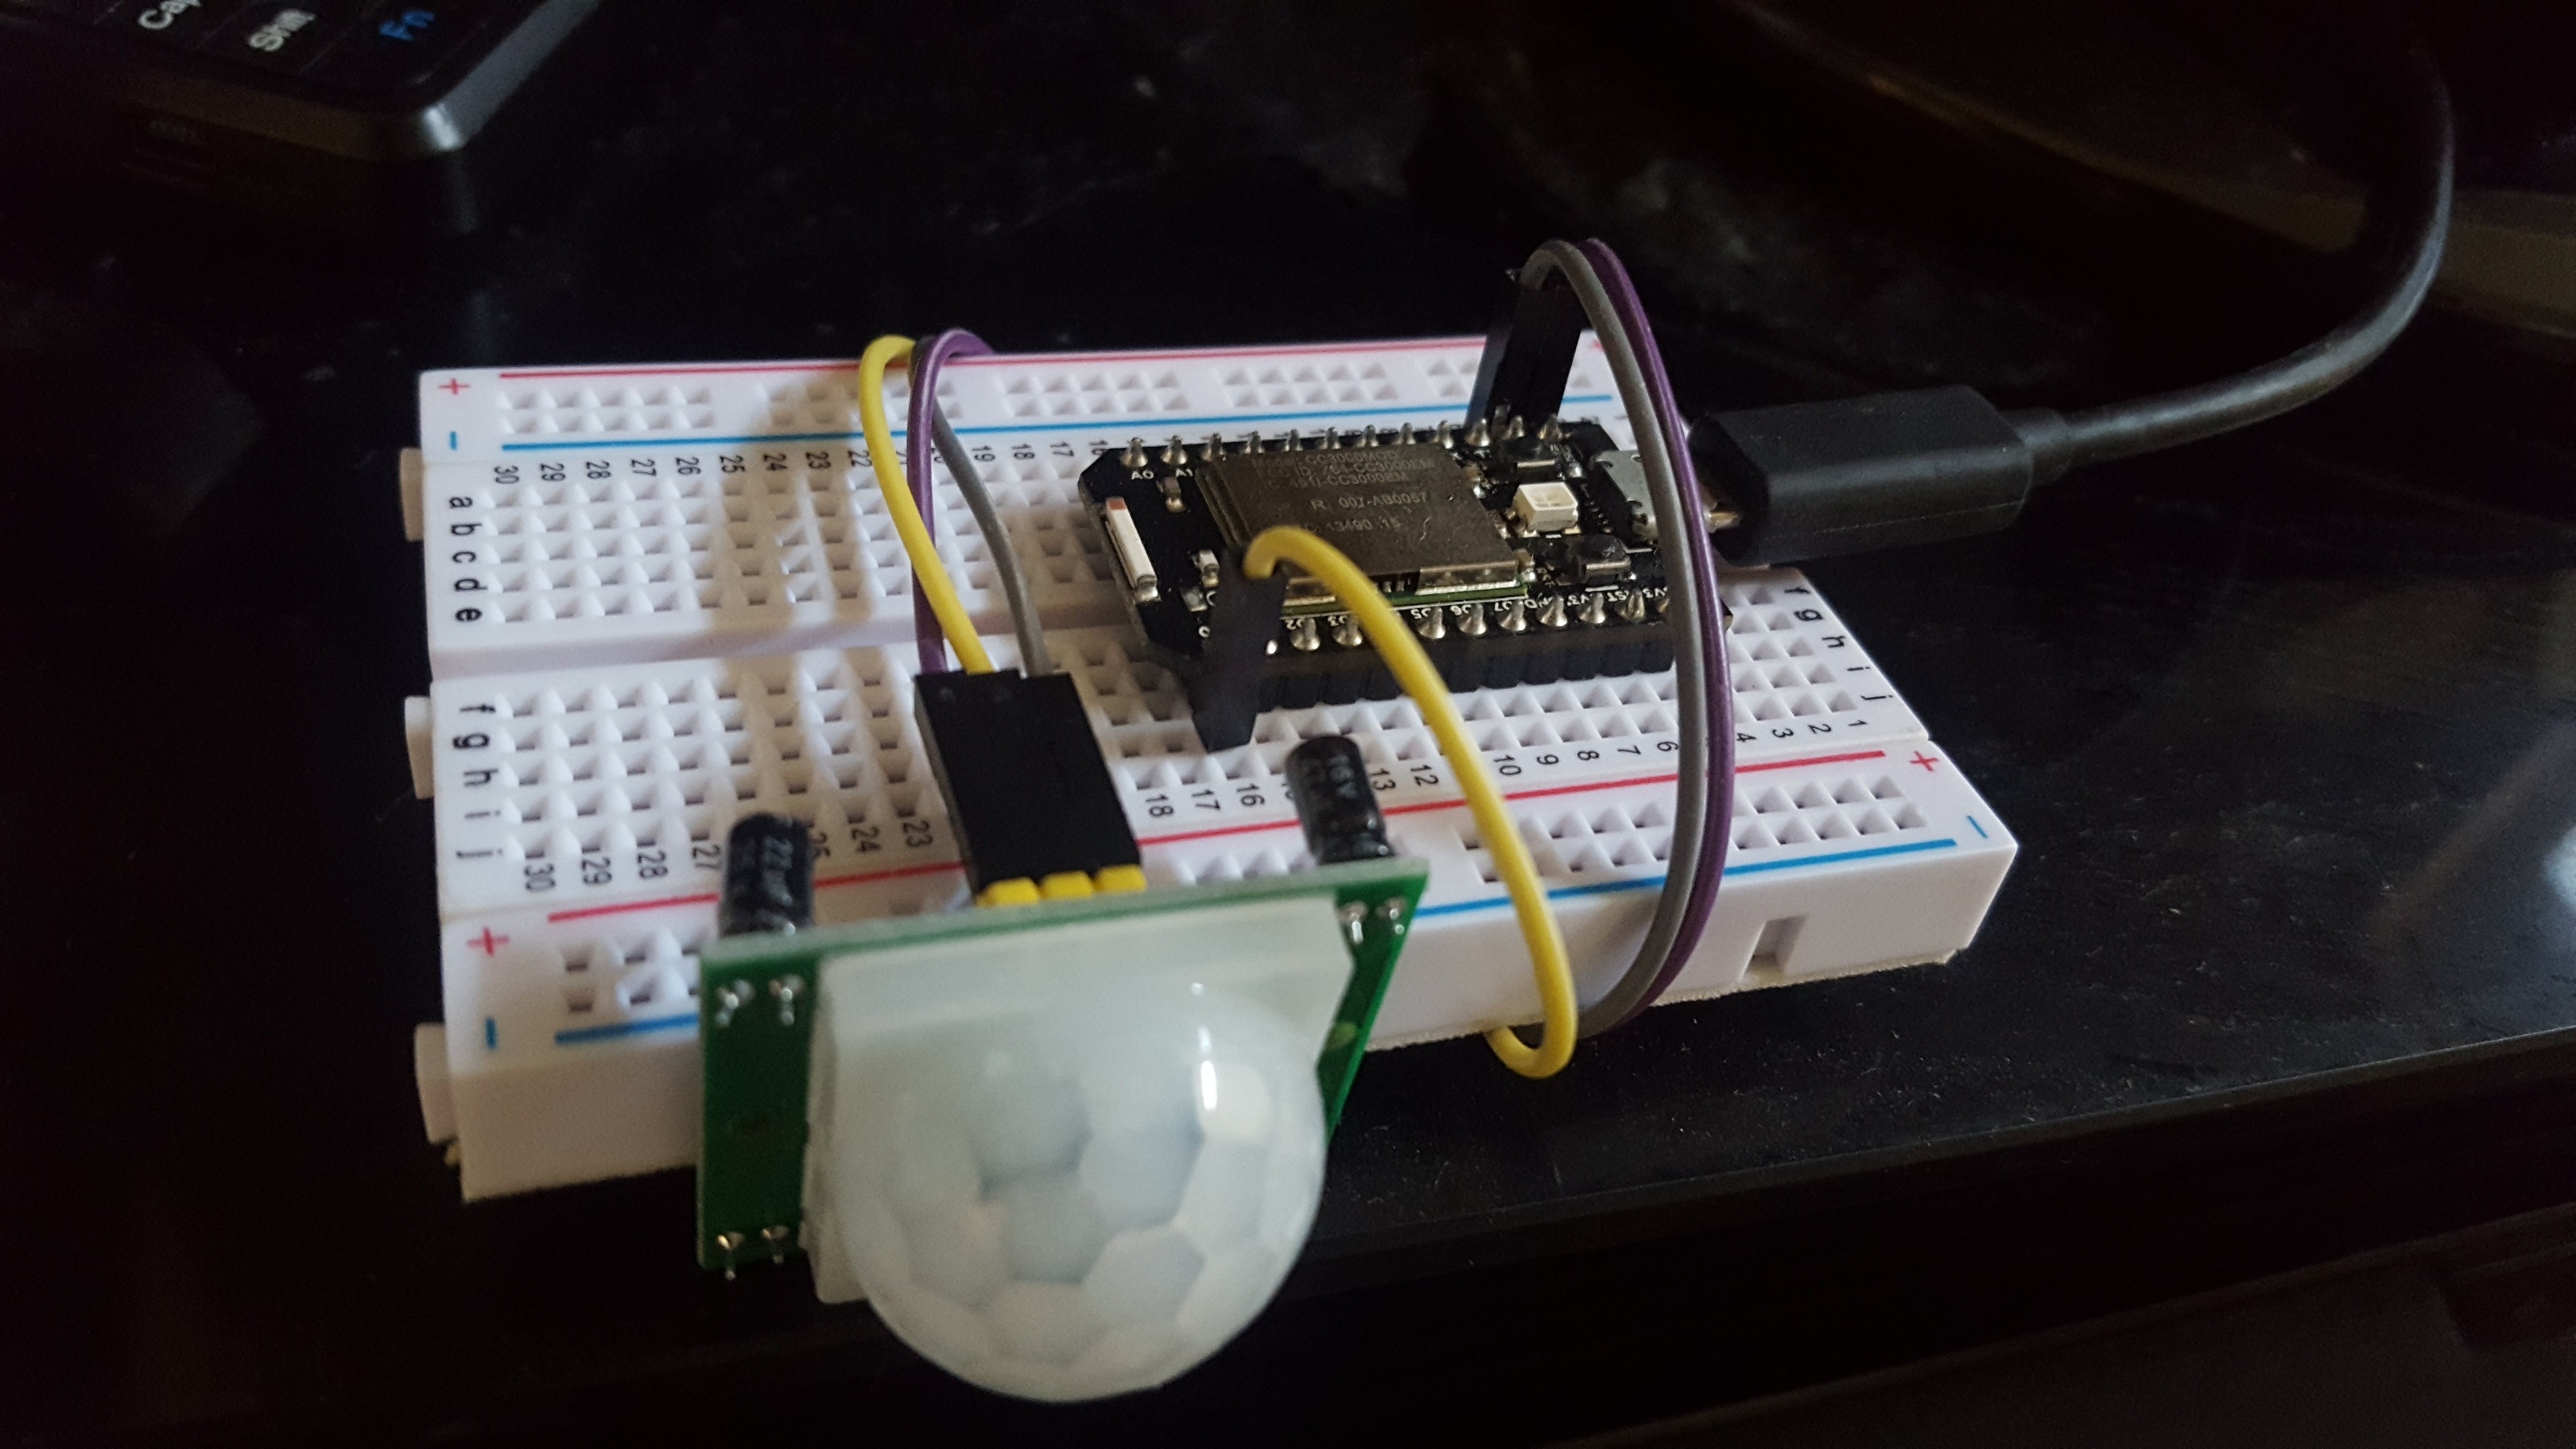
您将需要刷新附加的nest-motion.ino并确保包含相关的 CircularBuffer.h
该程序使用 CircularBuffer 来允许通过采样窗口监控传感器读数。这使我们能够非常精确地从硬件控制运动触发事件的灵敏度。通常,PIR 传感器很容易产生误报事件,而没有根据调速器评估样本读数的机制。要获得更高的灵敏度,请减少“PostiveSamplesToTriggerMotion”变量。要为触发器需要更长的运动窗口,您可以调整“SampleWindowSize”。
为了方便起见,下面提供了nest-motion.ino :
/*
*********************
Nest Motion Detection
*********************
A tunable program for determining motion events using a PIR sensor, with an emphasis on reducing false-positives and minimizing energy consumption.
When motion is detected, an event is published to Particle.io.
This event is then forwarded to an Azure IoT Hub which calls a Serverless function informing Nest to set Away Status to "Home"
Instruction for end-to-end configuration are avaiable @
*/
#include "CircularBuffer.h"
#define PIRPIN D0 //The Pin attached to the PIR Sensor
const int CalibrationTimeInSeconds = 30; //Seconds to await for calibration of the PIR sensor
const int SampleWindowSize = 10; //Ex: SampleWindowSize is the amount of samples to keep track of for evaluating the occurence of a motion event
const int PostiveSamplesToTriggerMotion = 10; //Ex: A value of x will require that at least x samples produced within the sampleWindow are postive to trigger a motion event
const int SleepIntervalInSeconds = 600;  //The amount of time to go into deep sleep mode afer motion is reported, 600 seconds equates to a max of 10 alerts per hour
CircularBuffer<bool, SampleWindowSize> sampleWindow;
char output[50];
//Per PIR spec, allow 30s to calibrate (warm up) the sensor
void CalibrateSensor()
{
   Serial.print("Calibrating Sensor... ");
   for(int i = 0; i < CalibrationTimeInSeconds; i++){
       delay(1000);
   }
   Serial.println("PIR Sensor Calibrated");
}
void setup() {
   Serial.begin(9600);
   Serial.println("***************************************");
   Serial.println("    Nest Motion Detection Started ");
   Serial.println("***************************************");
   pinMode(PIRPIN, INPUT);
   CalibrateSensor();
}
void loop() {
   sampleWindow.push(SamplePIR());
   if(CheckSampleWindowForMotion())
   {
       Serial.print("Publishing motion event... ");
       //Motion accurately detected, time to inform Nest that we are we are home
       Particle.publish("motion",  "true", PRIVATE); //Trigger the integration
       delay(1000); //Extra sleep to ensure message delivery
       Serial.println("Motion event published");
       Serial.println("Going to sleep now...");
       System.sleep(SLEEP_MODE_DEEP, SleepIntervalInSeconds); //Go into deep sleep low-power mode for SleepIntervalInSeconds seconds
       CalibrateSensor();//Recalibrate Sesnor on awaken
   }
}
//Takes ten readings per second, returns true if a postive reading is encountered
bool SamplePIR() {
   Serial.print("Sampling PIR... ");
   int val = 0;
   for(int i = 0; i < 10; i += 1)
   {
       if(val == LOW)
           val = digitalRead(PIRPIN);
       delay(100);
   }
   if(val)
    {
        Serial.println(" Motion Detected in sample!");
        return true;
    }
   else
   {
       Serial.println(" No Motion Detected in sample");
       return false;
   }
}
//Loops through the sampleWindow, returns true if enough positive samples are found
bool CheckSampleWindowForMotion()
{
   Serial.print("Checking Sample Window... ");
   int positiveSamples = 0;
   for(int i = 0; i < SampleWindowSize ; i++){
       if(sampleWindow.pop() == true)
           positiveSamples++;
   }
   Serial.print(positiveSamples);
   Serial.println(" positive samples were found in sample window");
   if(positiveSamples >= PostiveSamplesToTriggerMotion)
       return true;
   else
       return false;
}
设置粒子集成以将事件转发到 Azure IoT 中心
此步骤需要一个活动的 Azure 帐户。我们将创建的服务将是免费的,或者几乎不需要任何费用来运营。
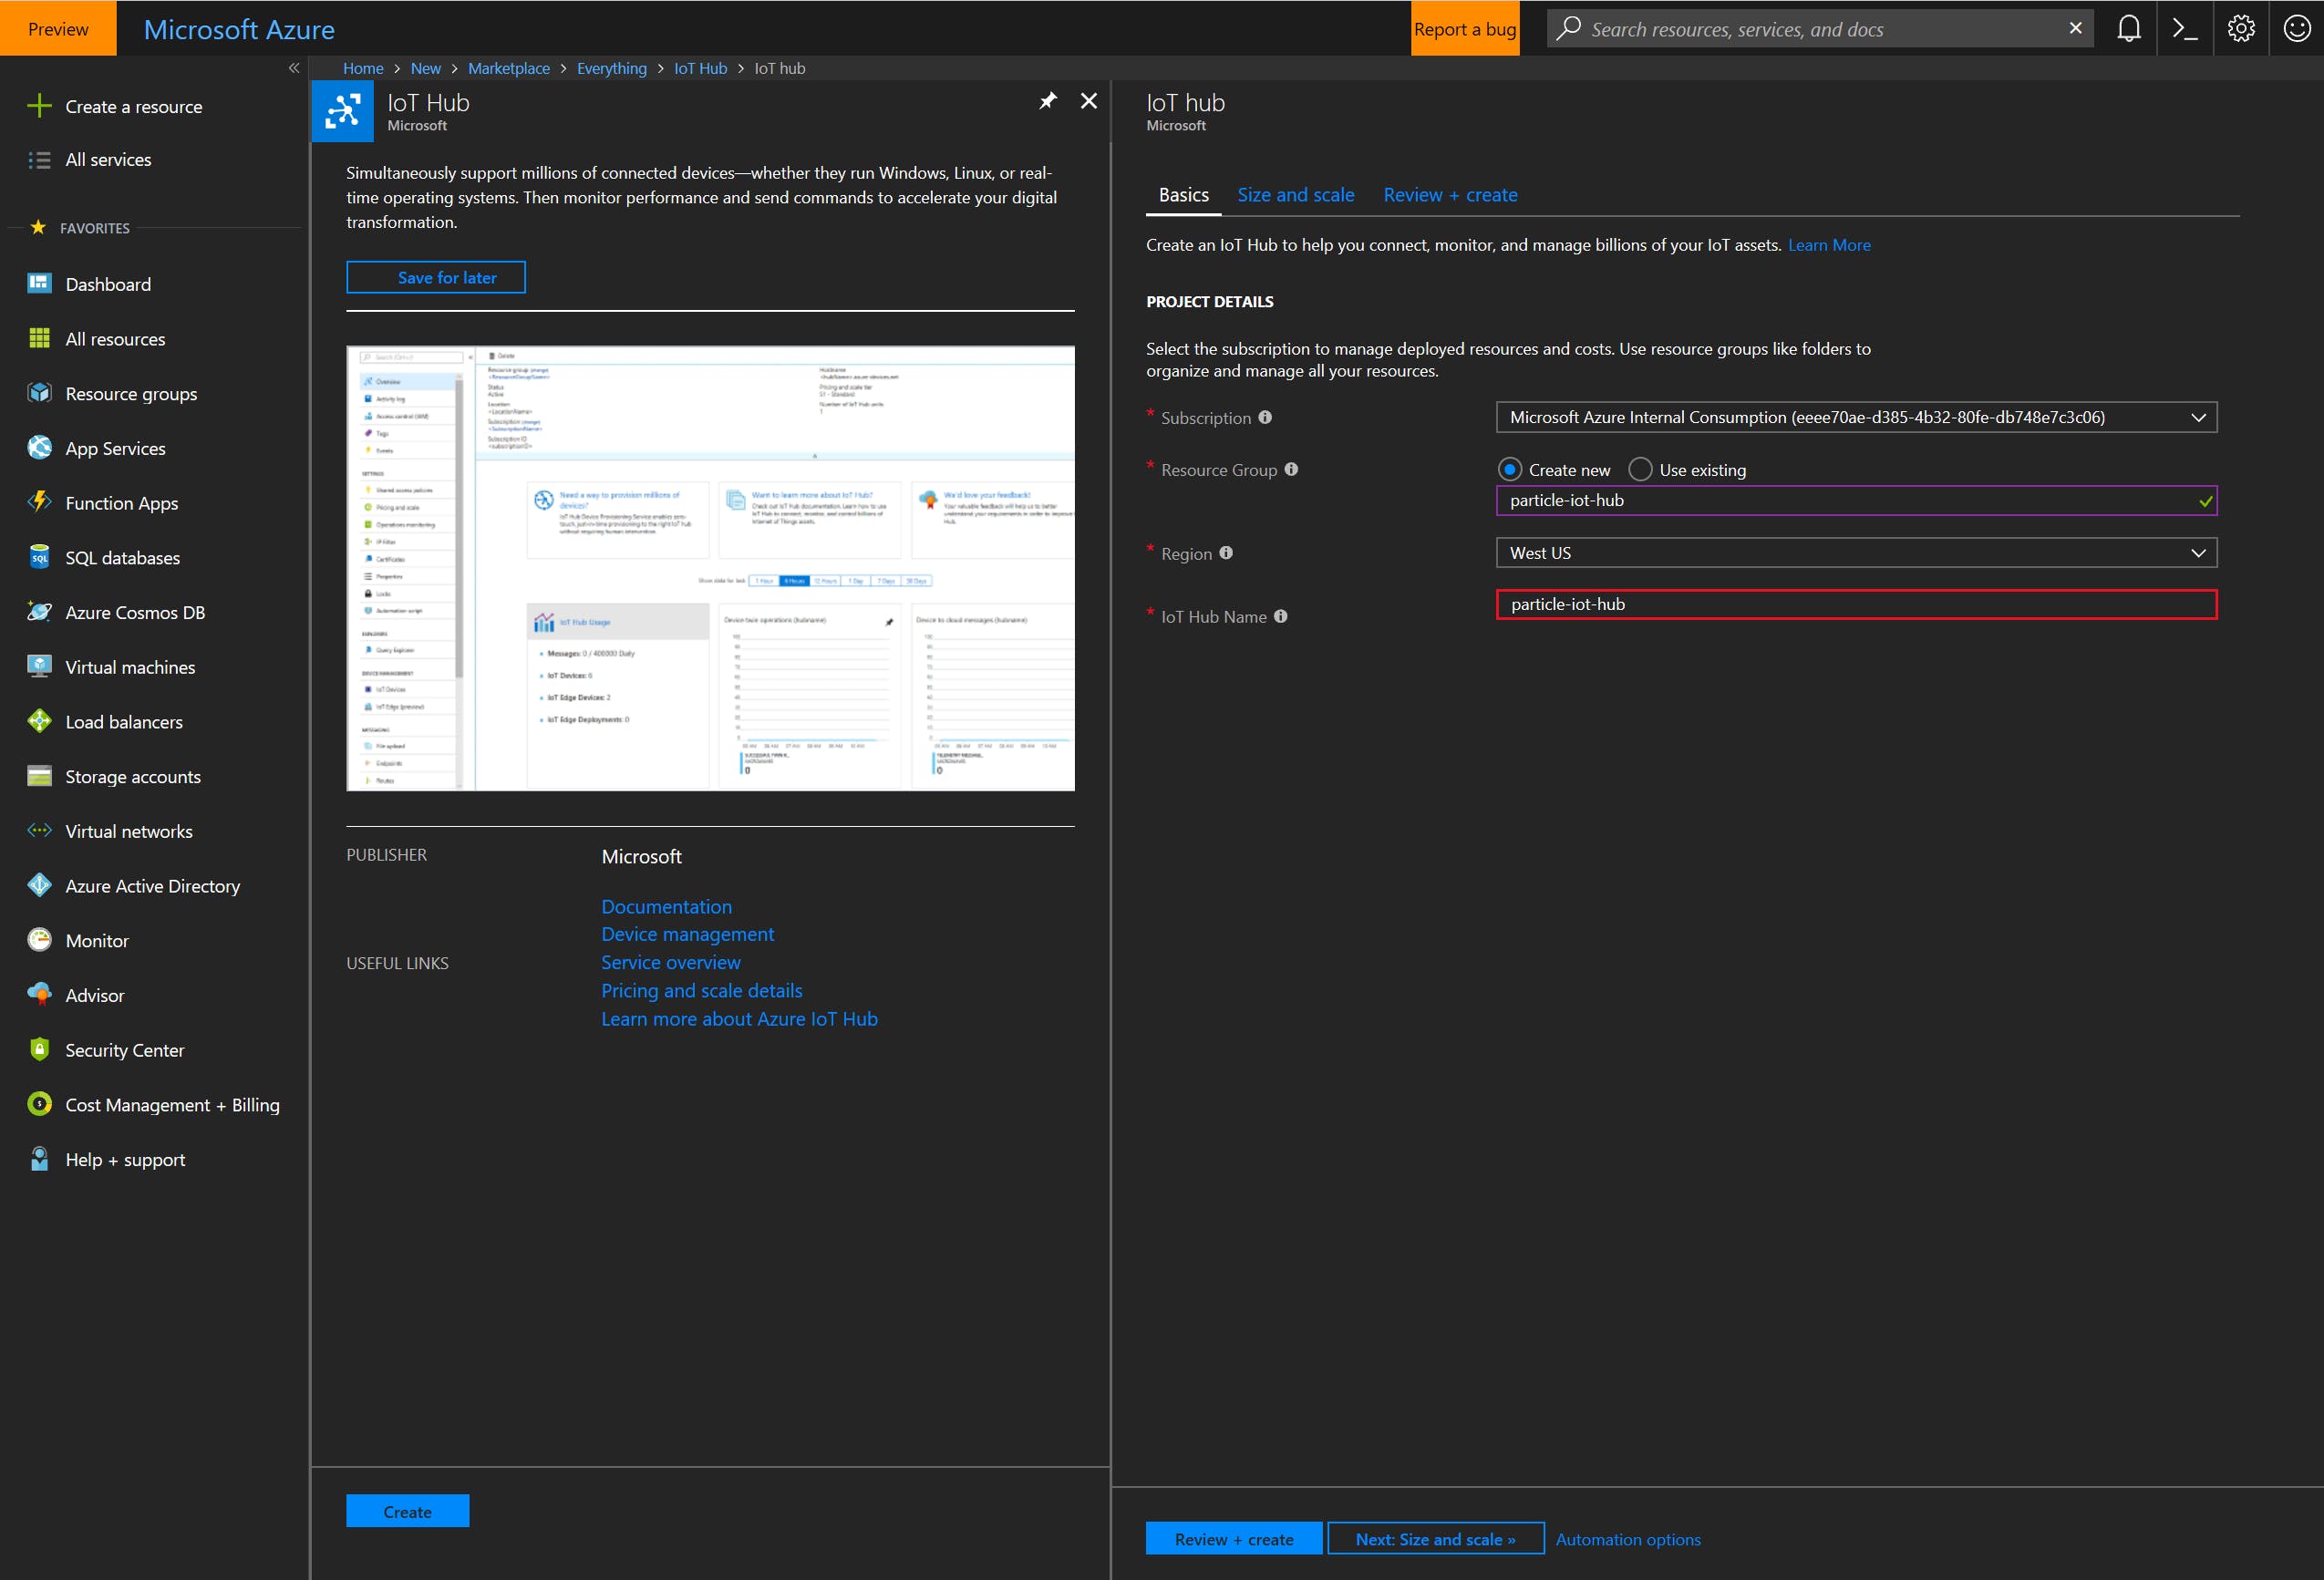
1. 在http://azure.com创建一个 Azure IoT 中心
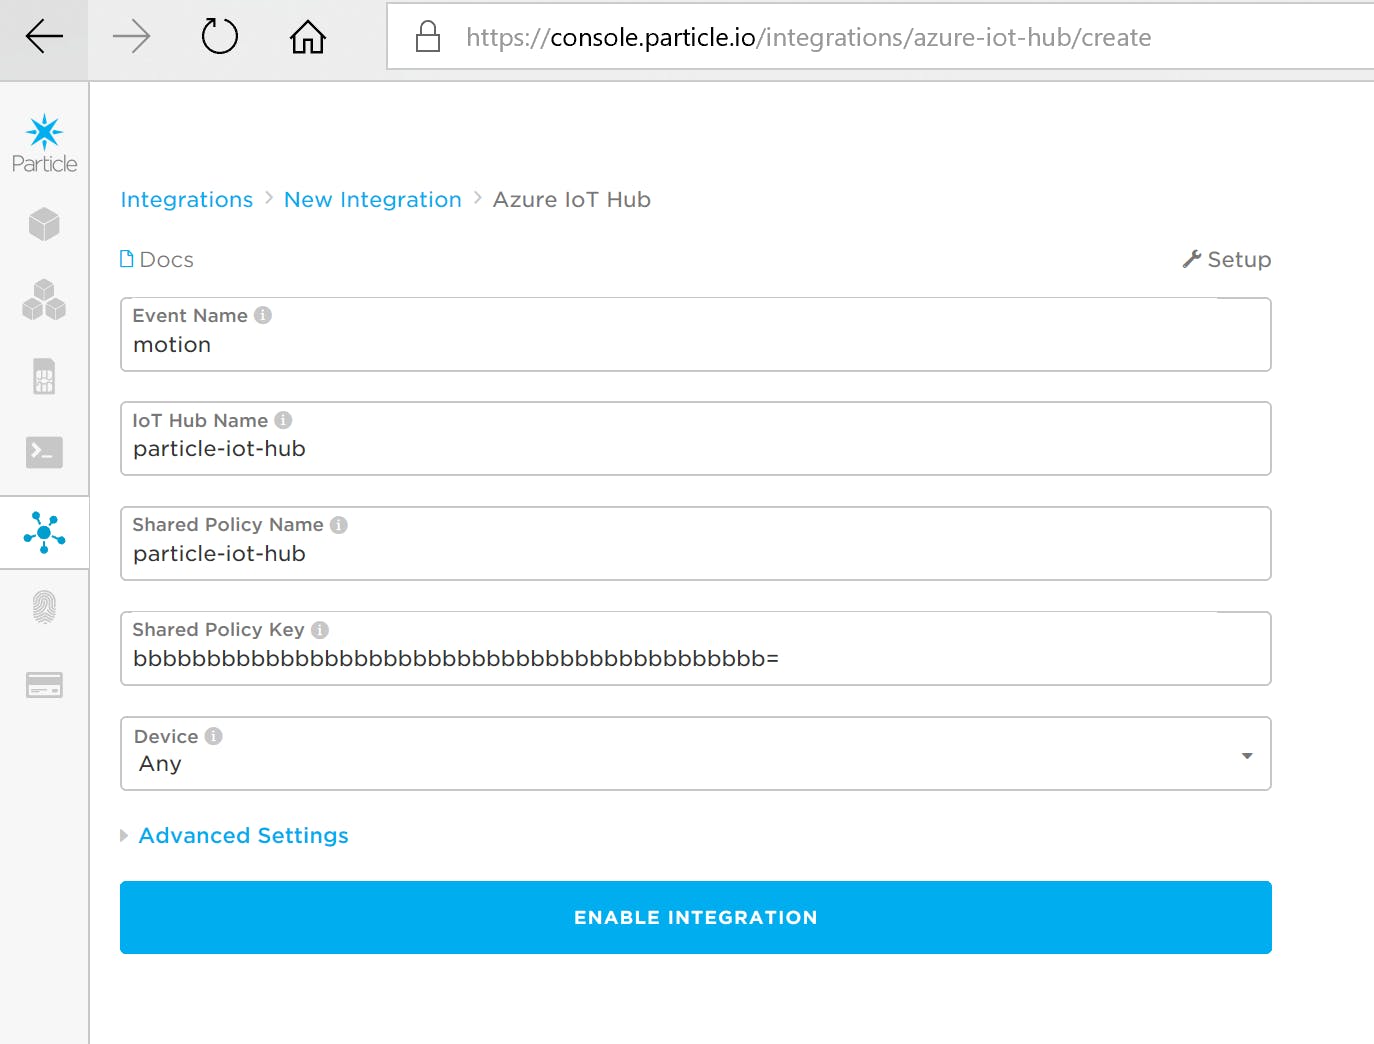
2.创建粒子集成
在创建一个新的粒子集成。请务必遵循所有说明,并特别注意有关创建“共享访问策略”的部分。在生成的设置页面上使用值“motion”作为事件名称。
填写相应信息后,启用集成。
现在,当Particle.publish("motion", "true", PRIVATE);在nestmotion.ino中调用时,该事件将被发送到Particle.io ,然后转发到您的 Azure IoT Hub。
使用 Azure 函数设置嵌套“离开”状态
我们几乎完成了,我们只需要触发对 Nest 的 API 的调用,以便在检测到运动时将 Nest 的“离开”状态设置为 home。
我已尽我最大的努力使用执行此任务的预制 Azure 函数使此操作尽可能简单。
1. 在创建一个新的 Azure Function 应用
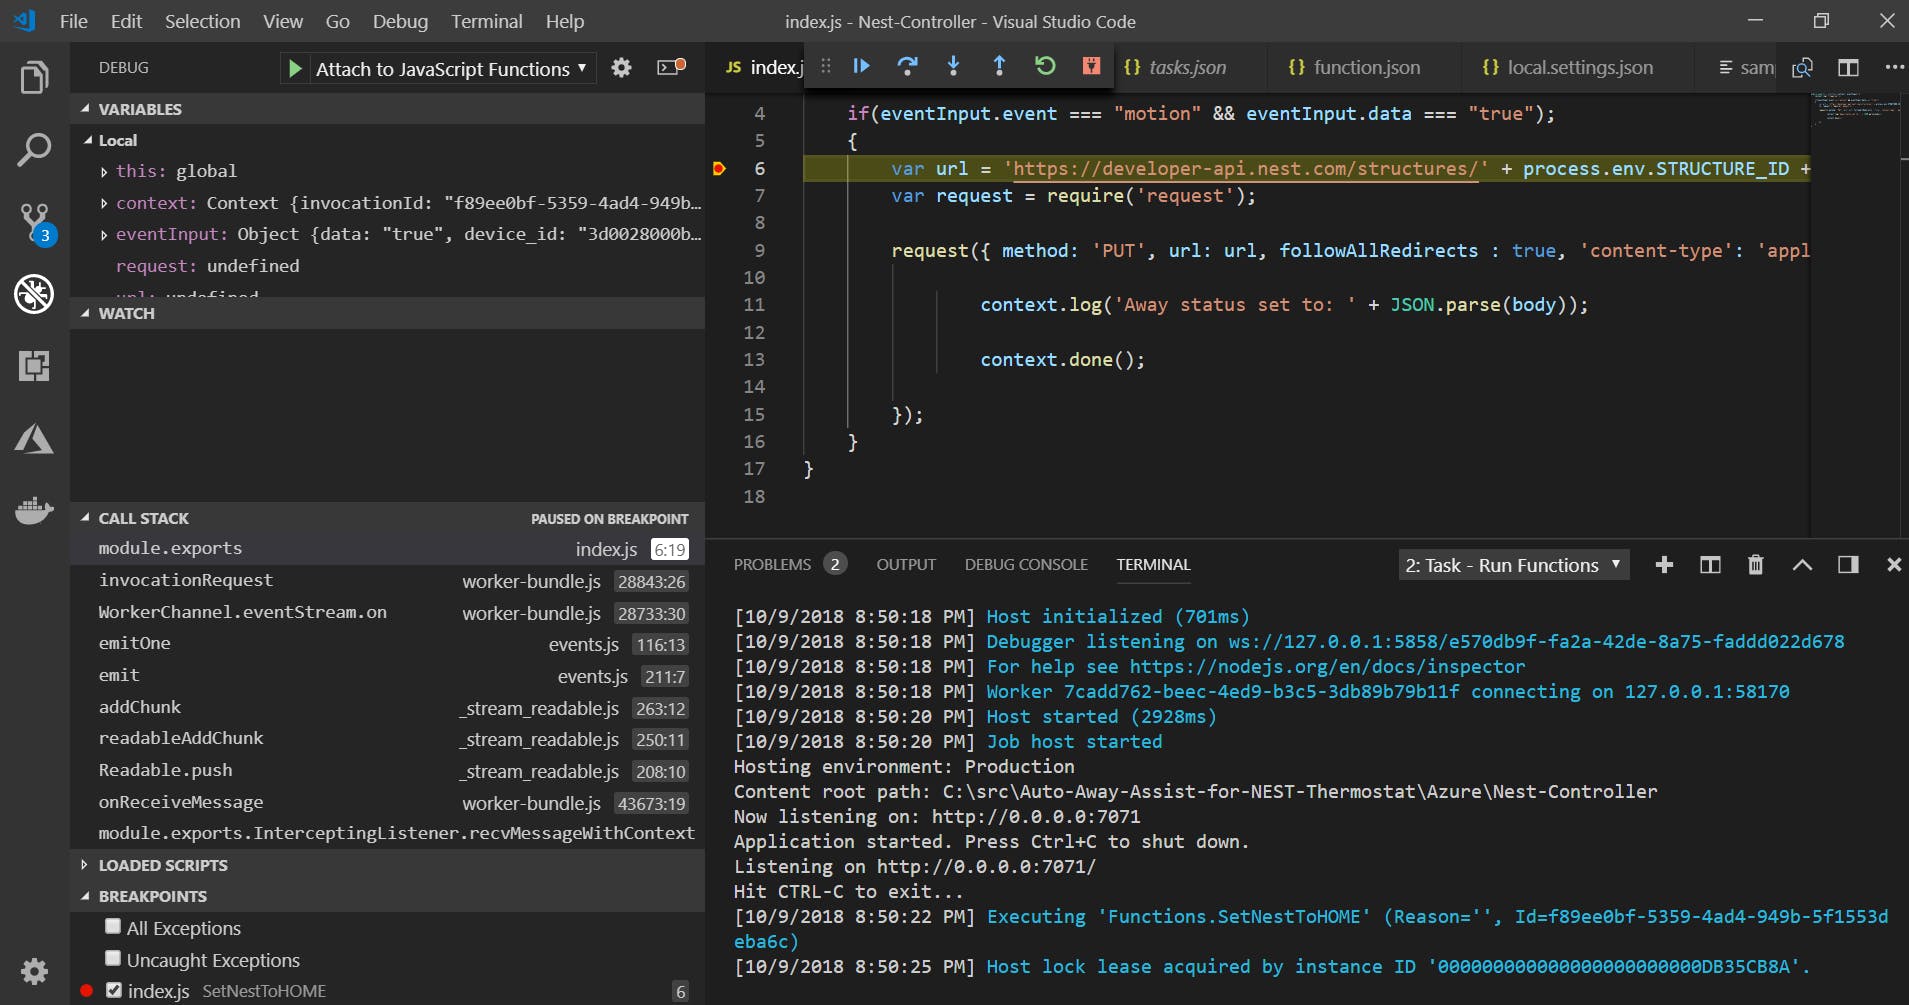
2. 在Visual Studio Code中,打开源代码库中包含的Nest-Controller文件夹,
您将需要编辑local.settings.json配置文件:
ACCESS_TOKEN和STRUCTURE_ID应设置为“获取 Oauth 令牌以访问 Nest API ”的步骤 4 和 5 中获得的值
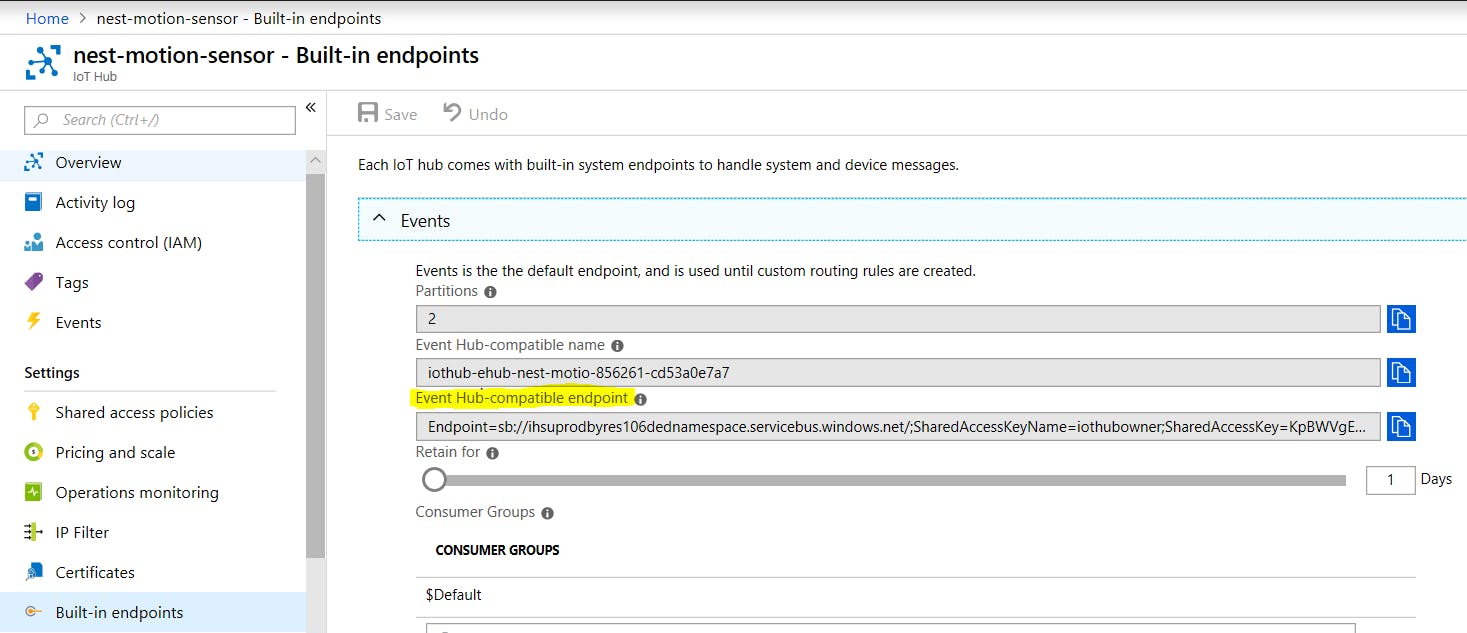
在 Azure 门户中,导航到 IoT 中心并选择“设置”下的“内置终结点”部分。
< EventHub-Compatible-Endpoint> 应更改为“Event Hub-compatible endpoint”的值。
您现在可以调试和测试 Azure 函数。当从粒子设备发送运动事件时,您应该会看到函数触发器。
当您能够验证函数是否按预期工作时,您可以通过右键单击项目并选择“部署到函数应用程序”来将函数发布到 Visual Studio 中的 Azure。
可选:如果您知道自己在做什么,则可以使用下面提供的代码完全在 Azure 门户中创建函数。请注意,您必须通过访问http://、导航到“wwwroot”并发出命令“ npm install request -g ”来满足“request.js”的依赖项,在 kudu cli 中安装“请求”依赖项。
module.exports = function (context, eventInput) {
   context.log('Triggered!');
   if(eventInput.event === "motion" && eventInput.data === "true");
   {
       var url = 'https://developer-api.nest.com/structures/' + process.env.STRUCTURE_ID + '/away?auth=' + process.env.ACCESS_TOKEN;
       var request = require('request');
       request({ method: 'PUT', url: url, followAllRedirects : true, 'content-type': 'application/json', body: '"home"' }, function (err, res, body) {
               context.log('Away status set to: ' + JSON.parse(body));
               context.done();
       });
   }
}
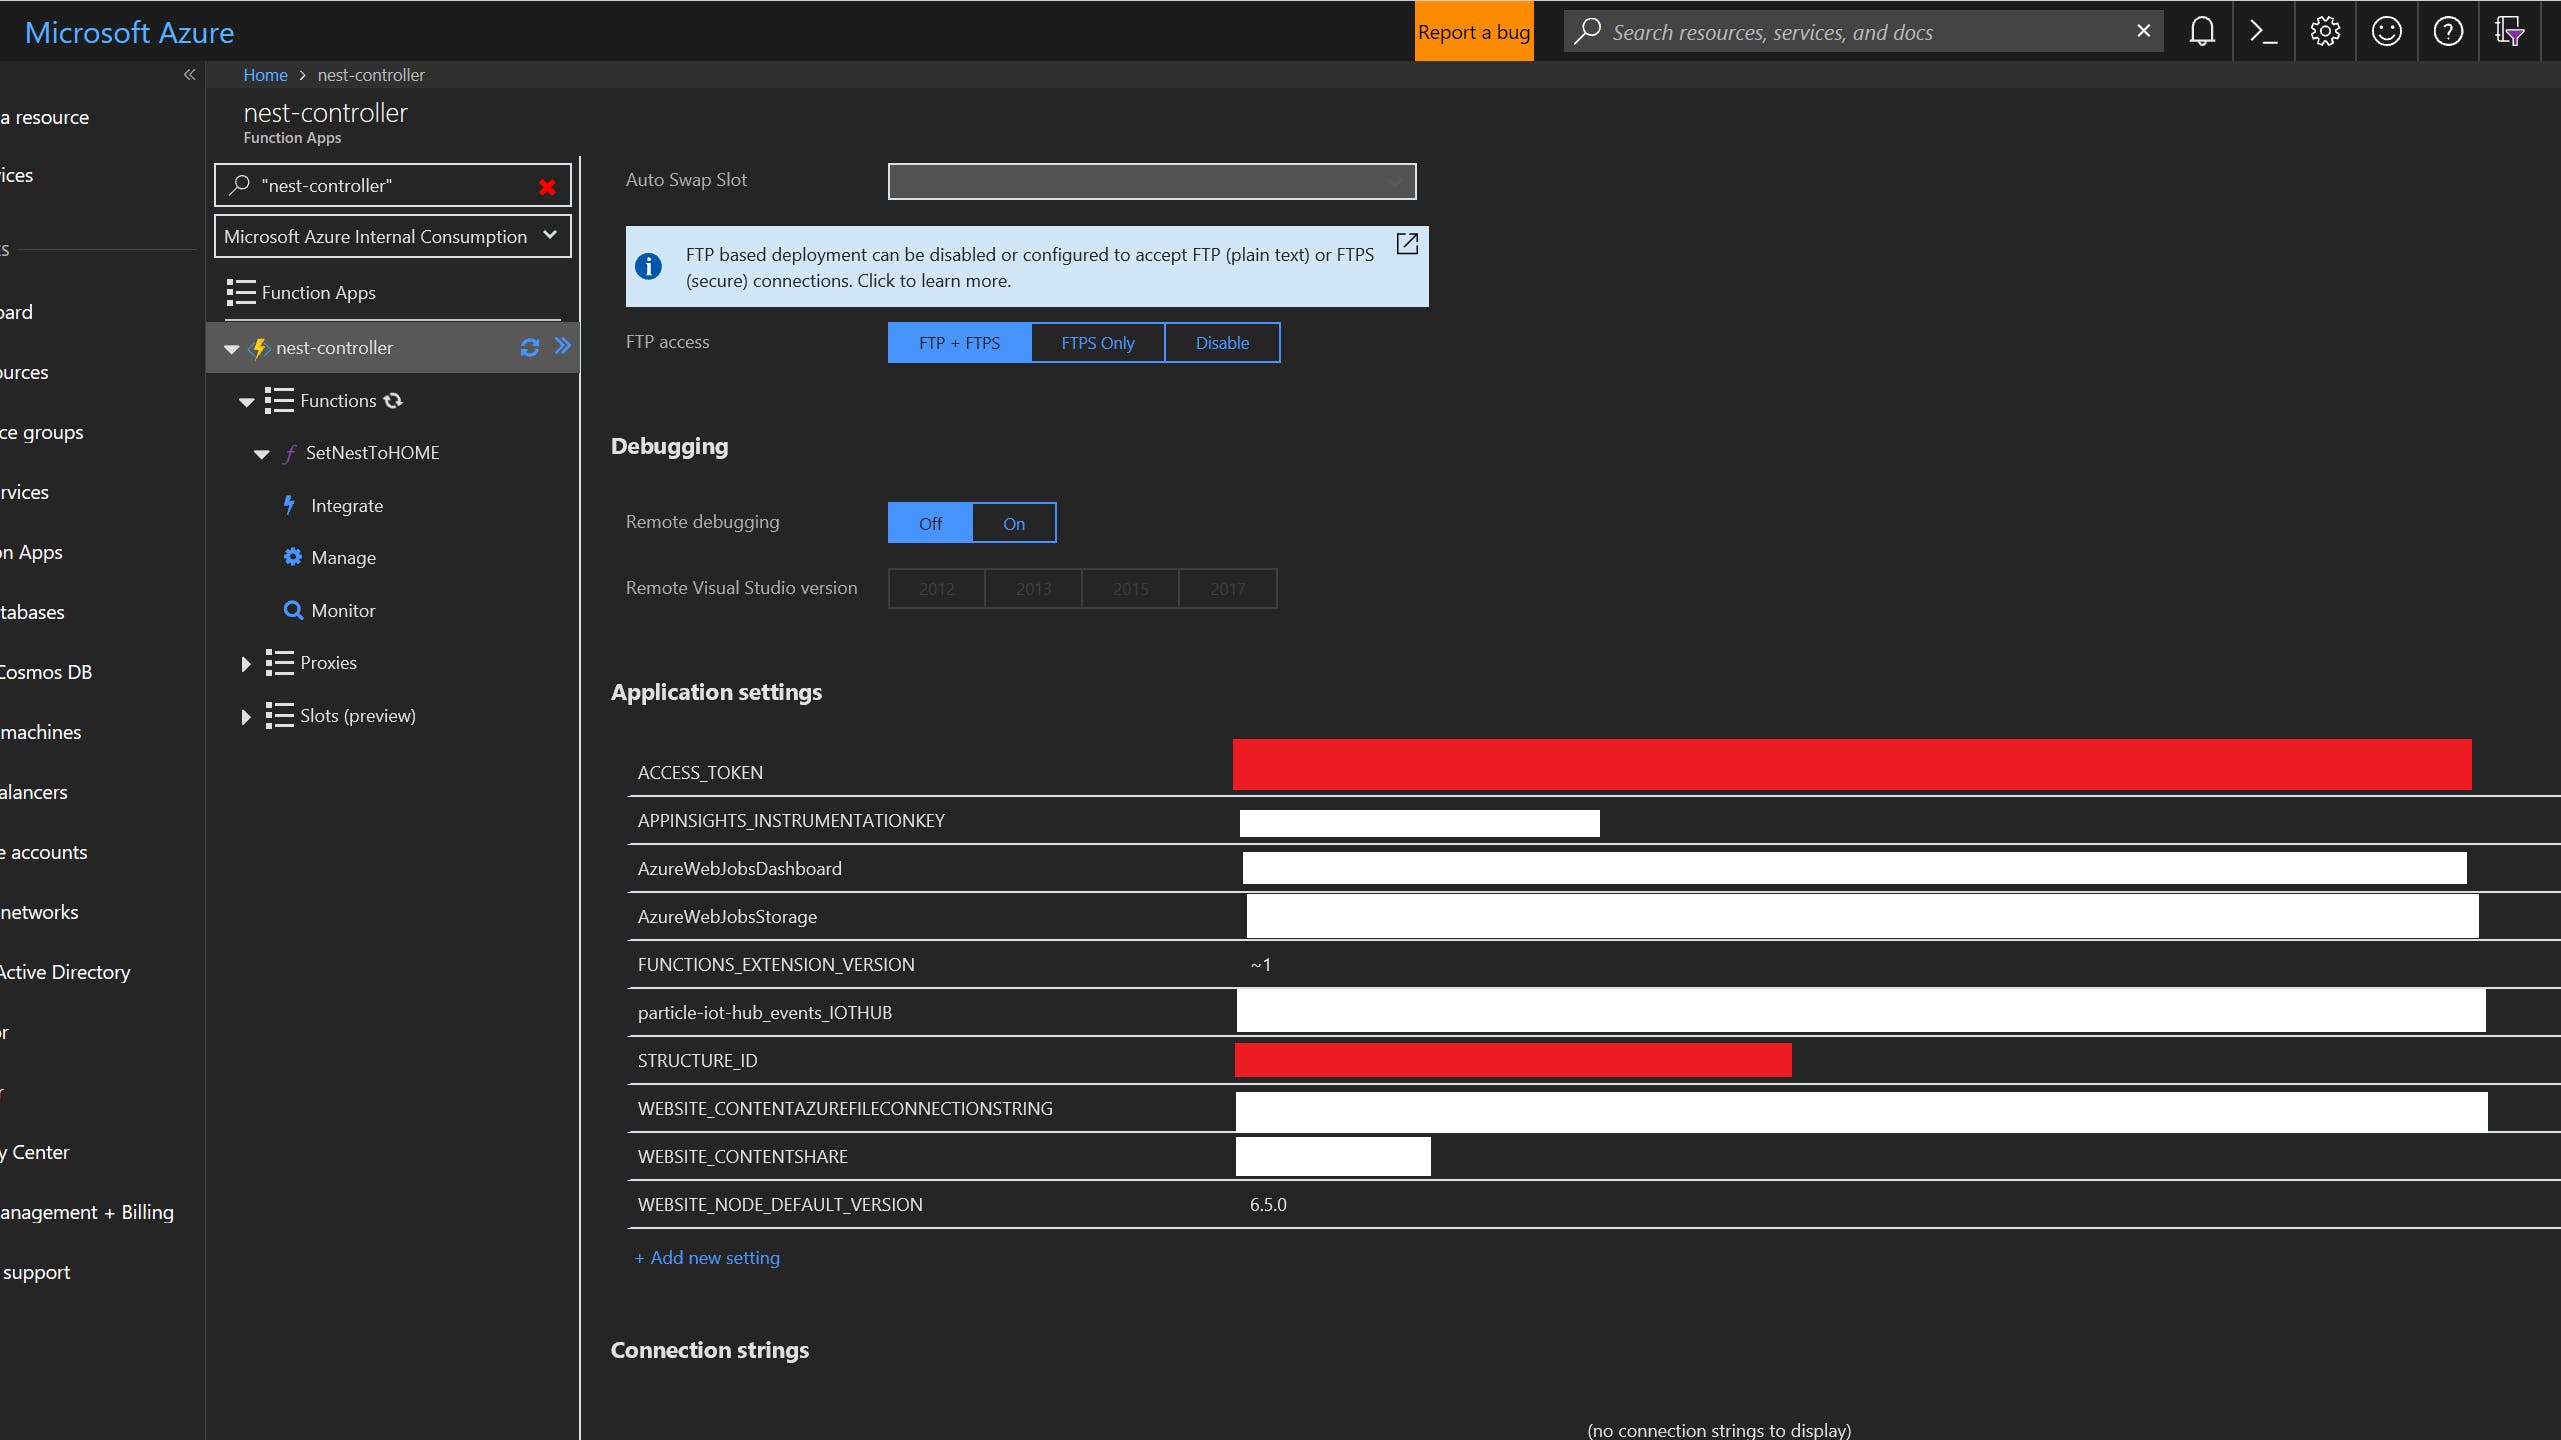
4. 更新函数 AppSettings 以使用您的值
ACCESS_TOKEN、STRUCTURE_ID和particle-iot-hub_events_IOTHUB应设置为在“使用Azure 函数设置嵌套”状态“的步骤2 中配置的local.settings.json配置文件的值。
您可以在 Azure 门户中使用sample.dat的内容测试函数:
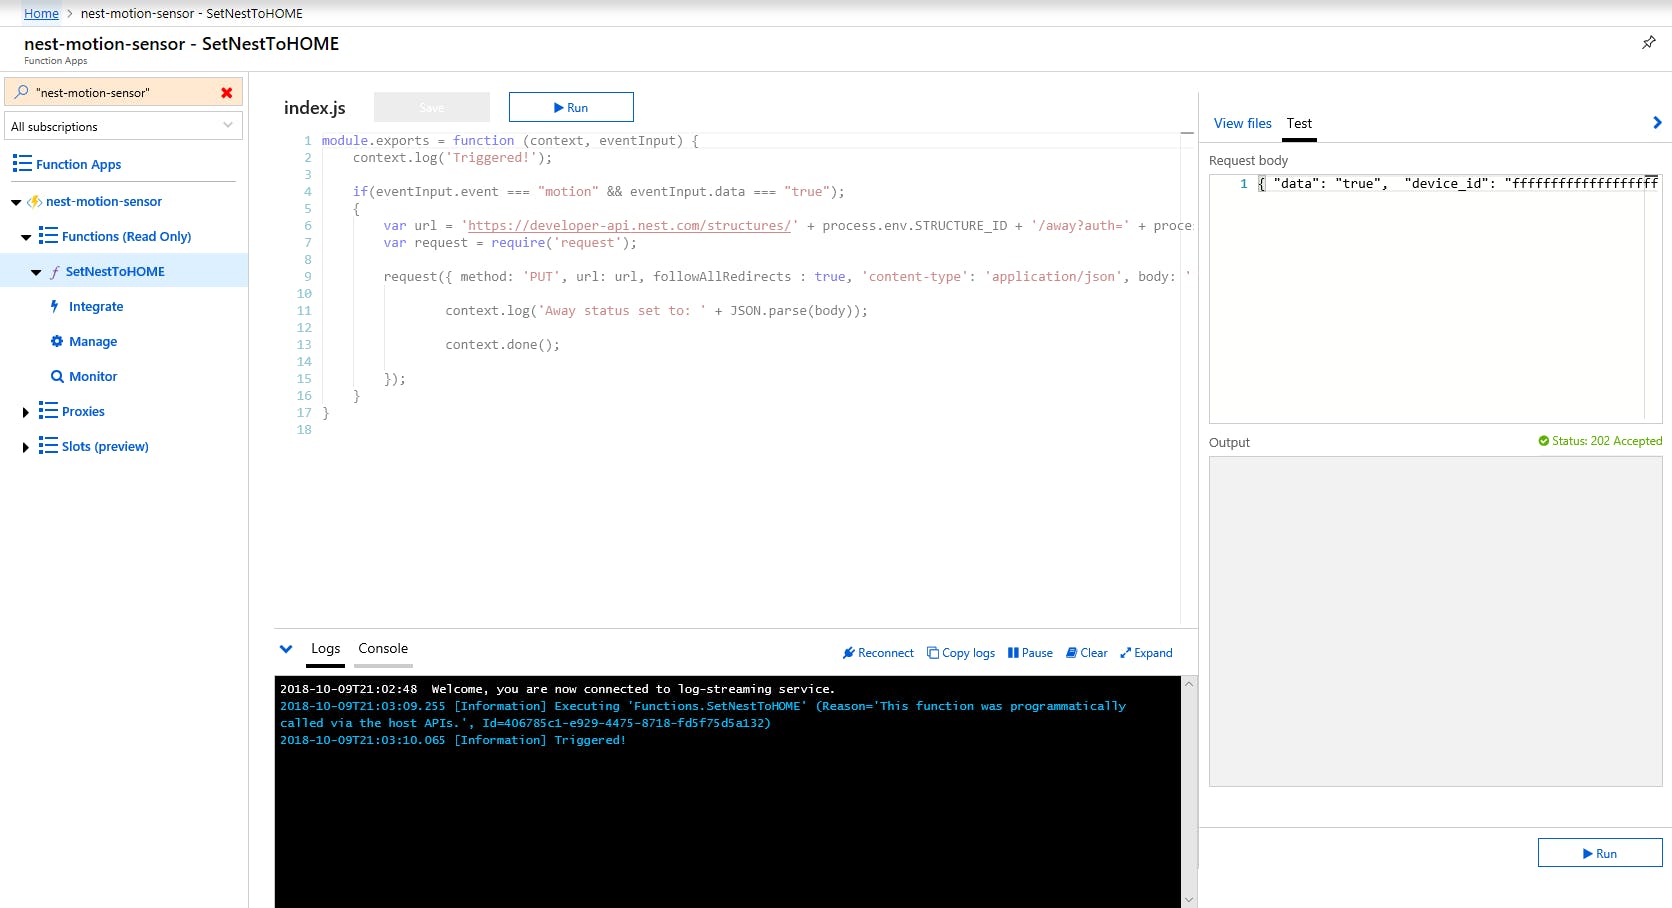
你有它!您现在应该在 Azure 中有一个完整的管道来处理来自 Hardware => Particle.io => Azure IoT Hub => Azure Function => Nest API 的消息。
您可以在监控粒子积分点的运动事件,然后选择您的积分并向下滚动到历史记录。请务必检查此区域以确保您没有发送误报运动事件:
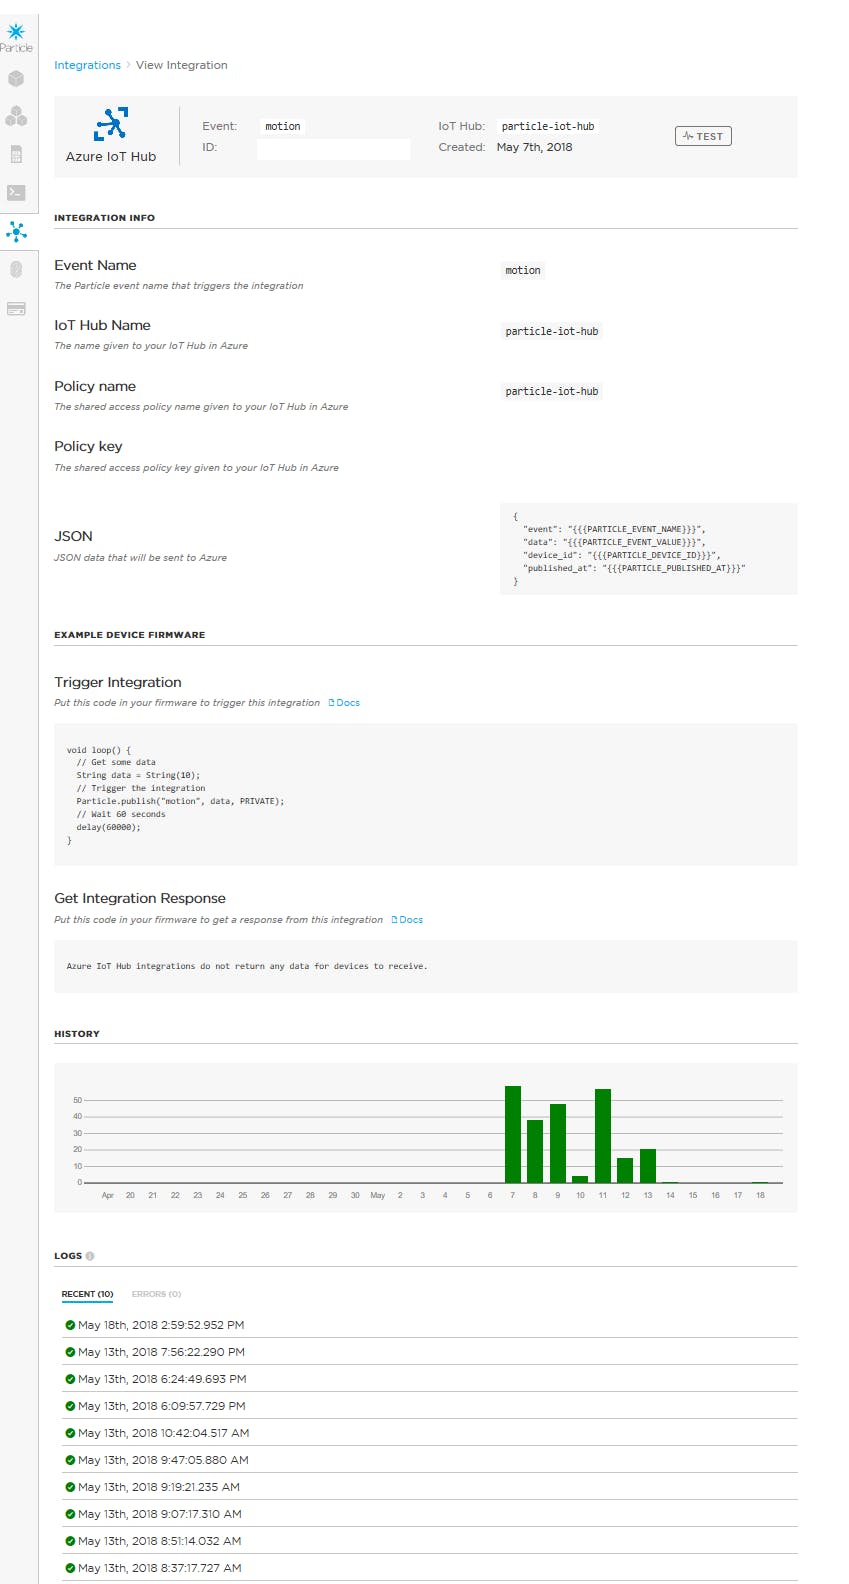
我的传感器在我的办公室里工作,我巧合地在过去 5 天不在城里。很高兴看到发送了零误报!
结论
Nest 拥有一系列非常棒的产品,但是,我们已经证明,通过访问他们的开发人员 API,我们可以让它们变得更好!我再也不用担心在楼上工作时我的空调会关闭。我可以简单地将nest-motion.ino代码闪烁到多个粒子设备,并在房子的多个房间内提醒Nest 家庭入住。目前,我有一个设备连接到我办公室打印机的 USB 端口(始终开启),另一个在我兄弟的房间里插入墙上,还有一个连接到我楼下电视的 USB 端口,只有在电视开着。这种设置可以让 Nest 真正知道我们何时在家。
我们使用的服务都是免费的,只需大约 22 美元,您就可以根据需要构建任意数量的设备。硬件是节能的,因为它在运动检测事件发生后默认进入深度睡眠模式 10 分钟,仅消耗200uA 。此外,我们可以通过使用各种附加传感器来扩展功能。我们甚至可以通过使用温度传感器和显示器来创建自己的Nest Thermostat 。
在评论中让我们知道您的想法,并随时分享您的想法以改进设计!
声明:本文内容及配图由入驻作者撰写或者入驻合作网站授权转载。文章观点仅代表作者本人,不代表电子发烧友网立场。文章及其配图仅供工程师学习之用,如有内容侵权或者其他违规问题,请联系本站处理。 举报投诉
- 相关下载
- 相关文章


