
资料下载


i2c开源项目分享
远不及你
分享资料个
描述
i2c协议是什么?
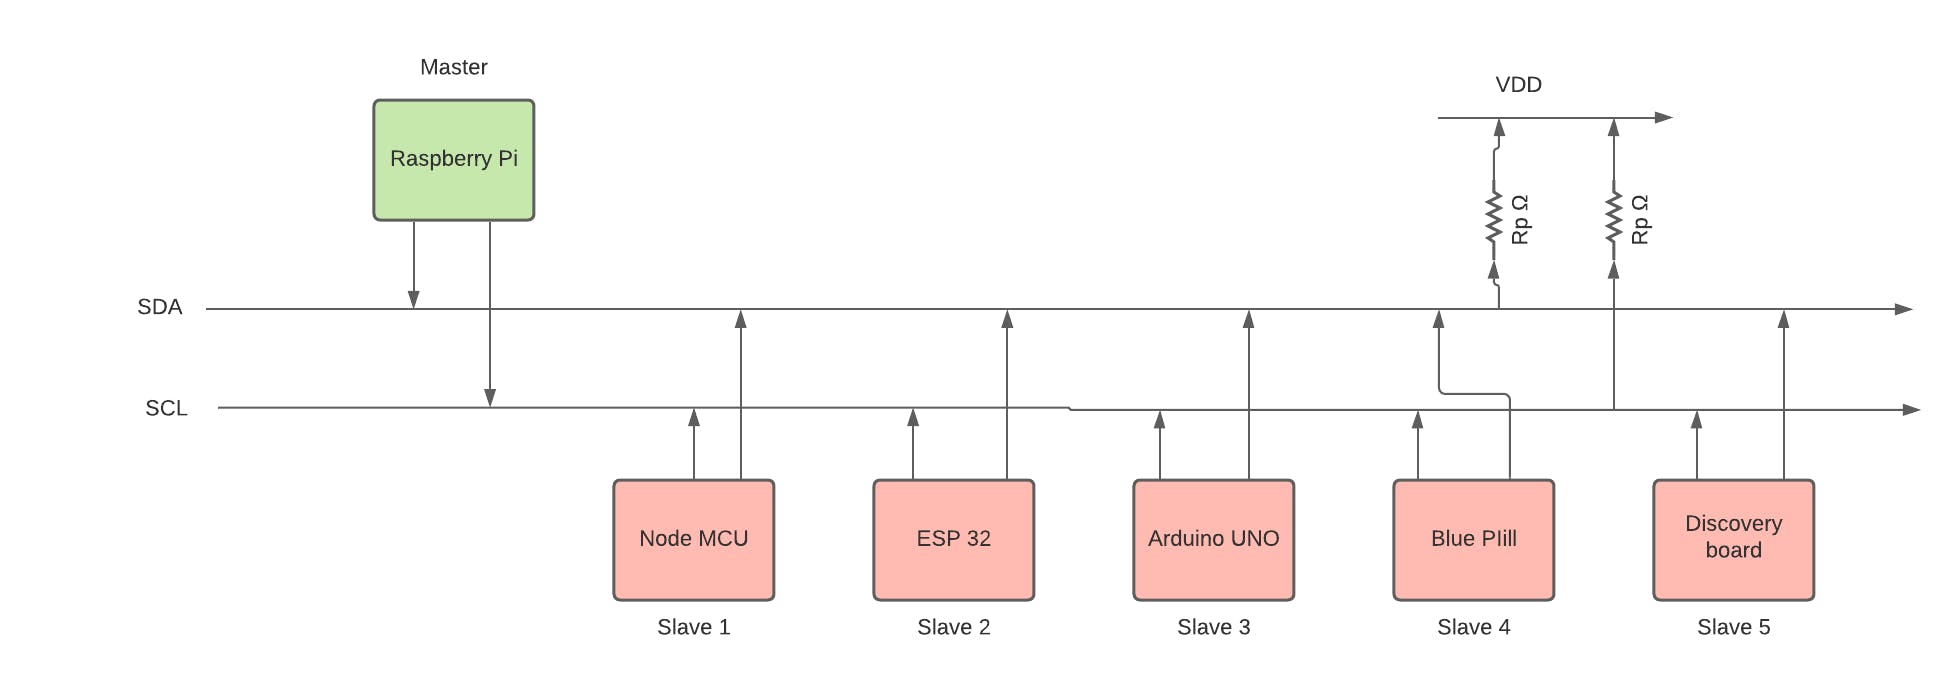
I2C(Inter-Integrated Circuit),发音为 I-squared-C,是飞利浦半导体(现为 NXP 半导体)于 1982 年发明的同步、多主、多从、分组交换、单端、串行通信总线。它广泛用于在短距离板内通信中将低速外围 IC 连接到处理器和微控制器。或者,I2C 拼写为 I2C(发音为 I-two-C)或 IIC(发音为 IIC)。
两线协议由串行数据线(SDA)和串行时钟线(SCL)组成。开始/停止条件分别确保数据传输的开始和结束。
i2c 数据框

- 起始位:当 SCL 为高时,SDA 为 0 -> 1。
- 停止位:当 SCL 为高时,SDA 为 1 -> 0。
- 设备地址位(7-10 位):设备地址可以访问所有唯一的从设备。一个 7 位设备地址可以访问 2^7 个设备或 128 个设备,一个 ACK 位“0”从特定的从设备发送到主设备,以确认其存在于信号线中。
- 读/写位:当主设备写入从设备时,“0”被发送到从设备,反之亦然。
- ACK/NACK 位:如果成功接收到地址帧或数据帧,则接收方向发送方发送一个位“0”。
- 数据帧(8 位):i2c 协议的数据帧为 8 位长,在发送方收到接收方确认确认 ACK 位后发送。成功接收数据后,接收器再次发送 ACK 位为“0”。
i2c 速度模式
双向总线:-
- 标准模式 100 kbit/s
- 快速模式 400 kbit/s
- 快速模式 1 Mbit/s
- 高速模式3.4 Mbit/s
单向总线:-
- 超快速模式 5 Mbit/s
资料来源:NXP i2c 总线规范
主要优点和缺点:
优点:
- 多从和多主协议。
- 使用 ACK 位进行错误处理。
- 时钟延长为使用慢速 IC 提供了灵活性。
缺点:
- 由于开销,传输速度慢。
- 半双工。
- 复杂性随着主设备和从设备数量的增加而增加。
- 数据帧的大小限制为 8 位。
i2c Wire.h 库
Wire.h 库在主设备和从设备之间建立 i2c 通信。
#include
按照主从设备(微控制器)的引脚图,定义 SDA 和 SCL 线。
#define SDA D1
#define SCL D2
主从地址保存在常量变量中。
const int16_t i2c_rpi=0x00; //master
const int16_t i2c_node=0x01; // slave 1
const int16_t i2c_ard=0x02; // slave 2
const int16_t i2c_disco=0x03; // slave 3
const int16_t i2c_esp32=0x04; // slave 4
const int16_t i2c_blue=0x05; // slave 5
在设置中,所有设备都与它们的特定 SDA、SCL 线和设备地址相连。
Wire.begin(SDA,SCL,i2c_address); /* slave or master address depending on the slave or the master device respectively */
对于 Slave 读/写,还设置了特定的请求函数。
Wire.onRequest(requestEvent); /* for slave write request */
Wire.onReceive(receiveEvent); /* for slave read request */
此后,主设备使用其唯一地址向其从设备发送请求或接收事件。
/*For read*/

Wire.requestFrom(i2c_slave_addr,data_size); /* slave address along with data bits requested. */
  while(Wire.available())
  {
    char c=Wire.read();
    Serial.println(c);
  }

/*For Write*/

Wire.beginTransmission(i2c_slave_addr);
Wire.write("xyz");
Wire.endTransmission();
为 i2c 配置 pi
要使用树莓派实现 i2c 通信,smbus2 库是建立主从连接的合适库。
Few initial set up is required for the i2c interface in raspberry pi.
After logging in to the pi, enter this command and enable the i2c from the interface dropdown. reboot the pi.
sudo raspi-config
Install the smbus2 package and i2c tools.
sudo pip install smbus2
sudo apt-get install i2c-tools
To check the slave devices that have established the i2c interface.
sudo i2cdetect -y 1
Thesmbus2 library
from smbus2 import SMBus, i2c_msg
Read some data
with SMbus(1) as bus:
    msg=i2c_msg.read(i2c_slave_addr,data_size)
    bus.i2c_rdwr(msg)
Write some data
with SMbus(1) as bus:
    msg=i2c_msg.write(i2c_slave_addr,data)
    bus.i2c_rdwr(msg)
Interfacing with various micro-controllers
- Raspberry Pi 3B Master
- Node MCU Slave1
- Arduino UNO Slave 2
- Blue-Pill(STM32F103C8T6) Slave 3
- DISCO-L475VG-IOT01A Slave 4
- ESP-32 Slave 5
声明:本文内容及配图由入驻作者撰写或者入驻合作网站授权转载。文章观点仅代表作者本人,不代表电子发烧友网立场。文章及其配图仅供工程师学习之用,如有内容侵权或者其他违规问题,请联系本站处理。 举报投诉
- 相关下载
- 相关文章


