
资料下载


使用Arduino的基于RFID的考勤系统
王辉
分享资料个
描述
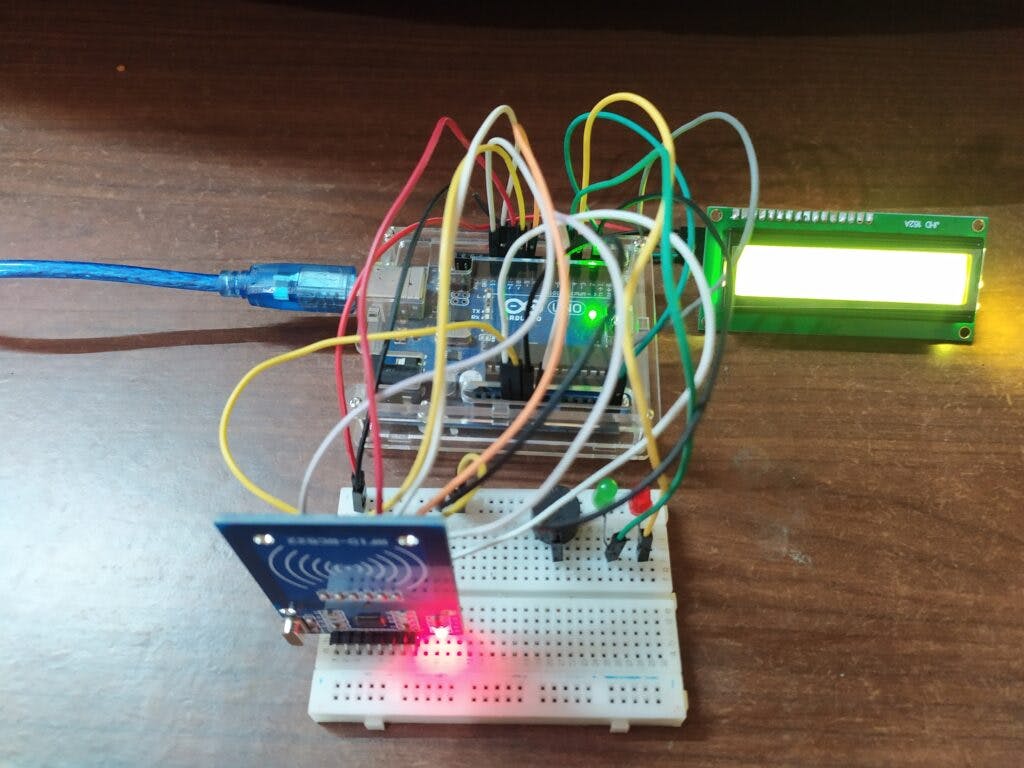
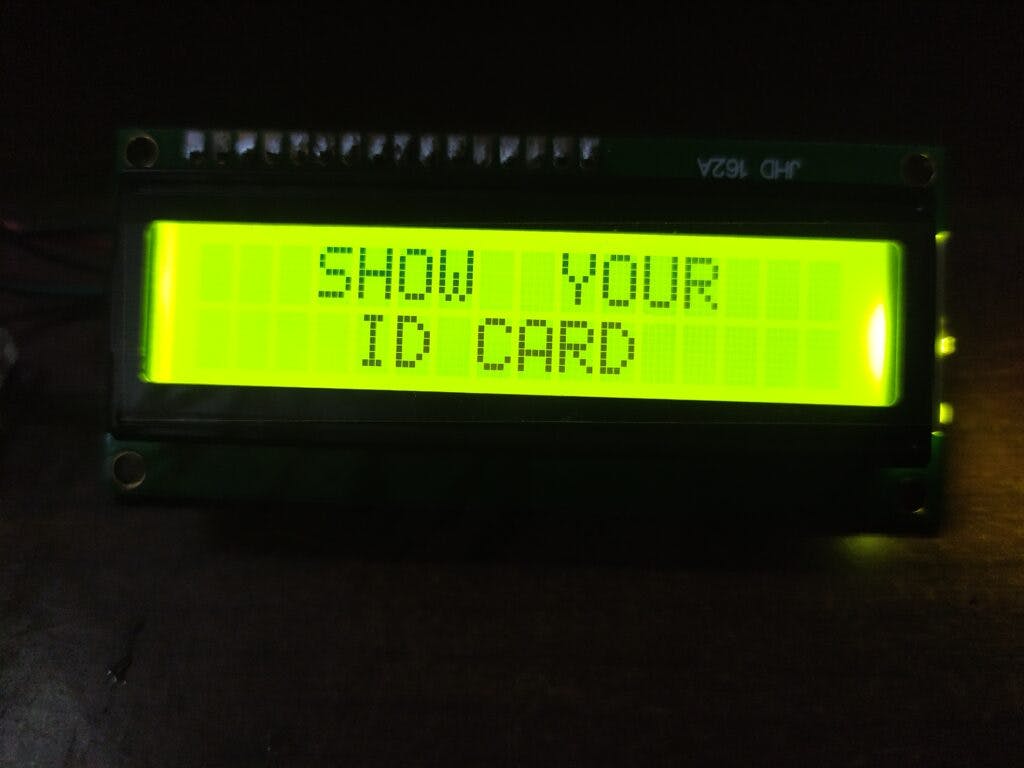
你好极客,希望你做得很好。这是我们使用Arduino UNO微控制器板制作的基于 RFID 的智能考勤系统。您也可以在我们的网站上阅读完整的项目。学生只需将智能卡放在阅读器模块上即可自行注册。该系统足以在串行监视器屏幕上记录考勤情况。稍后,您可以从中提取信息。
基于RFID的考勤系统如何工作?
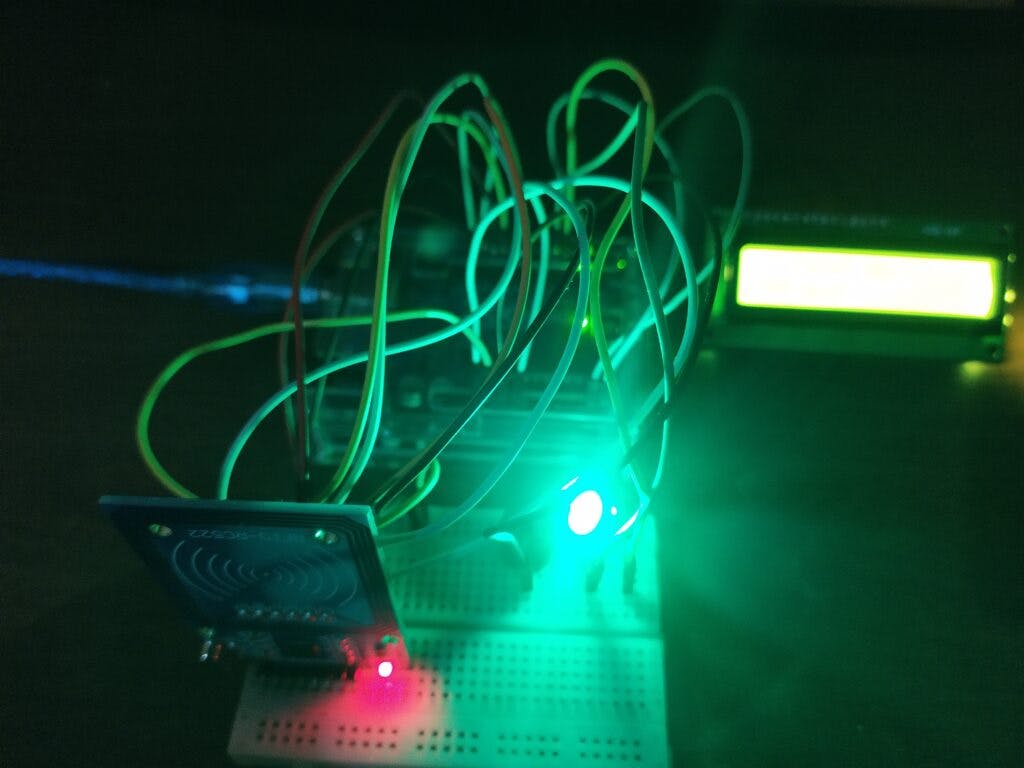
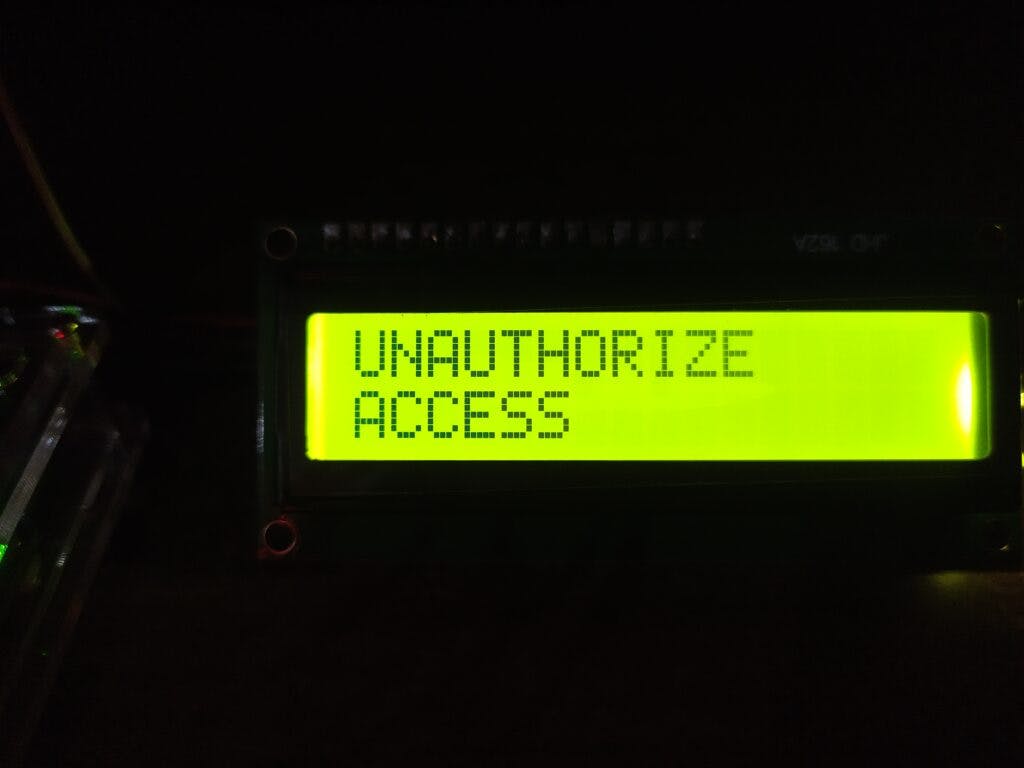
该系统适用于射频识别,即 RFID。我们在这里使用的智能卡预先编码了学生的卷号。每当有人使用未在系统内存中注册信息的卡时,红色 LED 将亮起,蜂鸣器开始发出哔哔声。当系统启动时,它会要求您将智能卡放在读卡器模块上。为了显示内容,我们使用带有 I2C 模块的16×2 LCD 。
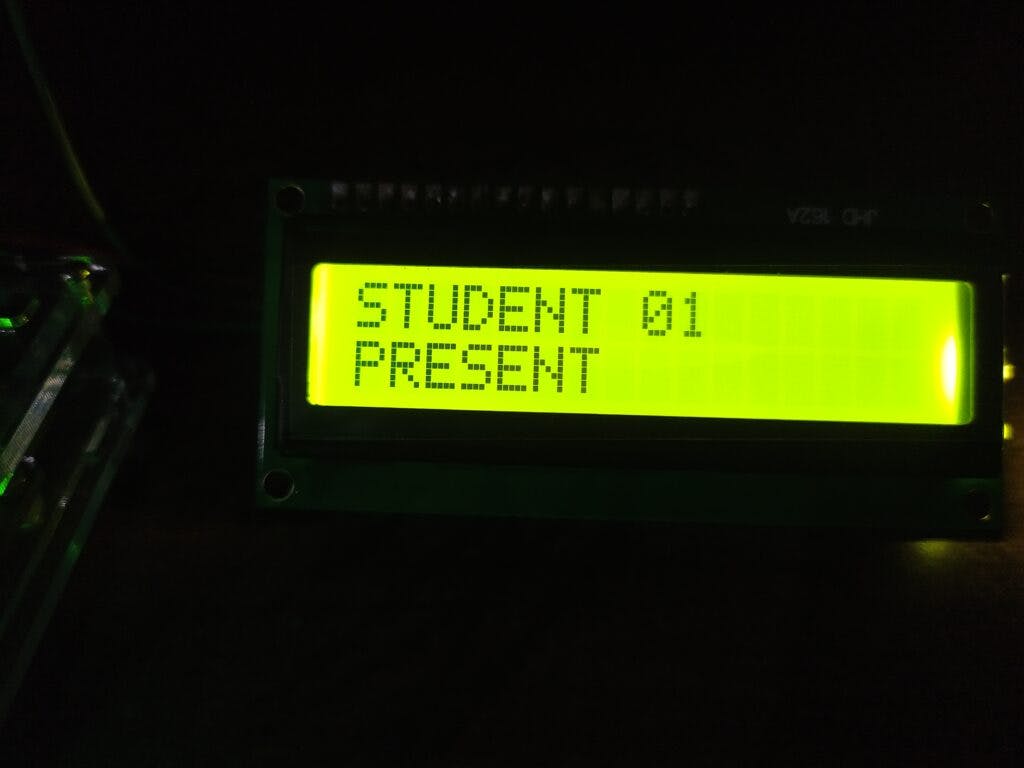
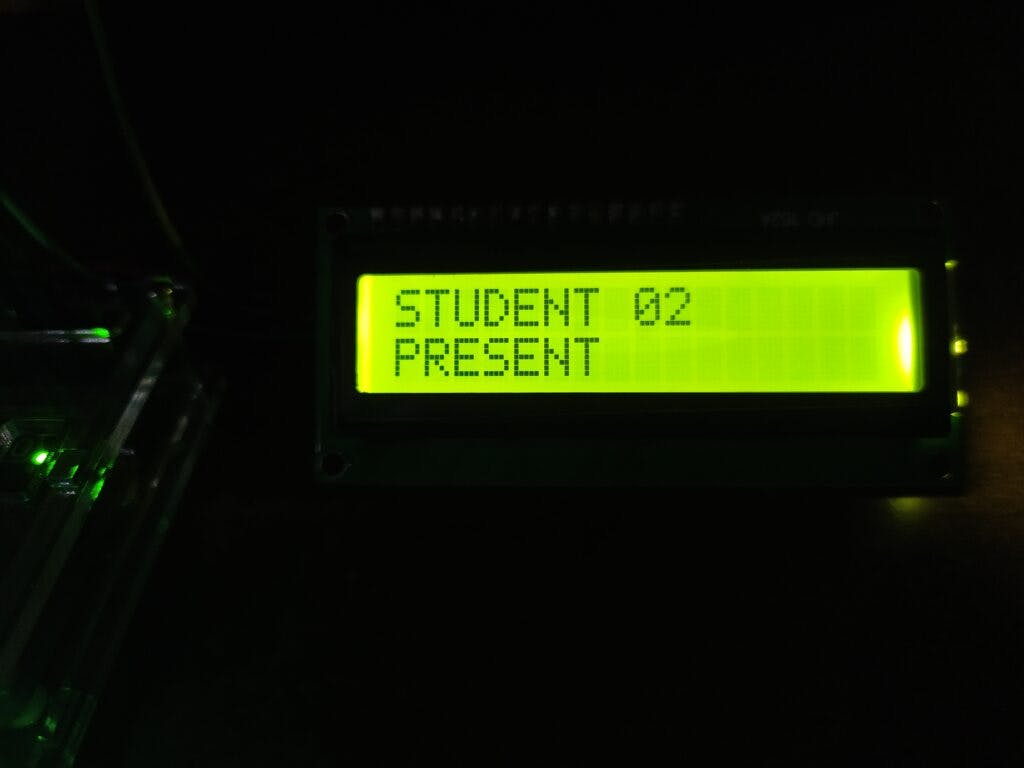
当 RFID 读取印有学生正确详细信息的卡片时,绿色 LED 将亮起。
您可以根据需要添加任意数量的学生,也可以通过修改代码来更改他们的姓名。

所需组件
- Arduino UNO
- RC522 射频识别模块
- 不同的RFID标签
- 跳线和面包板
- 红色和绿色 LED
- 蜂鸣器和 220 欧姆电阻
- I2C模块
- 16×2液晶显示器
- 用于上传代码的 USB 电缆
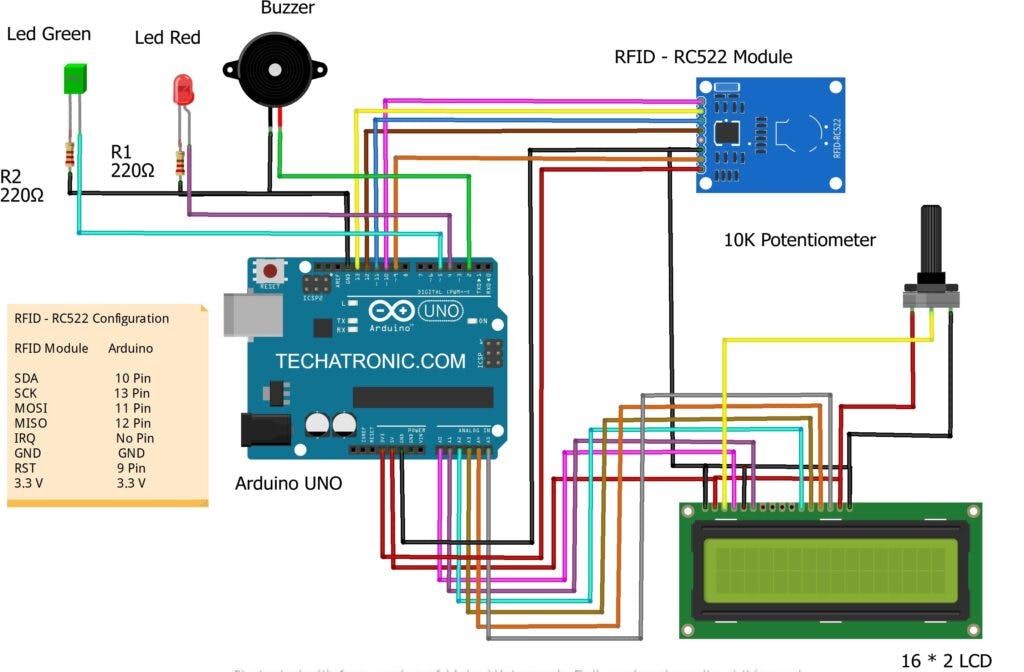
基于RFID的考勤系统电路图
下面给出了使用 I2C 模块和不使用 I2C 模块的电路图。你可以让任何你想要的人。
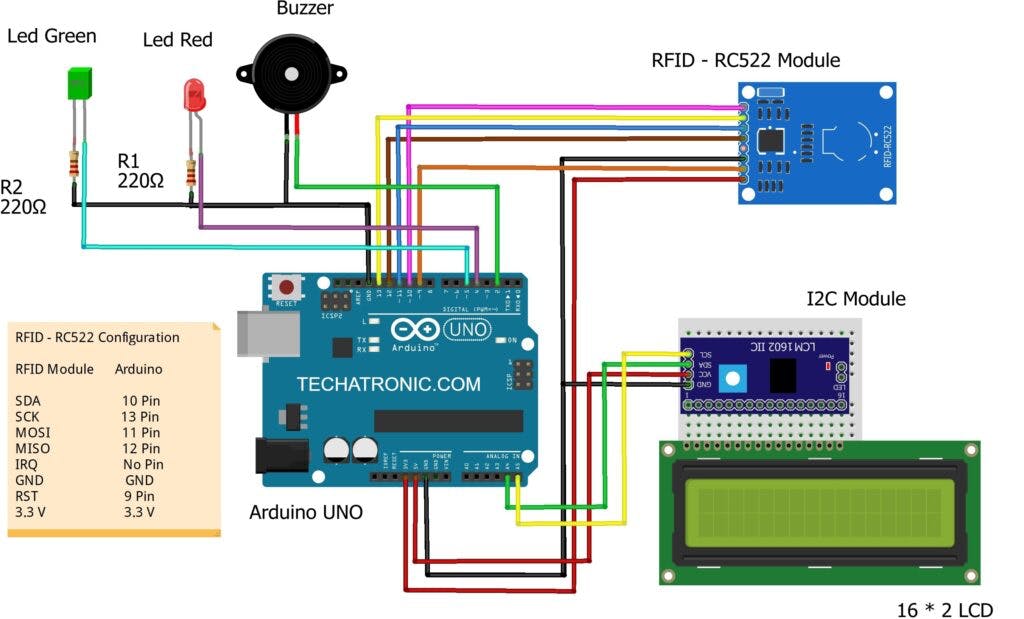
Arduino 5 伏引脚 -> I2c 模块的 VCC
Arduino GND 引脚 -> I2C 模块的 GND
Arduino模拟4针-> I2C模块的SDA
Arduino模拟5针-> I2C模块的SCL
Arduino digital-2 pin -> 蜂鸣器正极
Arduino digital-4 pin -> 红色 LED 的正极
Arduino digital-5 pin -> 绿色 LED 的正极
不带 I2C 模块
基于RFID的考勤系统代码
带I2C模块
// Techatronic.com
#include
#include
#include
#include
// Set the LCD address to 0x27 for a 16 chars and 2 line display
LiquidCrystal_I2C lcd(0x27, 16, 2);
#define SS_PIN 10
#define RST_PIN 9
#define LED_G 5 //define green LED pin
#define LED_R 4 //define red LED pin
#define BUZZER 2 //buzzer pin
MFRC522 mfrc522(SS_PIN, RST_PIN);  // Create MFRC522 instance.
void setup()
{
Serial.begin(9600);  // Initiate a serial communication
SPI.begin();   // Initiate SPI bus
mfrc522.PCD_Init();  // Initiate MFRC522
lcd.begin();
lcd.backlight(); // Turn on the blacklight and print a message.
pinMode(LED_G, OUTPUT);
pinMode(LED_R, OUTPUT);
pinMode(BUZZER, OUTPUT);
noTone(BUZZER);
}
void loop()
{
// Look for new cards
if ( ! mfrc522.PICC_IsNewCardPresent())
{
lcd.setCursor(3,0);
lcd.print("SHOW YOUR");
lcd.setCursor(4,1);
lcd.print("ID CARD");
return;
}
else{
lcd.clear();
}
// Select one of the cards
if ( ! mfrc522.PICC_ReadCardSerial())
{
return;
}
//Show UID on serial monitor
Serial.print("UID tag :");
String content= "";
byte letter;
for (byte i = 0; i < mfrc522.uid.size; i++)
{
Serial.print(mfrc522.uid.uidByte[i] < 0x10 ? " 0" : " ");
Serial.print(mfrc522.uid.uidByte[i], HEX);
content.concat(String(mfrc522.uid.uidByte[i] < 0x10 ? " 0" : " "));
content.concat(String(mfrc522.uid.uidByte[i], HEX));
}
Serial.println();
content.toUpperCase();
if (content.substring(1) == "36 B1 03 32") //change here the UID of the card/cards that you want to give access
{
lcd.print("STUDENT 01");
lcd.setCursor(0,1);
lcd.print("PRESENT");
digitalWrite(LED_G, HIGH);
tone(BUZZER, 500);
delay(300);
noTone(BUZZER);
delay(3000);
digitalWrite(LED_G, LOW);
lcd.clear();
}
else if (content.substring(1) == "81 93 40 43") //change here the UID of the card/cards that you want to give access
{
lcd.print("STUDENT 02");
lcd.setCursor(0,1);
lcd.print("PRESENT");
digitalWrite(LED_G, HIGH);
tone(BUZZER, 500);
delay(300);
noTone(BUZZER);
delay(3000);
digitalWrite(LED_G, LOW);
lcd.clear();
}
else if (content.substring(1) == "91 69 3E 43") //change here the UID of the card/cards that you want to give access
{
lcd.print("STUDENT 03");
lcd.setCursor(0,1);
lcd.print("PRESENT");
digitalWrite(LED_G, HIGH);
tone(BUZZER, 500);
delay(300);
noTone(BUZZER);
delay(3000);
digitalWrite(LED_G, LOW);
lcd.clear();
}
else  {
lcd.print("UNAUTHORIZE");
lcd.setCursor(0,1);
lcd.print("ACCESS");
digitalWrite(LED_R, HIGH);
tone(BUZZER, 300);
delay(2000);
digitalWrite(LED_R, LOW);
noTone(BUZZER);
lcd.clear();
}
}
不带 I2C 模块
#include
#include
#include "LiquidCrystal.h"
LiquidCrystal lcd(A0, A1, A2, A3, A4, A5);
#define SS_PIN 10
#define RST_PIN 9
#define LED_G 5 //define green LED pin
#define LED_R 4 //define red LED pin
#define BUZZER 2 //buzzer pin
MFRC522 mfrc522(SS_PIN, RST_PIN);  // Create MFRC522 instance.
void setup()
{
Serial.begin(9600);  // Initiate a serial communication
SPI.begin();   // Initiate SPI bus
mfrc522.PCD_Init();  // Initiate MFRC522
lcd.begin(16,2); // Turn on the blacklight and print a message.
pinMode(LED_G, OUTPUT);
pinMode(LED_R, OUTPUT);
pinMode(BUZZER, OUTPUT);
noTone(BUZZER);
}
void loop()
{
// Look for new cards
if ( ! mfrc522.PICC_IsNewCardPresent())
{
lcd.setCursor(3,0);
lcd.print("SHOW YOUR");
lcd.setCursor(4,1);
lcd.print("ID CARD");
return;
}
else{
lcd.clear();
}
// Select one of the cards
if ( ! mfrc522.PICC_ReadCardSerial())
{
return;
}
//Show UID on serial monitor
Serial.print("UID tag :");
String content= "";
byte letter;
for (byte i = 0; i < mfrc522.uid.size; i++)
{
Serial.print(mfrc522.uid.uidByte[i] < 0x10 ? " 0" : " ");
Serial.print(mfrc522.uid.uidByte[i], HEX);
content.concat(String(mfrc522.uid.uidByte[i] < 0x10 ? " 0" : " "));
content.concat(String(mfrc522.uid.uidByte[i], HEX));
}
Serial.println();
content.toUpperCase();
if (content.substring(1) == "36 B1 03 32") //change here the UID of the card/cards that you want to give access
{
lcd.print("STUDENT 01");
lcd.setCursor(0,1);
lcd.print("PRESENT");
digitalWrite(LED_G, HIGH);
tone(BUZZER, 500);
delay(300);
noTone(BUZZER);
delay(3000);
digitalWrite(LED_G, LOW);
lcd.clear();
}
else if (content.substring(1) == "81 93 40 43") //change here the UID of the card/cards that you want to give access
{
lcd.print("STUDENT 02");
lcd.setCursor(0,1);
lcd.print("PRESENT");
digitalWrite(LED_G, HIGH);
tone(BUZZER, 500);
delay(300);
noTone(BUZZER);
delay(3000);
digitalWrite(LED_G, LOW);
lcd.clear();
}
else if (content.substring(1) == "91 69 3E 43") //change here the UID of the card/cards that you want to give access
{
lcd.print("STUDENT 03");
lcd.setCursor(0,1);
lcd.print("PRESENT");
digitalWrite(LED_G, HIGH);
tone(BUZZER, 500);
delay(300);
noTone(BUZZER);
delay(3000);
digitalWrite(LED_G, LOW);
lcd.clear();
}
else  {
lcd.print("UNAUTHORIZE");
lcd.setCursor(0,1);
lcd.print("ACCESS");
digitalWrite(LED_R, HIGH);
tone(BUZZER, 300);
delay(2000);
digitalWrite(LED_R, LOW);
noTone(BUZZER);
lcd.clear();
}
}
我们希望您了解项目的概念,并且必须尝试自己制作。更多有趣的项目请访问我们的官方网站。
学习愉快!
声明:本文内容及配图由入驻作者撰写或者入驻合作网站授权转载。文章观点仅代表作者本人,不代表电子发烧友网立场。文章及其配图仅供工程师学习之用,如有内容侵权或者其他违规问题,请联系本站处理。 举报投诉
- 相关下载
- 相关文章


