
资料下载


×
使用TCS3200和Arduino Uno制作Arduino Chameleon
消耗积分:2 |
格式:zip |
大小:0.30 MB |
2022-10-26
廖阿朋
分享资料个
描述
关于该项目
在这个项目中,我将指导您如何使用 TCS3200 和 Arduino Uno 制作自己的 Arduino Chameleon。有关更多信息以及 Arduino 和 Raspberry Pi 相关项目,
所需零件
- TCS3200 x 1
- Arduino Uno x 1
- RGB LED x 1
- 面包板 x 1
- 很多跳线
需要的软件
- Arduino IDE
要遵循的步骤
- 请参阅下图了解所有电线连接。
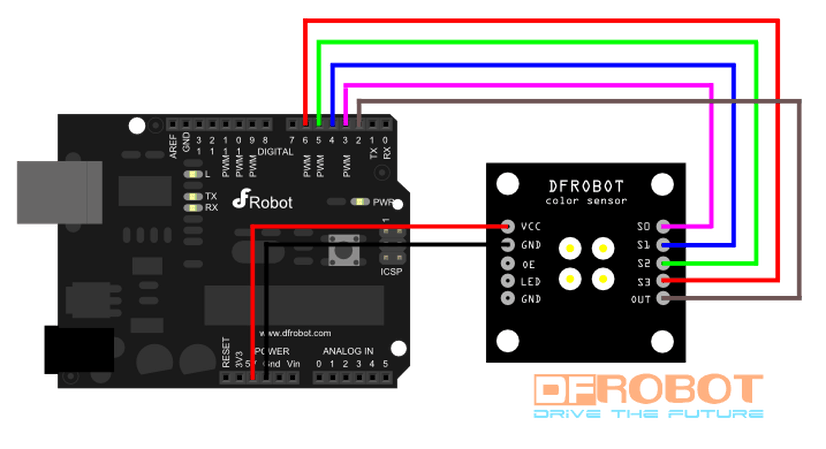
Arduino——Tcs3200
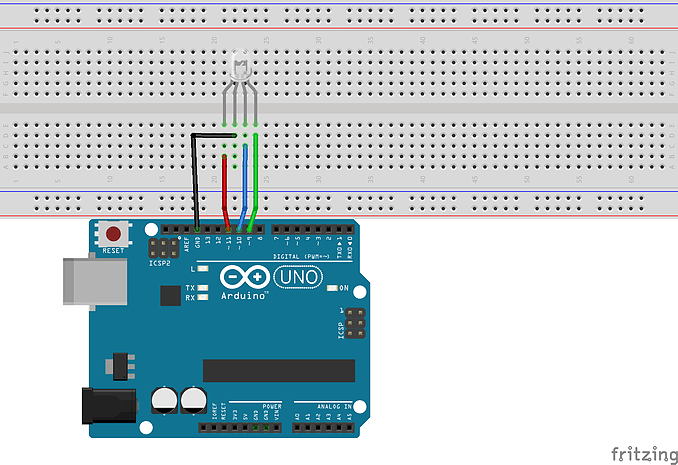
RGB LED 连接
- 现在只需将以下代码上传到您的 Arduino 上即可。
/*
* Created By Manan Thareja
* Color sensor using TCS3200
*/
#define S0 3
#define S1 4
#define S2 5
#define S3 6
#define sensorOut 2
int green = 9;
int blue = 10;
int red  = 11;
int redfrequency = 0;
int greenfrequency = 0;
int bluefrequency = 0;
void setup() {
pinMode(S0, OUTPUT);
 pinMode(S1, OUTPUT);
 pinMode(S2, OUTPUT);
 pinMode(S3, OUTPUT);
 pinMode(sensorOut, INPUT);
 pinMode(green, OUTPUT);
 pinMode(blue, OUTPUT);
 pinMode(red, OUTPUT);
 // Setting frequency-scaling to 20%
 digitalWrite(S0,HIGH);
 digitalWrite(S1,LOW);
 Serial.begin(9600);
}
void loop() {
 // Setting red filtered photodiodes to be read
 digitalWrite(S2,LOW);
 digitalWrite(S3,LOW);
 // Reading the output frequency
 redfrequency = pulseIn(sensorOut, LOW);
 //Remaping the value of the frequency to the RGB Model of 0 to 255
 redfrequency = map(redfrequency, 25,72,255,0);
 if (redfrequency > 255)
 {
     redfrequency = 255;
 }
  else if (redfrequency < 0)
 {
     redfrequency = 0;
 }
 // Printing the value on the Serial monitor
 Serial.print("R ");//printing name
 Serial.print(redfrequency);//printing RED color frequency
 analogWrite(red, redfrequency);
 delay(100);
 // Setting Green filtered photodiodes to be read
 digitalWrite(S2,HIGH);
 digitalWrite(S3,HIGH);
 // Reading the output frequency
 greenfrequency = pulseIn(sensorOut, LOW);
 //Remaping the value of the frequency to the RGB Model of 0 to 255
 greenfrequency = map(greenfrequency, 30,90,255,0);
 if (greenfrequency > 255)
 {
     greenfrequency = 255;
 }
 else if (greenfrequency < 0)
 {
     greenfrequency = 0;
 }
 // Printing the value on the Serial monitor
 Serial.print(" G ");//printing name
 Serial.print(greenfrequency);//printing GREEN color frequency
 analogWrite(green, greenfrequency);
 delay(100);
 // Setting Blue filtered photodiodes to be read
 digitalWrite(S2,LOW);
 digitalWrite(S3,HIGH);
 // Reading the output frequency
 bluefrequency = pulseIn(sensorOut, LOW);
 //Remaping the value of the frequency to the RGB Model of 0 to 255
 bluefrequency = map(bluefrequency, 25,70,255,0);
 if (bluefrequency > 255)
 {
     bluefrequency = 255;
 }
  else if (bluefrequency < 0)
 {
     bluefrequency = 0;
 }
 // Printing the value on the Serial monitor
 Serial.print(" B ");//printing name
 Serial.print(bluefrequency);//printing BLUE color frequency
 analogWrite(blue, bluefrequency);
 Serial.println("  ");
 delay(100);
如果您有任何问题或建议,请随时将其发布在我们网站论坛页面的“Arduino Projects”类别中。
声明:本文内容及配图由入驻作者撰写或者入驻合作网站授权转载。文章观点仅代表作者本人,不代表电子发烧友网立场。文章及其配图仅供工程师学习之用,如有内容侵权或者其他违规问题,请联系本站处理。 举报投诉
评论(0)
发评论
- 相关下载
- 相关文章


